3/31/12

FTU Fantasy Moments and Camilla Drakenborg

This tutorial was written on March 29,2012.
Any similarities to another tutorial is purely coincidental.
All my tutorial are register with My Free Copyright.
Please do not claim as your own.
This tutorial writer assumes you have a working
knowledge of using Paint Shop Pro.
This tutorial was done in Paint Shop Pro9,
but can be adapted to use in other
Paint Shop Pro versions.

SUPPLIES NEEDED

Tube of choice: I'm using the awesome work of Camilla Drakenborg.
Please do not use unless you have a license to do so.
You can get her tubes HERE

Scrapkit of Choice: I am using FTU Fantasy Moments Scrap kit
called Last Autumn...You can purchase it HERE..Thank you Sylvie

Mask of choice:I am using Insatiable Dreams mask #42.You can
download it HERE...Thank you Cat

Template of Choice: I am using Essence of Creativity-Template #30
You can download it HERE....Thank you Yvette

Filters used:Eye Candy 4000 gradient glow - HERE

Font for Name is Pyxidium...HERE
copy write is always done in Pixelette ...HERE


Drop shadow use through out H-2/V-2/O-65/B-6.00
Please leave a thank you when you downloading for supplies.

my tag is just a guide...please use your imagination
and make the tag your own you do not have to
use any of the supplies I used.
This is a simple but elegant tutorial that very easy to do

     LET'S BEGIN

Open up Template and ShiftD and close original...delete
copyright layer/close all layers/choose paper of choice
copy/paste and put underneath background layer/go to mask
of choice with these setting 
 
and click ok delete background layer

On the following raster layers follow these directions...

activate rectangle layer/copy/paste paper of choice/go to rectangle
layer/invert/go to paper layer and delete/merge down/add drop shadow

activate rectangle1 layer/copy/paste paper of choice/go to rectangle1
layer/invert/go to paper layer and delete/merge down/add drop shadow

activate long rectangle1 layer/copy/paste paper of choice/go to long
rectangle1 layer/invert/go to paper layer and delete/merge down
add drop shadow

activate big rectangle layer/copy/paste paper of choice/go to big rectangle
layer/invert/go to paper layer and delete/merge down/add drop shadow

copy/paste your tube/resize to fit/add drop shadow

now add any other element you wish to use to make your tag your own/add drop
shadow on each element/resize your tag if needed

add your watermark and copyright credits/give it a slight gradient glow
...now give your tag to a friend.

You're done...thank you for trying my tutorial
please send me a copy so that I can show case it on my blog
send to riggsbee53@gmail.com

FTU Kittz Kreationz and Camilla Drakenborg


This tutorial was written on March 28,2012.
Any similarities to another tutorial is purely coincidental.
All my tutorial are register with My Free Copyright.
Please do not claim as your own.
This tutorial writer assumes you have a working
knowledge of using Paint Shop Pro.
This tutorial was done in Paint Shop Pro9,
but can be adapted to use in other
Paint Shop Pro versions.


SUPPLIES NEEDED

Tube of choice: I'm using the awesome work of Camilla Drakenborg.
Please do not use unless you have a license to do so.
You can get her tubes HERE

Scrapkit of Choice: I am using FTU Just Black and White Scrap kit by
Kittz Kreationz...You can download it HERE..Thank you Kittz

Mask of choice:I am using Insatiable Dreams mask#161.You can download
it HERE...Thank you Cat

Template of Choice: I am using Eye Candii Graphicz #3..
Get it HERE...Thank you Sylvie

Fairy Word art of choice or use one I provided...HERE

Filters used:Eye Candy 4000 gradient glow - HERE

Font for Name is Black Night...HERE
copy write is always done in Pixelette ...HERE

Drop shadow use through out H-2/V-2/O-65/B-6.00
Please leave a thank you when you downloading for supplies.

my tag is just a guide...please use your imagination
and make the tag your own you do not have to
use any of the supplies I used.

     LET'S BEGIN

Resize 700x700/ this will give you space to work/
We'll resize at the end
Open up Template and ShiftD and close original/Resize 700x700
this will give you space to work/We'll resize at the end
delete copyright layer/close all layers/choose paper of choice
copy/paste and put underneath background layer/go to mask
of choice with these setting and click ok


delete background layer

On the following raster layers follow these directions...
leave dotted rectangle as is
activate large pink rectangle layer/choose two colors from tube/I chose
for-e1e7df/back-b1c0ad/take change target brush and back ground color
and color rectangle/

activate pink rectangle/flood fill with b1c0ad/leave black rectangle
copy/paste floral1/resize if needed/duplicate/mirror/flip/merge down
add drop shadow to floral

leave small black rectangle/on small pink rectangle/take target brush
again and color b1c0ad/leave small white as is/color small pink 2
color gradient with the two color gradient on these setting


open background tube/resize 300x235/copy/paste and put on top of small
gradient/raster deform tool/turn slightly to the left/(see my tag for
reference)

activate 3 gradient rectangle/flood fill with gradient/in opposite directions
for each one/while still activated/take your tube/copy/paste and put on top
resize so that some part is showing in each box/go to rectangle layer/selection
invert/tube layer/delete

leave white noisy rectangles and 3 dotted black rectangles as is/activate
small black circle/flood fill with color 7a9877/adjust/add/remove noise
add noise with these setting/


click ok/flood fill top small circle with color
cce7c5/add drop shadow

copy/paste fairy word art of choice or use the one I provided/add gradient glow
of one of the colors/add slight drop shadow

Add any elements you wish to use to make your tag personal to you.
add drop shadow to all elements.

once you finish decorating your tag/resize to your liking

add your watermark and copyright credits/give it a slight gradient glow
...now give your tag to a friend.

You're done...thank you for trying my tutorial
please send me a copy so that I can show case it on my blog

3/29/12

PTU Wisteria Moments and Jennifer Janesko


Timeless

This tutorial was written on March 28,2012.
Any similarities to another tutorial is purely coincidental.
All my tutorial are register with My Free Copyright.
Please do not claim as your own.
This tutorial writer assumes you have a working
knowledge of using Paint Shop Pro.
This tutorial was done in Paint Shop Pro9,
but can be adapted to use in other
Paint Shop Pro versions.


SUPPLIES NEEDED

Tube of choice: I'm using the awesome work of Jennifer Janesko.
Please do not use unless you have a license to do so.
You can get her tubes HERE

Scrapkit of Choice: I am using PTU Wisteria Moments Scrap kit
called Timeless Treasures...You can purchase it HERE..Thank you Chrissy

Mask of choice:I am using Insatiable Dreams mask #167.You can download
it HERE...Thank you Cat

Template of Choice: No template was used

Filters used:Eye Candy 4000 gradient glow - HERE
Xero -Radiance - HERE

Font for Name is Renaissance...HERE
copy write is always done in Pixelette ...HERE

Drop shadow use through out H-2/V-2/O-65/B-6.00
Please leave a thank you when you downloading for supplies.

my tag is just a guide...please use your imagination
and make the tag your own you do not have to
use any of the supplies I used.


     LET'S BEGIN

open new blank canvass 700x700
Copy/paste frame oval paper/resize by 40%/resize canvass by 660x768
copy/paste paper/vintage roses dark pink/resize to fit canvass
layers/load/save mask/load mask from disk/find the mask/apply with
these setting
click ok

activate frame/using magic wand click inside frame/selection/modify
expand by 14/copy/paste paper of choice/resize by 40%/go to frame layer
selection/invert/go to paper layer/delete/place paper underneath frame
now copy/paste word art paper/resize by 40%/because frame is still activated
just delete on word art layer/keep frame activated

copy/paste tube of choice/resize if needed/hit delete on tube layer/now
you can deactivate frame and add a drop shadow to frame and tube

on the tube layer/duplicate tube and close that layer/on original tube
blend/screen/on duplicate layer/xerox/radiance with these setting
lower opacity to 90%/add another drop shadow

now we're going to get creative and make your tag beautiful.Add any
elements you wish to use to make your tag personal to you.add drop
shadow to all elements.

once you finish decorating your tag/resize to your liking

add your watermark and copyright credits/give it a slight gradient glow
...now give your tag to a friend.

You're done...thank you for trying my tutorial
please send me a copy so that I can show case it on my blog
send to riggsbee53@gmail.com

3/26/12

FTU Inzpired Creationz and Eugene Rzhevskii

Punky Plaid

This tutorial was written on March 25,2012.
Any similarities to another tutorial is purely coincidental.
All my tutorial are register with My Free Copyright.
Please do not claim as your own.
This tutorial writer assumes you have a working
knowledge of using Paint Shop Pro.
This tutorial was done in Paint Shop Pro9,
but can be adapted to use in other
Paint Shop Pro versions.


SUPPLIES NEEDED

Tube of choice: I'm using the awesome work of Eugene Rzhevskii.
Please do not use unless you have a license to do so.
You can get her tubes HERE

Scrapkit of Choice: I am using FTU Inzpired Creationz Scrap kit
called Punk and Plaid...You can download it HERE..Thank you Nicky

Mask of choice:I am using Weescotslass mask #276...
You can download it HERE...Thank you Chelle

Template of Choice: I am using Additive Pleasures-Template #8
You can download it HERE....Thank you Tammi

Filters used:Eye Candy 4000 gradient glow and glass - HERE

Font for Name is Organic Elements...HERE
copy write is always done in Pixelette ...HERE

Drop shadow use through out H-2/V-2/O-65/B-6.00
Please leave a thank you when you downloading for supplies.

my tag is just a guide...please use your imagination
and make the tag your own you do not have to
use any of the supplies I used.

     LET'S BEGIN

Open up Template and ShiftD and close original...delete
copyright layer/close all layers/choose paper of choice
copy/paste and put underneath background layer/go to mask
of choice with these setting and click ok
delete background layer

On the following raster layers follow these directions...

Color rectangle1 and rectangle2 to match you color scheme of your
tag/add drop shadow to both

Leave thin rectangle1 and thin rectangle2 as is (or change color
to match your tag) /add drop shadow to both

activate circle layer/copy/paste paper of choice/go to circle layer
invert/go to paper layer and delete/merge down/keep activated

copy/paste tube/resize/place the part of the tube that you want to
show/on circle layer/invert/on tube layer/delete/deactivate
add drop shadow

copy/paste frame2/resize to fit circle layer
eyecandy 400-glass with these setting
add drop shadow/place over top of thin strip and rectangle

leave thin strip as is or change the color to suit your tag/add drop shadow

color rectangle to match your tag/I made mine a little darker/activate/
copy paste tube/place to the part you want showing/on rectangle layer
invert/on tube layer/delete/blend/overlay/add drop shadow

leave thin strip2 as is/add drop shadow

activate small circle/choose two colors that match your tag/ add gradient
to circle/change circle frame to white/add drop shadow

now add your main tube and place where you want it/add drop shadow

I change the colors of the word art to match my tag

now add any other element you wish to use to make your tag your own/add drop
shadow on each element/resize your tag if needed

add your watermark and copyright credits/give it a slight gradient glow
...now give your tag to a friend.

You're done...thank you for trying my tutorial
please send me a copy so that I can show case it on my blog
send to riggsbee53@gmail.com


PTU Foxy's Designz and Markia

Take Your Drama

This tutorial was written on March 25,2012.
Any similarities to another tutorial is purely coincidental.
All my tutorial are register with My Free Copyright.
Please do not claim as your own.
This tutorial writer assumes you have a working
knowledge of using Paint Shop Pro.
This tutorial was done in Paint Shop Pro9,
but can be adapted to use in other
Paint Shop Pro versions.


SUPPLIES NEEDED

Tube of choice: I'm using the awesome work of Marika.
Please do not use unless you have a license to do so.
This is a kit/tube combo.You can get her tubes HERE


Scrapkit of Choice: I am using PTU Foxy's Designs Scrap kit
that comes with the tube...You can purchase it HERE..Thank you Foxy


Mask of choice:I am using Weescotslass mask #105.
You can download it HERE...Thank you Chelle

Template of Choice: I am using Alikas Scraps-Template #8
You can download it HERE....Thank you Alika

Filters used:Eye Candy 4000 gradient glow - HERE
Toadies-Blast em-HERE

Font for Name is Pyxidium...HERE
copy write is always done in Pixelette ...HERE


Drop shadow use through out H-2/V-2/O-65/B-6.00
Please leave a thank you when you downloading for supplies.

my tag is just a guide...please use your imagination
and make the tag your own you do not have to
use any of the supplies I used.

     LET'S BEGIN

Open up Template and ShiftD and close original...delete
copyright layer/close all layers/choose paper of choice
copy/paste and put underneath background layer/go to mask
of choice with these setting and click ok/delete background layer


copy/paste mesh element29/duplicate/merge down/
mirror/lower opacity to 60%

On the following raster layers follow these directions...

activate square layer/copy/paste paper of choice/go to square layer
invert/go to paper layer and delete/merge down/add drop shadow

copy/paste element 20/resize to fit/leave frame as is/add drop shadow

recolor circle to match tag/copy/paste close up tube/resize/duplicate
close/toadies/blast em with these setting/


open duplicate/duplicate again/on bottom lower opacity 
to 60%/on top one/blend/screen/add drop shadow

leave square2 as is/activate rect1 layer/copy/paste paper of choice/go
to rect1 layer/invert/go to paper layer and delete/merge down
add drop shadow

activate rect2 layer/copy/paste paper of choice/go to rect2 layer
invert/go to paper layer and delete/merge down/add drop shadow

color round rectangle to match your tag/add drop shadow/copy/paste
element27/duplicate and move over a little/merge down/add drop shadow/
leave frame layer as is

activate background1 layer/copy/paste/tube/resize to fit/position where
you want to tube to show/selections on background1 layer/invert/go to
tube layer and delete/add drop shadow to tube/leave frame as is

activate background2 layer/copy/paste/tube/resize to fit/position where
you want to tube to show/selections on background2 layer/invert/go to
tube layer and delete/add drop shadow to tube/leave frame as is

leave everything else as it/add drop shadow and position where you want
them to be/add your main tube/resize if needed/add drop shadow

now add any other element you wish to use to make your tag your own/add drop
shadow on each element/resize your tag if needed

add your watermark and copyright credits/give it a slight gradient glow
...now give your tag to a friend.

You're done...thank you for trying my tutorial
please send me a copy so that I can show case it on my blog


3/23/12

PTU Additive Pleasures and Jose Cano

Bite Me

This tutorial was written on March 22,2012.
Any similarities to another tutorial is purely coincidental.
All my tutorial are register with My Free Copyright.
Please do not claim as your own.
This tutorial writer assumes you have a working
knowledge of using Paint Shop Pro.
This tutorial was done in Paint Shop Pro9,
but can be adapted to use in other
Paint Shop Pro versions.

SUPPLIES NEEDED

Tube of choice: I'm using the awesome work of Jose Cano.
Please do not use unless you have a license to do so.
You can get his tubes HERE

Scrapkit of Choice: I am using Additive Pleasures PTU
Scrap kit called Bite Me You can purchase it HERE..Thank you Tammi

Mask of choice:I am using yez mask #067.
You can download it HERE...Thank you Yez

Template of Choice: I am using Additive Pleasures-Template #170
You can download it HERE....Thank you Tammi

Filters used:Eye Candy 4000 gradient glow - HERE
Crescent Moon-cut glass..HERE
Tramages -Tow the Line...HERE

Font for Name is Tabatha Heavy..HERE
Copy write is always done in Pixelette ...HERE

Drop shadow use through out H-2/V-2/O-65/B-6.00
Please leave a thank you when you downloading for supplies.

my tag is just a guide...please use your imagination
and make the tag your own you do not have to
use any of the supplies I used.


     LET'S BEGIN

Open up Template and ShiftD and close original...delete
copyright layer/close all layers/choose paper of choice
copy/paste and put underneath background layer/go to mask
of choice with these setting 
and click ok/delete background layer

On the following raster layers follow these directions...name
each layer as you go along


activate circle layer/copy/paste paper of choice/go to circle layer
invert/go to paper layer and delete/merge down/add drop shadow

copy/paste tickets/duplicate/place one on top of the other/merge
down/add drop shadow

activate rectangle layer/copy/paste paper of choice/go to rectangle
layer/invert/go to paper layer and delete/merge down/add drop shadow

copy/paste label 2/resize to fit/copy/paste brad/resize to fit
duplicate/mirror/add drop shadow

activate circle2 layer/copy/paste paper of choice/go to circle2 layer
invert/go to paper layer and delete/merge down/keep activated


copy/paste bottom close up tube/place on top of 
circle2 layer/delete/effects/crescent moon cut glass
adjust/sharpness/sharpen/with these setting
add drop shadow to both layer and tube

activate rectangle2 layer/copy/paste paper of choice/go to rectangle2
layer/invert/go to paper layer and delete/merge down/add drop shadow

copy/paste heart w/ribbon2/duplicate/place side by side/merge down
add drop shadow

activate rectangle3 layer/copy/paste paper of choice/go to rectangle3
layer/invert/go to paper layer and delete/merge down/add drop shadow

copy/paste ribbon4/duplicate/overlap side by side/merge down/add
drop shadow

activate rectangle4 layer/copy/paste paper of choice/go to rectangle4
layer/invert/go to paper layer and delete/merge down/add drop shadow

copy/paste star/duplicate 2x/overlap each star/merge down2x/duplicate
again/close original layer/on dupe layer/blend/hard light/go back to
original/place underneath the dupe/lower opacity to 60%/add drop
shadow to both

activate circle3 layer/copy/paste paper of choice/go to circle3
layer/invert/go to paper layer and delete/merge down/add drop shadow

copy/paste close up top/duplicate/on dupe tramages/tow the line with
these settings
click ok/click blend/screen/place original underneath
dupe/lower opacity to 90%/add drop shadow to both

activate rectangle5 layer/copy/paste paper of choice/go to rectangle5
layer/invert/go to paper layer and delete/merge down/add drop shadow

copy/paste kiss lips/duplicate/place on either side of the heart
merge down/add light shadow

leave heart and heart back as is/copy/paste your main tube/resize/add
drop shadow/leave word art back and word art as is/add drop shadow
to word art back

now add any other element you wish to use to make your tag your own/add drop
shadow on each element/resize your tag if needed

add your watermark and copyright credits/give it a slight gradient glow
...now give your tag to a friend.

You're done...thank you for trying my tutorial
please send me a copy so that I can show case it on my blog
send to  riggsbee53@gmail.com

3/21/12

FTU Bea's Creations and Ralph Macrey

She's So Hot

This tutorial was written on March 20,2012.
Any similarities to another tutorial is purely coincidental.
All my tutorial are register with My Free Copyright.
Please do not claim as your own.
This tutorial writer assumes you have a working
knowledge of using Paint Shop Pro.
This tutorial was done in Paint Shop Pro9,
but can be adapted to use in other
Paint Shop Pro versions.
SUPPLIES NEEDED

Tube of choice: I'm using the awesome work of Ralph Macrey
Please do not use unless you have a license to do so.
You can get his tubes HERE

Scrapkit of Choice: I am using Bea's Creations FTU Scrap kit Mixed
..Thank you Bea

Mask of choice:I am using Vix Big Mask #010
You can download it HERE...Thank you Vix

Template of Choice: I am using Saras Sinful Pleasures Template #3
..Thank you Sara

Filters used:Eye Candy 4000 gradient glow...HERE
muras meister filter-copies..you can get it HERE

Font for Name is Aristocrat
copy write is always done in Pixelette ...HERE

Drop shadow use through out H-2/V-2/O-65/B-6.00
Please leave a thank you when you downloading for supplies.


my tag is just a guide...please use your imagination
and make the tag your own
you do not have to use any of the supplies I used.

     LET'S BEGIN

Open up Template and ShiftD and close original...delete copyright layer
resize template 610x658 for space to work/we will resize again at the end/
close all layers/choose paper of choice/copy/paste and put underneath
background layer/go to mask of choice with these setting and click ok

delete background layer

On the following raster layers follow these directions...

activate rectangle1 layer/copy/paste paper of choice/resize/go to rectangle1
layer/invert/go to paper layer and delete/merge down/add drop shadow

activate bracket rectangle layer/copy/paste paper of choice/resize/go to
bracket rectangle layer/invert/go to paper layer and delete/merge down/
add drop shadow

activate circles layer/copy/paste paper of choice/resize/go to circles
layer/invert/go to paper layer and delete/merge down/add drop shadow

activate rectangle2 layer/copy/paste paper of choice/resize/go to rectangle2
layer/invert/go to paper layer and delete/keep activates/font/ type
she's so hot/muras meister filter-copies/ with these setting
click ok/merge down/add drop shadow

activate rectangle3 layer/copy/paste paper of choice/resize/go to rectangle3
layer/invert/go to paper layer and delete/merge down/add drop shadow

activate rectangle4 layer/copy/paste paper of choice/resize/go to rectangle4
layer/invert/go to paper layer and delete/merge down/add drop shadow

copy/paste tube/place on top of rectangle2 layer/resize to fit/add drop shadow

now add any other element you wish to use to make your tag your own/
add drop shadow on each element/resize you entire tag if needed/if tag
is fuzzy/adjust/sharpness/sharpen each item until clear

add your watermark and copyright credits/give it a slight gradient glow
...now give your tag to a friend.

You're done...thank you for trying my tutorial
please send me a copy so that I can show case it on my blog
send to riggsbee53@gmail.com

FTU Rieka Rafita Scraps and Ralph Macrey

Angel Vs Devil

This tutorial was written on March 20,2012.
Any similarities to another tutorial is purely coincidental.
All my tutorial are register with My Free Copyright.
Please do not claim as your own.
This tutorial writer assumes you have a working
knowledge of using Paint Shop Pro.
This tutorial was done in Paint Shop Pro9,
but can be adapted to use in other
Paint Shop Pro versions.


SUPPLIES NEEDED

Tube of choice: I'm using the awesome work of Ralph Macrey
Please do not use unless you have a license to do so.
You can get his tubes HERE

Scrapkit of Choice: I am using Rieka Rafita FTU Scrap kit
called Redilicous.You can download it HERE. Rieka is no longer with us
but her awesome work lives on...Thank you Rieka for all the awesome
 work you did, You are missed.

Mask of choice:I am using Vix Big Mask #003
You can download it HERE...Thank you Vix

Template of Choice: I am using Divine Intentions Template #400
You can download it HERE....Thank you Missy

Filters used:Eye Candy 4000 gradient glow...HERE
Xero - fritillary and xero- improver..you can get it HERE

Font for Name is Angel
copy write is always done in Pixelette ...HERE

Drop shadow use through out H-2/V-2/O-65/B-6.00

Please leave a thank you when you downloading for supplies.

my tag is just a guide...please use your imagination
and make the tag your own
you do not have to use any of the supplies I used.

     LET'S BEGIN

Open up Template and ShiftD and close original...delete copyright layer
resize template 614x424 for space to work/we will resize again at the end/
close all layers/choose paper of choice/copy/paste and put underneath
background layer/go to mask of choice with these setting and click ok

delete background layer

On the following raster layers follow these directions...

activate center circle2 layer/copy/paste paper of choice/resize/go to
center circle2 layer/selection/modify/smooth/with these setting


invert/(do this for each layer)/go to paper layer 
and delete/keep activate/copy/paste tube/
resize to fit/go to xero/fritillary/with these setting


click ok/now go to xero improver with these setting/click ok/add drop shadow


activate square1 layer/copy/paste paper of choice/resize/go to square1
layer/invert/go to paper layer and delete/merge down/add drop shadow
copy/paste flower2/resize to fit/add drop shadow/duplicate/mirror
place on top of square2 layer

activate square2 layer/copy/paste paper of choice/resize/go to square2
layer/invert/go to paper layer and delete/merge down/add drop shadow

activate rectangle1/selection/modify/smooth/with previous setting/go to
color material pallet and flood fill black/deactivated/add drop shadow

activate rectangle2/selection/modify/smooth/with previous setting/go to
color material pallet and flood fill black/deactivated/add drop shadow

activate circle back1 layer/copy/paste paper of choice/resize/go to circle
back1 layer/invert/go to paper layer and delete/adjust/add/remove noise/add
noise with these setting


do this 3x/merge down/add drop shadow

activate circle back2 layer/copy/paste paper of choice/resize/go to circle
back2 layer/invert/go to paper layer and delete/adjust/add/remove noise/add
noise with these setting/do this 3x/merge down/add drop shadow

activate circle1 layer/selection/modify/smooth/with previous setting/go to
color material pallet and flood fill red/keep activated/copy/paste tube
resize/duplicate/close for now/on original layer/blend/screen/lower opacity
80%/add drop shadow/on duplicate layer/place below original/add drop shadow

activate circle2 layer/selection/modify/smooth/with previous setting/go to
color material pallet and flood fill red/keep activated/copy/paste tube
resize/duplicate/close for now/on original layer/blend/screen/lower opacity
80%/add drop shadow/on duplicate layer/place below original/add drop shadow

activate frame back1 layer/selection/modify/smooth/with previous setting
go to color material pallet and flood fill black/keep activated/copy/paste
glitter flower1/resize to fit/add drop shadow

activate frame back2 layer/selection/modify/smooth/with previous setting
go to color material pallet and flood fill black/keep activated/copy/paste
glitter flower1/resize to fit/add drop shadow

activate frame1 layer/copy/paste paper of choice/resize/go to frame1
layer/selection/modify/smooth/with previous setting/invert
go to paper layer and delete/add drop shadow

activate frame2 layer/copy/paste paper of choice/resize/go to frame2
layer/selection/modify/smooth/with previous setting/invert
go to paper layer and delete/add drop shadow

activate center circle layer/copy/paste paper of choice/resize/go to center
circle layer/invert/go to paper layer and delete/adjust/add/remove noise
add noise with these setting/merge down/add drop shadow

copy/paste tube/place on top of center circle layer/resize to fit/duplicate
on orginal layer/blend/screen/lower opacity to 80%/place duplicate layer
below orginal layer/add drop shadow to both

leave word art shadow layer and word art back layer as is/on word art
layer activate the pink words/copy/paste paper of choice/resize/ on word
art layer /invert/go to paper layer and delete

now add any other element you wish to use to make your tag your own/
add drop shadow on each element/resize you entire tag if needed/if tag
is fuzzy/adjust/sharpness/sharpen each item until clear

add your watermark and copyright credits/give it a slight gradient glow
...now give your tag to a friend.

You're done...thank you for trying my tutorial
please send me a copy so that I can show case it on my blog
send to riggsbee53@gmail.com

FTU Fantasy Moments and Art Whimsico


This tutorial was written on March 19,2012. 
Any similarities to another tutorial is purely coincidental.
All my tutorial are register with My Free Copyright. 
Please do not claim as your own.
This tutorial writer assumes you have a working
knowledge of using Paint Shop Pro.
This tutorial was done in Paint Shop Pro9,
but can be adapted to use in other
Paint Shop Pro versions.


SUPPLIES NEEDED

Tube of choice: I'm using the awesome work of Art Whimsico.

Please do not use unless you have a license to do so. You can get her tubes HERE

Scrapkit of Choice: I am using Fantasy Moments FTU Scrap kit called Easter

You can purchase it HERE....Thank you

Mask of choice:I am using EDB mask #16.She is under construction
right now, please choose another mask.. Thank you

Template of Choice: I am using Denz's Designs-Template #120

You can download it HERE....Thank you Denny

Two Easter tubes of choice...one of eggs 
and one with eggs in a basket..please Google

Filters used:Eye Candy 4000 gradient glow..HERE
Xero - Mistified..you can get it HERE

Font for word art is Sakkal Majalla...HERE

Font for Name is Johannes...HERE
Copy write is always done in Pixelette ...HERE


Drop shadow use through out H-2/V-2/O-65/B-6.00

Please leave a thank you when you downloading for supplies.


my tag is just a guide...please use your imagination and make the tag your own

you do not have to use any of the supplies I used.
     LET'S BEGIN

Open up Template and ShiftD and close original...delete copyright layer

resize template 600x600 for space to work/we will resize again at the end/
close all layers/choose paper of choice/copy/paste and put underneath
background layer/go to mask of choice with these setting and click ok

delete background layer

On the following raster layers follow these directions...


activate lg circle layer/adjust/hue saturation/hue map with these setting

click ok/add drop shadow/keep activated


copy/paste element 24 on top of lg circle layer/resize/place where you

want what part to show/add drop shadow

activate square layer/copy/paste paper of choice/go to square layer

invert/go to paper layer and delete/merge down/add drop shadow

copy/paste bunny/resize to fit /add drop shadow/now copy/paste yellow frame

resize to fit square/make sure bunny is underneath yellow frame/add drop shadow

activate strip 2 top/choose three colors/go to material properties with

these setting/then gradient editor with these setting/ click ok/
flood fill strip with these colors/add drop shadow

activate strip2 bottom/reverse colors and flood fill bottom strips with

these colors/add drop shadow

leave word art layers as is and bring the heart layers down and place on

word art layer/(see my tag for reference)

on the top and bottom layers where the hearts were/choose font (Sakkal Majalla)

size 14 and type out Happy Easter three times/color-white

activate pink circle layer/copy/paste paper of choice/go to pink circle layer

invert/go to paper layer and delete/merge down/add drop shadow

copy/paste/resize bunny tube/place on top of pink circle layer/
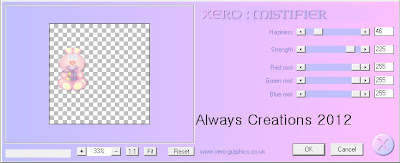
on duplicate/filter xero/mistified effect with these setting/
click ok/add drop shadow to both

activate blue circle layer/copy/paste paper of choice/go to blue circle layer

invert/go to paper layer and delete/merge down/add drop shadow

I put the basket of eggs and eggs in blue circle/duplicate/close duplicated

layer/on original layer/blend/screen/add drop shadow
on duplicated layer lower opacity to 80%/now place both duplicated layers
on to of original layers

now add any  other element you wish to use to make
 your tag your own/add drop
shadow on each element

add your watermark and copyright credits/
give it a slight gradient glow
...now give your tag to a friend.

You're done...thank you for trying my tutorial

please send me a copy so that I can show case it on my blog
send to riggsbee53@gmail.com

3/13/12

PTU Diva Designz and Medievil

Friends Forever

This tutorial was written on March 12,2012.
 Any similarities to another tutorial is purely coincidental.
All my tutorial are register with My Free Copyright.
 Please do not claim as your own.
This tutorial writer assumes you have a 
working knowledge of using Paint Shop Pro.
This tutorial was done in Paint Shop Pro9,
but can be adapted to use in other
Paint Shop Pro versions.

SUPPLIES NEEDED

Tube of choice: poser tube within kit

Scrapkit of Choice: I am using Diva Designz PTU Scrap kit called Friends Forever
You can purchase it HERE....Thank you Mandy

Mask of choice:I am using Insatiable dreams pattern mask #4
You can download it HERE...Thank you Cat

Template of Choice: I am using Sara's Sinful Pleasures-Template#26
Sara is no longer on the net so please choose another ....Thank you Sara

Filters used:Eye Candy 4000 gradient glow-HERE
Xero - Radiance..you can get it HERE

Font for name is Florentine Swash Caps..HERE
and copy write is always done in Pixelette ..HERE

Drop shadow use through out H-2/V-2/O-65/B-6.00

Please leave a thank you when you downloading for supplies.

my tag is just a guide...please use your imagination and make the tag your own
you do not have to use any of the supplies I used.


     LET'S BEGIN

Open up Template and ShiftD and close original...delete copyright layer
resize template 600x600 for space to work/we will resize again at the end/
close all layers/choose paper of choice/copy/paste and put underneath
brush layer/go to mask of choice with these setting and click ok


On the following raster layers follow these directions...

activate circle layer/copy/paste paper of choice/go to circle layer
invert/go to paper layer and delete/delete original circle layer/add
drop shadow/keep activated

copy/paste flower element on top of lg circle layer/resize/place where you
want what part to show/resize if needed/add drop shadow

activate large rectangle layer/copy/paste paper of choice/go to large rectangle
layer/invert/go to paper layer and delete/add drop shadow

copy/paste a poser of choice/resize to fit large rectangle/blend hard light
duplicate/merge down/add drop shadow

activate small rectangle layer/copy/paste paper of choice/go to small
rectangle layer/invert/go to paper layer and delete/copy/paste another poser
blend soft light/duplicate and merge down/add drop shadow

leave all frame layers as is/add drop shadow to each

now add any elements to make your tag unique/make it your own/remember
to add drop shadow on each element/ I used several poser/ on sitting poser
xero/radiance with these setting/
on the lying down poser I just add drop shadow/
I also used the word art word art and circle word art

add your watermark and copyright credits/
give it a slight gradient glow
...now give your tag to a friend.

You're done...thank you for trying my tutorial
please send me a copy so that I can show case it on my blog
riggsbee53@gmail.com

3/11/12

PTU Hungry Hills Scraps and Anna Marine

This tutorial was written on March 9,2012. 
Any similarities to another tutorial is purely coincidental.
All my tutorial are register with My Free Copyright. 
Please do not claim as your own.
This tutorial writer assumes you have a 
working knowledge of using Paint Shop Pro.
This tutorial was done in Paint Shop Pro9,
but can be adapted to use in other
Paint Shop Pro versions.

SUPPLIES NEEDED

Tube of choice: I'm using the awesome work of Anna Marine.
I used one with a close up. Please do not use unless you
have a license to do so. You can get her tubes HERE


Scrapkit of Choice: I am using Hungry Hills PTU Scrap kit
called Love Bites,purchase it HERE....Thank you Ali


Mask of choice: I am using IR mask #119
You can download it HERE...Thank you  Laurie

Template of Choice: No Template

Filters used:Eye Candy 4000 gradient glow- HERE
Xero - Soft Mood..you can get it HERE

Font for name is PostAntiquaBE- HERE
and copy write is always done in Pixelette ...
Get them HERE


Drop shadow use through out H-3/V-2/O-60/B-10.00

Please leave a thank you when you downloading for supplies
.

my tag is just a guide...please use your imagination
and make the tag your own you do not have to use
any of the supplies I used.

     LET'S BEGIN

Open up frame #6/magic ward-click inside frame/selections/expand by 10
invert/paper of choice/delete on paper layer/keep activated/copy/paste
half apple element/resize if needed/place on top of frame/delete on element
layer/blend luminance legacy/deactivate/add drop shadow to frame

copy/paste paper of choice underneath frame layer/resize to fit/go to mask
of choice with these setting and click ok


copy/paste frame #1/resize and place on left side of circle frame/see my tag
magic wand/click inside of frame/selections expand by 10/invert/copy/paste
paper of choice/place on top of square frame/delete paper layer/move paper
underneath frame/keep activated/copy close up tube on top of frame/resize
if needed/place where you want it/delete on tube layer/move tube underneath
frame/xero/soft mood with these setting/click ok/add drop shadow to tube and
frame


now add any other elements to make your tag unique/make it your own
remember to add drop shadow on each element


copy/paste your tube where you want it/resize/add drop shadow

add your watermark and copyright credits/give it a slight gradient glow
...now give your tag to a friend.

You're done...thank you for trying my tutorial
please send me a copy so that I can show case it on my blog
riggsbee53@gmail.com

3/7/12

PTU Diva Designz and Elias Chatzoudis

Luck of the Irish

This tutorial was written on March 7,2012. 
Any similarities to another tutorial is purely coincidental.
All my tutorial are register with My Free Copyright. 
Please do not claim as your own.
This tutorial writer assumes you have a
 working knowledge of using Paint Shop Pro.
This tutorial was done in Paint Shop Pro9,
 but can be adapted to use in other
Paint Shop Pro versions.


SUPPLIES NEEDED

Tube of choice: I'm using the awesome work of Elias Chatzoudis.
I used one with a close up.Please do not use unless you have a
license to do so. You can get his tubes HERE

Scrapkit of Choice: I am using Diva's Designz PTU Scrap kit
called Luck of the Irish.You can purchase it HERE..Thank you Mandy

Mask of choice:I am using Insatiable Dreams mask #489
You can download it HERE...Thank you Cat

Template of Choice: I am using a template #55 
from Amy&Leahs gimptastictuts
You can download it HERE....Thank you Leah

Filters used:Eye Candy 4000 gradient glow- HERE
Xero- Fritillary..you can get it HERE

Font for name is Marela and copy write is 
always done in Pixelette ... Get them HERE

Drop shadow use through out H-3/V-2-3/O-65/B-6.00

Please leave a thank you when you downloading for supplies.

my tag is just a guide...please use your imagination and make the tag your own
you do not have to use any of the supplies I used.

     LET'S BEGIN

Open up Template and ShiftD and close original...delete copyright layer
resize template 600x600 for space to work/we will resize again at the end/
close all layers/choose paper of choice/copy/paste and put underneath
square layer/go to mask of choice with these setting and click ok


On the following raster layers follow these directions...I resize
all layer by 85%/do this first so you won't forget

keep square layer 3 as is/copy/paste clover with word/place on top of square
layer on left side/resize to fit/blend/screen/add drop shadow/duplicate/
now close for later

activate rect2 layer/copy/paste paper of choice/go to rect2 layer
invert/go to paper layer and delete/delete original rect2 layer/add
drop shadow/


activate rect1 layer/copy/paste paper of choice/go to rect1 layer
invert/go to paper layer and delete/delete original rect1 layer/add
drop shadow/

keep square layer 1 and 2 as is/on square layer 1 move duplicate clover
on top near right side


activate circle layer/copy/paste paper of choice/go to circle layer
invert/go to paper layer and delete/on original circle layer/raster
deform tool/make circle a little larger so that it's a frame/activate
adjust/add noise with these setting


add drop shadow/on duplicated circle
activate circle/copy/paste close up tube/resize to fit/blend/screen/
add drop shadow

leave circle 1 layer as is/activate circle/copy/paste close up/resize
xero/fritillary with these setting


click ok/add drop shadow

now add any elements to make your tag unique/make it your own/remember
to add drop shadow on each element

copy/paste your tube where you want it/resize/add drop shadow

add your watermark and copyright credits/give it a slight gradient glow
...now give your tag to a friend.

You're done...thank you for trying my tutorial
please send me a copy so that I can show case it on my blog
riggsbee53@gmail.com