6/18/12

PTU SWA and Sinful Mindz Posers

Da Brat Da Bomb

This tutorial was written on June 18,2012.
Any similarities to another tutorial is purely coincidental.
All my tutorial are register with My Free Copyright.
Please do not claim as your own.
This tutorial writer assumes you have a working
knowledge of using Paint Shop Pro.
This tutorial was done in Paint Shop Pro9,
but can be adapted to use in other
Paint Shop Pro versions.


SUPPLIES NEEDED

Tube of choice: I'm using the awesome work of Sinful Mindz Poser.
Please do not use unless you have a license to do so. 
Her tube is within the kit

Scrapkit of Choice: I am using  PTU Scrap kit Scraps With Attitude
Called Brat...You can purchase it HERE...Thank you Missy

Template of choice: I am using mine Template #102
You can download it HERE...Leave a thank you please

Mask of Choice: I am using Insatiable Dreams-Mask #323
You can download it HERE....Thank you Cat

Filters used: Eye Candy 4000 gradient glow - HERE

Font for Name is Jubilee Lines MN...HERE
Copy write is always done in Pixelette ...HERE


Drop shadow use through out H-2/V-2/O-50/B-5.00

Please leave a thank you when you downloading for supplies.


my tag is just a guide...please use your imagination
and make the tag your own you do not have to
use any of the supplies I used.


I made the template for this scrap kit,so if you're using
a different tube you will need to change the colors on the
template to match your tag/follow TOU for my template...thanks


     LET'S BEGIN

Open up Template and ShiftD and close original...delete
copyright layer/close all layers/choose paper of choice
copy/paste and put underneath background layer/go to mask
of choice with these setting and click ok/delete background
layer


on gradient layer/copy/paste element of choice/ I chose the
splats/three on each layer/resize to fit/alternate colors
add drop shadow

on dark blue oval/copy/paste/element of choice/resize to fit
place where you want it/add drop shadow

activate green circle1/copy/paste one of the poser/resize/position 
where you want the part to show/selections/on green circle1 layer
invert/on poser layer/delete/duplicate/on original layer/blend/screen
place duplicate layer underneath and lower opacity to 64%/add drop
shadow to both

activate green circle2/copy/paste one of the poser/resize/position 
where you want the part to show/selections/on green circle2 layer
invert/on poser layer/delete/duplicate/on original layer/blend/screen
place duplicate layer underneath and lower opacity to 64%/add drop
shadow to both

on lg green circle layer/copy/paste another poser/resize/position where
you want it/add drop shadow/place your word art where you want it

now add any other element you wish to use to make your tag your
own/add drop shadow on each element/resize your tag

add your watermark and copyright credits/give it a slight gradient
glow ...now give your tag to a friend.

You're done...thank you for trying my tutorial
please send me a copy so that I can show case it on my blog
send to....riggsbee53@gmail.com

6/17/12

PTU Foxy's Designz and Arthur Crowe

Lick This Lollipop

This tutorial was written on June 16,2012.
Any similarities to another tutorial is purely coincidental.
All my tutorial are register with My Free Copyright.
Please do not claim as your own.
This tutorial writer assumes you have a working
knowledge of using Paint Shop Pro.
This tutorial was done in Paint Shop Pro9,
but can be adapted to use in other
Paint Shop Pro versions.

 
SUPPLIES NEEDED

Tube of choice: I'm using the awesome work of Arthur Crowe.
Please do not use unless you have a license to do so.
You can get her tubes HERE

Scrapkit of Choice: I am using Color Girl
Scrap/Bundle PTU scrap kit by Foxy Designs...
You can purchase it HERE...Thank you Foxy

Template of choice:I am using Toxic Desires Template #146
You can download it HERE...Thank you Kristin

Mask of Choice: I am using Vix -Mask # 363
You can download it HERE....Thank you Vix

Filters used:Eye Candy 4000 gradient glow - HERE

Font for Name is Andantino Script...HERE
Copy write is always done in Pixelette ...HERE

Drop shadow use through out H-2/V-2/O-50/B-5.00

Please leave a thank you when you downloading for supplies.


my tag is just a guide...please use your imagination
and make the tag your own you do not have to
use any of the supplies I used.


     LET'S BEGIN

Open up Template and ShiftD and close original...delete
copyright layer/close all layers/choose paper of choice
copy/paste and put underneath background layer/go to mask
of choice with these setting and click ok/delete background
layer/add drop shadow

On the following raster layers follow these directions...

activate circle layer/copy/paste paper of choice/resize
go to circle layer/selections/invert go to paper layer and
delete/merge down/keep activated/copy/paste/close up tube
resize/delete/duplicate/on original layer/blend/screen/place
duplicate underneath top layer/lower opacity to 50%/add drop
shadow to both

tone layer as is/frame layer change last color to a light purple
choose two colors from one of the papers/I chose c08cc0 and ffd299
with these setting/click ok/
change color of glittered rectangle 1
rectangle 1/glittered rectangle 2 and rectangle 2/tone 2 layer as is
add drop shadow

change color to sm rectangle layer/activate frame back 1 layer/copy
paste paper of choice/selections/frame back layer/invert/paper layer
delete/copy/paste tube//position part you want to show/delete/repeat
process for frame back 2 layer/frame 1 and frame 2 as is/add drop shadow

change lollipops with the lollipop in the kit/add drop shadow

change color of word art to match tag/add drop shadow

add your main tube/resize if needed/place where it will look best
add drop shadow

now add any other element you wish to use to make your tag your
own/add drop shadow on each element/resize your tag

add your watermark and copyright credits/give it a slight gradient
glow ...now give your tag to a friend.

You're done...thank you for trying my tutorial
please send me a copy so that I can show case it on my blog
send to....riggsbee53@gmail.com

6/16/12

PTU Foxy's Designz and Marika

Rock Chick With Attitude=Rockatutude

This tutorial was written on June 16,2012.
Any similarities to another tutorial is purely coincidental.
All my tutorial are register with My Free Copyright.
Please do not claim as your own.
This tutorial writer assumes you have a working
knowledge of using Paint Shop Pro.
This tutorial was done in Paint Shop Pro9,
but can be adapted to use in other
Paint Shop Pro versions.


SUPPLIES NEEDED

Tube of choice: I'm using the awesome work of Marika.
Please do not use unless you have a license to do so.
You can get her tubes HERE

Scrapkit of Choice: I am using  Marika Scrap/Bundle #2 PTU Scrap kit
by Foxy Designs...You can purchase it HERE...Thank you Foxy

Template of choice:I am using Eyecandi Template #2
You can download it HERE...Thank you Sylvie

Mask of Choice: I am using Horseplay's Pastures-Mask # 37
You can download it HERE....Thank you Bev

Filters used:Eye Candy 4000 gradient glow - HERE

Font for Name is Gracey's Curse...HERE
Copy write is always done in Pixelette ...HERE


Drop shadow use through out H-2/V-2/O-50/B-5.00

Please leave a thank you when you downloading for supplies.

my tag is just a guide...please use your imagination
and make the tag your own you do not have to
use any of the supplies I used.


     LET'S BEGIN

Open up Template and ShiftD and close original...delete
copyright layer/close all layers/color of choice from
your tube/flood fill background layer/go to mask of choice
with these setting and click ok/layer/merge/merge group
new raster layer/flood fill with color black/go to mask of
choice with same setting and click ok/layer/merge/merge
group/add drop shadow


On the following raster layers follow these directions...

activate pink rectangle back left/activate /copy/paste
paper of choice/resize/go to pink rectangle back left
invert go to paper layer and delete/merge down/add drop
shadow

activate pink rectangle back right/copy/paste paper of
choice/resize/go to pink rectangle back right/invert/go
to paper layer and delete/merge down/add drop shadow

leave oval large white noisy layer as is/oval large black
dotted layer/change color to match tag/leave oval white
noisy layer as is/oval pink noisy layer/lighten the pink

activate oval grey layer/copy/paste paper of choice/resize
go to oval grey layer/invert/go to paper layer and delete
keep activated/copy/paste close up tube/resize to fit/go to
selections/invert on oval layer/then go to tube layer and
delete/duplicate/move side by side/merge down/duplicate
this layer/on original layer/blend screen/place duplicate
layer underneath original layer/add drop shadow to both

leave the pink rectangle left and pink rectangle right as is
leave the black dotted rectangle right and the black dotted
rectangle left as is also

leave the black rectangle left and the black rectangle right
as is/copy paste element of choice on both of these layers
resize to fit/add drop shadow

leave white oval noisy layer as is/activate pink oval layer
copy/paste paper of choice/resize/go to pink oval layer
selection/invert/go to paper layer/keep activate/copy and
paste close up tube/resize if needed/go to oval layer/selections
invert/go to tube layer and delete/duplicate/on original/blend
overlay/place duplicate layer underneath and lower opacity to
50%/add drop shadow to both

I added a frame that I made from the kit.I can't give it to you
because it's from the paid kit/but you can either choose a frame
from the kit or skip this part/copy/paste frame/resize/place on
top of oval layer

leave the following layer as is/white circle noisy right/white

circle noisy left/gradient circle right/gradient circle left
white circle frame left and white circle frame right/add drop
shadow to these layers

change the color on pink circle noisy right/pink circle noisy left

black dotted circle left/black dotted circle right/make the pink
lighter/add element to gradient circle left and gradient circle
right/resize/add drop shadow

leave black small rectangle left/black small rectangle right/white

rectangle left/white rectangle right as is/copy paste/element of
choice/resize to fit/add drop shadow/leave wordart as is/I changed

the stars to hearts

add your main tube/resize if needed/place where it will look best

add drop shadow

now add any other element you wish to use to make your tag your

own/add drop shadow on each element/resize your tag

add your watermark and copyright credits/give it a slight gradient

glow ...now give your tag to a friend.

You're done...thank you for trying my tutorial

please send me a copy so that I can show case it on my blog
send to....riggsbee53@gmail.com

6/11/12

PTU Foxy's Designz and Arthur Crowe

Sizzling Hot

This tutorial was written on June 11,2012.
Any similarities to another tutorial is purely coincidental.
All my tutorial are register with My Free Copyright.
Please do not claim as your own.
This tutorial writer assumes you have a working
knowledge of using Paint Shop Pro.
This tutorial was done in Paint Shop Pro9,
but can be adapted to use in other
Paint Shop Pro versions.

SUPPLIES NEEDED

Tube of choice: I'm using the awesome work of Arthur Crowe.
Please do not use unless you have a license to do so.
You can get her tubes HERE

Scrapkit of Choice: I am using Foxy Designs PTU Scrap kit
Chipp Hot...You can purchase as a bundle or alone it HERE
Thank you

Template of choice:I am using Foxy Designs Template #3
You can download it HERE...Thank you Foxy

Mask of Choice: I am using EBD Mask #17 by Enchanted Obsessions
You can download it HERE....Thank you Rachel

Filters used:Eye Candy 4000 gradient glow - HERE

Font for Name is Blazed...HERE
Copy write is always done in Pixelette ...HERE


Drop shadow use through out H-2/V-2/O-50/B-5.00

Please leave a thank you when you downloading for supplies.


my tag is just a guide...please use your imagination
and make the tag your own you do not have to
use any of the supplies I used.


     LET'S BEGIN

Open up Template and ShiftD and close original...delete
copyright layer/close all layers/choose paper of choice
copy/paste and put underneath background layer/go to mask
of choice with these setting and click ok/delete background
layer/rotate the mask to your liking


On the following raster layers follow these directions...

rename all your layers so that it will be easier to follow
instructions without getting confused

activate rectangle layer/copy/paste paper of choice/go to
rectangle layer/ invert/go to paper layer and delete/keep
activated/copy/paste close up tube/resize to fit/duplicate
3x/over laying each tube on top of one another/merge down
each time/blend/screen/lower opacity to 70%./add drop shadow

activate rectangle frame layer/pick a color from the tube and
and apply to rectangle frame layer/add drop shadow
delete/add drop shadow

activate circle1 layer/copy/paste paper of choice/go to circle1
layer/ invert/go to paper layer and delete/add drop shadow/copy
paste tube/resize to fit what you want to show/duplicate/to
original layer/blend/screen/move duplicate layer underneath

activate circle frame layer1/fill with color  of choice/add drop
shadow

activate circle2 layer/copy/paste paper of choice/go to circle2
layer/ invert/go to paper layer and delete/add drop shadow/copy
paste tube/resize to fit what you want to show/duplicate/to
original layer/blend/hard light/move duplicate layer underneath
top layer

activate circle frame layer2/copy/paste paper of choice go to
circle frame layer2/invert/go to paper layer and delete/add
drop shadow

activate circle layer3/copy/paste paper of choice/go to circle3
layer/ invert/go to paper layer and delete/add drop shadow/copy
paste tube/resize to fit what you want to show/duplicate/to
original layer/blend/screen/move duplicate layer underneath
top layer

activate circle frame layer3/fill with color  of choice/add drop
shadow

activate each dotted circle 1,2,and 3 and change the color to match
the tag

activate each dash layer/color these also to match your tag/I used
the back and blue

copy/paste your tube/resize to fit/place where you think it will
look best/add drop shadow

now add any other element you wish to use to make your tag your
own/add drop shadow on each element/resize your tag

I also added a word art/font of choice

add your watermark and copyright credits/give it a slight gradient
glow ...now give your tag to a friend.

You're done...thank you for trying my tutorial
please send me a copy so that I can show case it on my blog
send to....riggsbee53@gmail.com

6/8/12

FTU Linda Lou Creations and Della Lindsey

I Only Look Innocent

This tutorial was written on June 6,2012.
Any similarities to another tutorial is purely coincidental.
All my tutorial are register with My Free Copyright.
Please do not claim as your own.
This tutorial writer assumes you have a working
knowledge of using Paint Shop Pro.
This tutorial was done in Paint Shop Pro9,
but can be adapted to use in other
Paint Shop Pro versions.


SUPPLIES NEEDED

Tube of choice: I'm using the awesome work of Della Lindsey.
Please do not use unless you have a license to do so.
You can get her tubes HERE

Scrapkit of Choice: I am using LindaLou Creations FTU Scrap kit
from September 2010 blog train called Asian Drama
You can download it HERE...Thank you Linda

Template of choice:I am using Kandi Kissez Template #10
You can download it HERE...Thank you Kandi

Mask of Choice: I am using WSL Mask #228 by Weescotlass
You can download it HERE....Thank you Chelle

Filters used:Eye Candy 4000 gradient glow - HERE

Font for Name is jsa lovechinese...HERE 
Copy write is always done in Pixelette ...HERE


Drop shadow use through out H-2/V-2/O-50/B-5.00

Please leave a thank you when you downloading for supplies.


my tag is just a guide...please use your imagination
and make the tag your own you do not have to
use any of the supplies I used.


     LET'S BEGIN

Open up Template and ShiftD and close original...delete
copyright layer/close all layers/choose paper of choice
copy/paste and put underneath background layer/go to mask
of choice with these setting and click ok/delete background
layer/add drop shadow


On the following raster layers follow these directions...

activate black rectangle layer/copy/paste paper of choice
go to black rectangle1 layer/ invert/go to paper layer and
delete/color your paper to match your tube/add drop shadow

activate pink circle layer/copy/paste paper of choice go to
pink circle layer/ invert/go to paper layer and delete/color
to match tube add drop shadow

activate circle 2 layer/copy/paste paper of choice/go to
circle 2 layer/ invert/go to paper layer and delete/color
to match tube/add drop shadow

activate blue heart layer/color it to match tag/adjust/hue
saturation/hue color with these setting/click ok/add drop
shadow


activate blue rectangle layer/copy/paste paper of choice
go to blue rectangle layer/ invert/go to paper layer and
delete/add drop shadow

activate angled rectangle layer/copy/paste paper of choice
go to angled rectangle layer/delete/color to match tube/
leave frame as is/add drop shadow/

leave small white circle layer as is/activate pink circle
layer/copy/paste paper /of choice go to pink circle layer
invert/go to paper layer and delete/keep activated/copy
paste your tube/place where you want it-just the head part
resize to fit/circle layer/invert/tube layer/delete/add
drop shadow

now add any other element you wish to use to make your tag your
own/add drop shadow on each element/resize your tag

On the word art innocent layer I changed the font and added the
fat shadow from EC400 gradient glow/use same font on name with
the same filter/also do the stars layer with the same filter
resize your tag

add your watermark and copyright credits/give it a slight gradient
glow ...now give your tag to a friend.

You're done...thank you for trying my tutorial
please send me a copy so that I can show case it on my blog
send to....riggsbee53@gmail.com

6/5/12

FTU Fantasy Moments and DCSMC

Autumn Tears

This tutorial was written on June 5,2012.
Any similarities to another tutorial is purely coincidental.
All my tutorial are register with My Free Copyright.
Please do not claim as your own.
This tutorial writer assumes you have a working
knowledge of using Paint Shop Pro.
This tutorial was done in Paint Shop Pro9,
but can be adapted to use in other
Paint Shop Pro versions.


SUPPLIES NEEDED

Tube of choice: I'm using the awesome work of DCSMC.
Please do not use unless you have a license to do so.
You can get her tubes HERE

Scrapkit of Choice: I am using Fantasy Moments FTU Scrap kit
from September 2010 blog train...You can download it HERE
Thank you

Template of choice:I am using Denz Designz Template #28
You can download it HERE...Thank you Denny

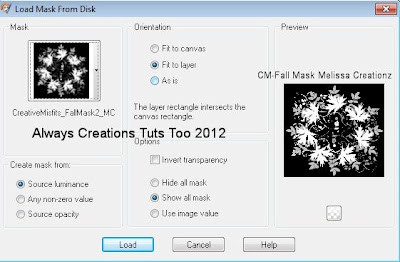
Mask of Choice: I am using CM Fall Mask #2 by Melissa Creationz
You can download it HERE....Thank you Melissa

Filters used:Eye Candy 4000 gradient glow - HERE

Font for name & word art is Arkona -Medium ...HERE
Copy write is always done in Pixelette ...HERE


Drop shadow use through out H-2/V-2/O-50/B-5.00

Please leave a thank you when you downloading for supplies.


my tag is just a guide...please use your imagination
and make the tag your own you do not have to
use any of the supplies I used.


     LET'S BEGIN

Open up Template and ShiftD and close original...delete
copyright layer/close all layers/choose paper of choice
copy/paste and put underneath background layer/go to mask
of choice with these setting and click ok/delete background
layer/add drop shadow


On the following raster layers follow these directions...

activate vertical rectangle1 layer/copy/paste paper of choice
go to vertical rectangle1 layer/ invert/go to paper layer and
delete/add drop shadow

activate vertical rectangle2 layer/copy/paste paper of choice
go to vertical rectangle2 layer/ invert/go to paper layer and
delete/add drop shadow

activate lg rectangle layer/copy/paste paper of choice/go to
lg rectangle layer/ invert/go to paper layer and delete/add
drop shadow/copy/paste tube/resize to fit/blend/screen

activate horizontal rectangle layer/copy/paste paper of choice
go to horizontal rectangle layer/ invert/go to paper layer and
delete/add drop shadow/copy/paste element of choce/resize to fit
add drop shadow

activate vertical rectangle3 layer/copy/paste paper of choice
go to vertical rectangle3 layer/ invert/go to paper layer and
delete/add drop shadow

activate both circle dots and color to match your tag/add drop
shadow

activate circle layer/copy/paste paper or color of choice
go to circle layer/ invert/go to paper layer and delete/add
drop shadow

activate top circle layer/copy/paste paper or color of choice
go to top circle layer/ invert/go to paper layer and delete/
keep activated/copy/paste your tube/place where you want it/resize
if needed/circle layer/invert/tube layer/delete/add drop shadow

now add any other element you wish to use to make your tag your
own/add drop shadow on each element/resize your tag

I also added some water drops on new raster layer

add your watermark and copyright credits/give it a slight gradient
glow ...now give your tag to a friend.

You're done...thank you for trying my tutorial
please send me a copy so that I can show case it on my blog
send to....riggsbee53@gmail.com

PTU Hungry Hills and Amy Brown

Devil In Her Heart

This tutorial was written on June 4,2012.
Any similarities to another tutorial is purely coincidental.
All my tutorial are register with My Free Copyright.
Please do not claim as your own.
This tutorial writer assumes you have a working
knowledge of using Paint Shop Pro.
This tutorial was done in Paint Shop Pro9,
but can be adapted to use in other
Paint Shop Pro versions.


SUPPLIES NEEDED

Tube of choice: I'm using the awesome work of Amy Brown.
Please do not use unless you have a license to do so.
You can get her tubes HERE

Scrapkit of Choice: I am using PTU Amy Brown Tube/Bundle #72 
from Hungry Hills...You can purchase it HERE...Thank you Ali

Template of choice:none

Mask of Choice: I am using Monti Blinds Mask #1
You can download it HERE....Thank you Monti

Filters used:Eye Candy 4000 gradient glow - HERE

Font for Name is Arkona -Medium...HERE
Copy write is always done in Pixelette ...HERE


Drop shadow use through out H-2/V-2/O-50/B-5.00

Please leave a thank you when you downloading for supplies.


my tag is just a guide...please use your imagination
and make the tag your own you do not have to
use any of the supplies I used.


     LET'S BEGIN

Making the cluster frame

I cannot supply the cluster frame, so you will be making
your own.First pick any frame from the kit.I chose frame1
ctrl-D to copy/close original/resize by 80%/copy/paste
vine/resize/on frame layer/magic wand/click inside frame
selections/invert/go to vine layer and delete/duplicate
place copy below frame/add drop shadow to vine below frame

copy/paste/capture angel/resize to fit/duplicate and close
copy/paste bow1/resize/raster deform tool/angel your bow
so that the edge of the bow is past the frame/open the
duplicated angle and place on top of the bow/now take your
eraser tool and erase any of the string that's in front of
the bow/also erase any that's over top of the ribbon
copy/paste cherubs/resize to your liking/place on right hand
side near the bottom part of the frame/sharpen if needed
and add drop shadows to all/merge visible and copy/paste as
a new image/your cluster is complete/save as png.


now back to your original cluster/choose paper of choice/copy
paste and put underneath frame layer/go to mask of choice
with these setting and click ok


copy/paste your cluster frame/position it on top of mask
copy/paste doodle of choice/duplicate 3x/place behind the
cluster frame where you would want them/close your mask
and frame/merge visible the doodles/add drop shadow

with your doodles and mask close/magic wand/click inside
cluster frame/selections/modify/expand by eight/copy/paste
paper of choice/go to frame layer/invert/go to paper layer
and delete/keep activated/copy/paste tube of choice/resize
by 150%/duplicate/place duplicated layer underneath frame
and close original tube layer/on duplicate layer /delete
open original layer and erase any excess tube around the frame
you want her head on top of the frame and the rest underneath
add drop shadow to duplicate tube/ add your word art/resize
to fit/duplicate/merge down/add drop shadow

add your watermark and copyright credits/give it a slight gradient
glow ...now give your tag to a friend.

You're done...thank you for trying my tutorial
please send me a copy so that I can show case it on my blog
send to....riggsbee53@gmail.com

6/3/12

PTU SWA and Sonia Roji

This tutorial was written on June 3,2012.
Any similarities to another tutorial is purely coincidental.
All my tutorial are register with My Free Copyright.
Please do not claim as your own.
This tutorial writer assumes you have a working
knowledge of using Paint Shop Pro.
This tutorial was done in Paint Shop Pro9,
but can be adapted to use in other
Paint Shop Pro versions.


SUPPLIES NEEDED

Tube of choice: I'm using the awesome work of Sonia Roji.
Please do not use unless you have a license to do so.

Scrapkit of Choice: I am using Scraps With Attitude PTU Scrap kit
Called Play Toy...You can purchase it HERE...Thank you Missy

Template of choice:I am using Bright's  Kreations Template #9
You can download it HERE...Thank you Bright

Mask of Choice: I am using Yez Mask #46
You can download it HERE....Thank you Yez

Filters used:Eye Candy 4000 gradient glow - HERE
Xero- Porcelain...HERE

Font for Name is Monika...HERE
Copy write is always done in Pixelette ...HERE

Drop shadow use through out H-2/V-2/O-50/B-5.00

Please leave a thank you when you downloading for supplies.

my tag is just a guide...please use your imagination
and make the tag your own you do not have to
use any of the supplies I used.


     LET'S BEGIN

Open up Template and ShiftD and close original...delete
copyright layer/close all layers/choose paper of choice
copy/paste and put underneath background layer/go to mask
of choice with these setting 


and click ok/delete background
layer/add drop shadow

On the following raster layers follow these directions...

activate layer 19/copy/paste paper of choice/go to layer 19
invert/go to paper layer and delete/adjust/noise with these setting


merge down/add drop shadow

activate layer 20/copy/paste paper of choice/go to layer 20
invert/go to paper layer and delete/merge down

activate layer 5/copy/paste paper of choice/go to layer 5
invert/go to paper layer and delete/adjust/noise with same
setting as above/merge down/add drop shadow

activate layer 3/copy/paste paper of choice/go to layer 3
invert/go to paper layer and delete/adjust/noise with same
setting as above/merge down/add drop shadow

activate layer 6/copy/paste paper of choice/go to layer 6
invert/go to paper layer and delete/merge down

activate layer 4/copy/paste paper of choice/go to layer 4
invert/go to paper layer and delete/merge down

leave layers 7,8,9,10,11,13,15 and 16 as is

activate layer 12/copy/paste paper of choice/go to layer 12
invert/go to paper layer and delete/merge down

activate layer 14/copy/paste paper of choice/go to layer 14
invert/go to paper layer and delete/merge down

activate layer 17/copy/paste paper of choice/go to layer 17
invert/go to paper layer and delete/adjust/noise with same
setting as above/merge down/add drop shadow

leave layer 17 as is/color rabbit 1 and 2 to match your tag
change the wordart to one in the kit/add drop shadow

activate layer 2/copy/paste paper of choice/go to layer 2
invert/go to paper layer and delete/adjust/noise with same
setting as above/merge down/add drop shadow

activate layer 1/copy/paste/tube/resize to fit where you want
it/selections/invert on layer 1/delete on tube layer/lower opacity
on layer 1 to 60%/blend screen on your tube layer

copy/paste tube again/mirror/because I wanted my tube above the
four circle layers I duplicated the tube/place the bottom one
underneath the bottom rectangle/place the top one on top of the
rectangle/take your eraser tool and erase the excess that's over
top/on top tube/effects/xero/porcelain with these setting


click ok/add drop shadow to the bottom tube.

now add any other element you wish to use to make your tag your
own/add drop shadow on each element/resize your tag

add your watermark and copyright credits/give it a slight gradient
glow ...now give your tag to a friend.

You're done...thank you for trying my tutorial
please send me a copy so that I can show case it on my blog
send to....riggsbee53@gmail.com

6/1/12

PTU SWA and Keith Garvey

This tutorial was written on May 31,2012.
Any similarities to another tutorial is purely coincidental.
All my tutorial are register with My Free Copyright.
Please do not claim as your own.
This tutorial writer assumes you have a working
knowledge of using Paint Shop Pro.
This tutorial was done in Paint Shop Pro9,
but can be adapted to use in other
Paint Shop Pro versions.

SUPPLIES NEEDED

Tube of choice: I'm using the awesome work of Keith Garvey.
Please do not use unless you have a license to do so.
You can get her tubes HERE

Scrapkit of Choice: I am using  PTU SWA Scrap kit
Called Garv-Sk8tr...You can purchase it HERE...Thank you Missy

Template of choice:I am using Addictive Pleasures Template #61
You can download it HERE...Thank you Tammi

Mask of Choice: I am using Melissa Creationz  -Mask # 16
You can download it HERE....Thank you Melissa

Filters used:Eye Candy 4000 gradient glow - HERE
Xero- Radiance...HERE

Font for Name is Organic Elements...HERE
Copy write is always done in Pixelette ...HERE


Drop shadow use through out H-2/V-2/O-50/B-5.00

Please leave a thank you when you downloading for supplies.


my tag is just a guide...please use your imagination
and make the tag your own you do not have to
use any of the supplies I used.


     LET'S BEGIN

Open up Template and ShiftD and close original...delete
copyright layer/close all layers/choose paper of choice
copy/paste and put underneath background layer/go to mask
of choice with these setting


and click ok/delete background
layer/duplicate/flip/duplicate/mirror/merge down each time
add drop shadow

On the following raster layers follow these directions...

activate square layer/copy/paste paper of choice/go to
square layer/invert/go to paper layer and delete/merge
down/add drop shadow

activate lg circle layer/copy/paste paper of choice/go to
lg circle layer/invert/go to paper layer and delete/merge
down/keep activated

copy/paste close up tube/place where whatever part you want
show/selection/invert on circle layer/delete on tube layer
blend/screen/add drop shadow

copy paste frame element/resize to fit circle layer/add
drop shadow to frame

activate strip layer/copy/paste paper of choice go to strip
layer/invert/go to paper layer and delete/merge down/add
drop shadow/move this layer to the right side of the frame

activate rectangle layer/copy/paste paper of choice/go to 
rectangle layer/invert/go to paper layer and delete/merge
down/go to raster deform tool and resize this layer so that
the rectangle does not cover her face(see my tag for reference)

activate sm circle layer/copy/paste paper of choice/go to sm
circle layer/invert/go to paper layer and delete/move this layer
to left side of frame

copy/paste/tube/resize to fit where you want it/xero/radiance
with these setting


click ok/add drop shadow

now add any other element you wish to use to make your tag your
own/add drop shadow on each element/resize your tag

add your watermark and copyright credits/give it a slight gradient
glow ...now give your tag to a friend.

You're done...thank you for trying my tutorial
please send me a copy so that I can show case it on my blog
send to....riggsbee53@gmail.com