Showing posts with label Gaetano DiFalco. Show all posts

9/4/14

CDO Rebel Dezigns and Gaetano DiFalco - Autumn Romance

Autumn Romance

This tutorial was written on September 4,2014. 
Any similarities to another tutorial is purely coincidental.
All my tutorial are register with My Free Copyright.
Please do not claim as your own.
This tutorial writer assumes you have a working
knowledge of using Paint Shop Pro.
This tutorial was done in Paint Shop Pro9,
but can be adapted to use in other
Paint Shop Pro versions.


SUPPLIES NEEDED
Animation Shop3 ....HERE

Animation of Choice: I am using Rebel Dezigns Animation pack 13 #38
you can download HERE .... Thank you Rene'

Tube of choice: I'm using the awesome work of Gaetano DiFalco.
Please do not use unless you have a license to do so.
He is no longer selling his tubes.Please use another tube/Thank you

Scrapkit of Choice: I am using PTU Rebel Dezigns Autumn Whispers
You can purchase it HERE ...Thanks Rene'

Template of choice:I am using Punky Butts Template #141
You can download it HERE...Thanks Punky

Mask of Choice: I am using Dees'Sign Depot Mask #8
You can download it HERE.... Thank You Dee

Filters used:Eye Candy 4000 gradient glow - HERE
Xero- Soft Mood and Radiance  - HERE

Font for Name is Impact
Copy write is always done in Pixelette  HERE

Drop shadow use through out H-2/V-2/O-60/B-6.00


Please leave a thank you when you downloading for supplies.

my tag is just a guide...please use your imagination
and make the tag your own you do not have to
use any of the supplies I used.

     LET'S BEGIN

Open up Template and Shift D and close original...delete
copyright layer/close all layers/copy/paste paper of
choice/resize to fit canvas/layers/load/save mask/find
your mask and set with these setting/click ok


On the following raster layers follow these directions...

On all frames choose a paper from the kit/change all
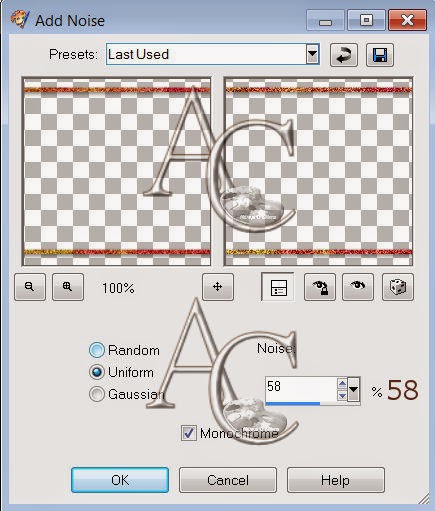
frames/adjust/add noise with these setting for all frames
add drop shadow

activate left square layer/copy/paste paper of choice
resize paper/selections/invert on square layer/delete on
paper layer/merge down/add drop shadow/see above for frame

activate right square layer/copy/paste paper of choice
resize paper/selections/invert on square layer/delete on
paper layer/merge down/add drop shadow/see above for frame

activate left rectangle layer/copy/paste paper of choice
resize paper/selections/invert on rectangle layer/delete
on paper layer/merge down/add drop shadow/see above for
frame

activate large circle layer/chose a color from paper #5/ on
material pallet/place that color in top box/null bottom box
selections/modify/smooth with these setting/click ok


add
color to circle layer/keep activated/copy/paste closeup tube
of choice/resize tube by 80%/delete on tube layer/effect
xero/radiance with these setting on tube


click ok/add drop
shadow/see above for frame

activate left circle layer/copy/paste paper of choice/resize
paper/selections/invert on circle layer/delete on paper layer
merge down/add drop shadow/see above for frame

activate right circle layer/copy/paste paper of choice/resize
paper/selections/invert on circle layer/delete on paper layer
merge down/keep activated/copy/paste closeup tube again/resize
by 90%/delete on tube layer/effects/xero/soft mood with these
settings


click ok/add drop shadow/see above for frame

activate right rectangle layer/copy/paste paper of choice/resize
paper/selections/invert on rectangle layer/delete on paper layer
merge down/add drop shadow/see above for frame

activate large rectangle layer/copy/paste paper of choice/resize
paper/selections/invert on rectangle layer/delete on paper layer
merge down/add drop shadow/see above for frame

On word art I colored the letters different colors from the papers
in the kit,mix it up to have fall colors/add drop shadow to frame
do the same with the name.

Copy/paste main tube of choice/place on left side of tag/resize
if needed/add some element to cover the bottom of tube/(see my
tag for reference)add drop shadow to all

now add any other elements you wish to use/resize if needed/have
fun creating to suit your taste/add drop shadow to each element
place where they will look best to you

add your watermark and copyright credits/give it a slight gradient
glow.....

To animate

close all layers except
right circle
left circle
large circle
left rectangle frame
left rectangle
right square frame
right square
left square frame
left square 
mask layer
Background

copy/merge/paste as new animation/duplicate for 25 frames
edit select all on animation/copy/into selected frame of tag
I placed leafs 4 x on bottom and 4x in the middle
see my tag for placement
animation/frame property/30%
go back to psp/close layers that are open
open layers that are closed
copy/merge/paste as new animation/duplicate for 25 frames
edit/select all/paste into selection/place on top
view animation/if satisfied/save as gif

now give your tag to a friend.

You're done...thank you for trying my tutorial
please send me a copy so that I can show case it on my blog
send to.... riggsbee53@gmail.com

Here's another tag using the same kit.

8/12/14

CDO Honored Scraps and Gaetano DiFalco - Autumn


Autumn

This tutorial was written on August 12,2014.
Any similarities to another tutorial is purely coincidental.
All my tutorial are register with My Free Copyright.
Please do not claim as your own.
This tutorial writer assumes you have a working
knowledge of using Paint Shop Pro.
This tutorial was done in Paint Shop Pro9,
but can be adapted to use in other
Paint Shop Pro versions.


SUPPLIES NEEDED

Tube of choice: I'm using the awesome work of Gaetano DiFalco.
Please do not use unless you have a license to do so.
DiFalco is no longer selling his tubes,so please use another.

Scrapkit of Choice: I am using PTU Honor Scraps Dark Cinnamon
You can purchase it HERE ...Thanks Patty

Word art of Choice: I am using Autumn Word Art by Deadly Desire
Creations...you can download it HERE  ....Thank you

Filters used:Eye Candy 4000 gradient glow - HERE

Font for Name is Redford BV
Copy write is always done in Pixelette  HERE

Drop shadow use through out H-2/V-2/O-60/B-6.85

Please leave a thank you when you downloading for supplies.

my tag is just a guide...please use your imagination
and make the tag your own you do not have to
use any of the supplies I used.

     LET'S BEGIN

Open up new raster layer 800x800

copy/paste element #22/resize if needed/place leaves as
the background/add a light drop shadow

copy/paste element #16/resize if needed/place clock on left
side of canvas/over top of leaves/add drop shadow

copy/paste element #26/resize if needed/duplicate/mirror/place
side by side and merge down/add drop shadow

copy/paste element #41/resize if needed/place on the right hand
side/outside of the fence/copy/add more leaves and place them
around the arch/add drop shadow

copy/paste elements #30,31 and 32/resize flowers/place flowers
at the bottom of the arch/alternating colors/once finish/merge
flowers down/add drop shadow

copy/paste tube of choice/resize if needed/place in the middle
of the fence/add drop shadow

add word art if you wish/add fat gradient glow/add drop shadow

add any other elements you wish to use/resize if needed/add
drop shadow

add your watermark and copyright credits/give it a slight gradient
glow.....now give your tag to a friend.

You're done...thank you for trying my tutorial
please send me a copy so that I can show case it on my blog
send to.... riggsbee53@gmail.com


5/14/14

PTU Honored Scraps and Gaetano Difalco - Rockitudeness

Rockitudeness

This tutorial was written on May 14,2013. 
Any similarities to another tutorial is purely coincidental.
All my tutorial are register with My Free Copyright. 
Please do not claim as your own.
This tutorial writer assumes you have a working 
knowledge of using Paint Shop Pro.
This tutorial was done in Paint Shop Pro9,
but can be adapted to use in other 
Paint Shop Pro versions.


SUPPLIES NEEDED

Tube of choice: I'm using the awesome work of Gaetano DiFalco.
DiFalco is no longer in the psp community
please use another tube

Scrapkit of Choice: I am using PTU Honored Scraps Rock It Roll It
You can purchase it HERE ...Thanks Patty

Template of choice:I am using Divine Intentionz Template #375
You can download it HERE...Thanks Missy

Mask of Choice: I am using Whips Mask #501403
I can not share this...please use another mask

Filters used:Eye Candy 4000 gradient glow - HERE
penta.com - Dot and Cross - HERE
Visual Manipulation -Dither - HERE

Font for Name is Dotumche
Copy write is always done in Pixelette  HERE

Drop shadow use through out H-2/V-2/O-60/B-6.85

Please leave a thank you when you downloading for supplies.

my tag is just a guide...please use your imagination 
and make the tag your own you do not have to 
use any of the supplies I used.

     LET'S BEGIN

Open up Template and ShiftD and close original...delete 
copyright layer/close all layers/copy/paste paper of choice
resize to fit canvas/layers/load/save mask/find your mask
and set with these setting/click ok


On the following raster layers follow these directions...

activate thin rectangle layer/copy/paste paper of choice/resize
paper/selections/invert on rectangle layer/delete on paper layer 
merge down/add drop shadow/recolor word art and dotted line to match
tag

activate double rectangle layer/copy/paste paper of choice/resize
paper/selections/invert on rectangle layer/delete on paper layer
merge down/effect/penta.com-dot and cross with these setting/click 
ok/add drop shadow


activate circle 1 layer/copy/paste paper of choice/resize paper
selections/invert on circle layer/delete on paper layer/merge down
add drop shadow

activate circle 2 layer/copy/paste paper of choice/resize paper
selections/invert on circle layer/delete on paper layer/merge down
add drop shadow

activate thin rectangle layer/copy/paste paper of choice/resize
paper/selections/invert on rectangle layer/delete on paper 
layer/merge down/add drop shadow

activate inside oval layer/copy/paste paper of choice/resize paper
selections/invert on oval layer/delete on paper/layer/merge down
recolor oval frame to match tag/add drop shadow

activate frame back layer/copy/paste paper of choice/resize paper
selections/invert on frame back layer/delete on paper/layer/merge 
down/leave frame as is/add drop shadow

copy/paste tube of choice/place where it would look best to you
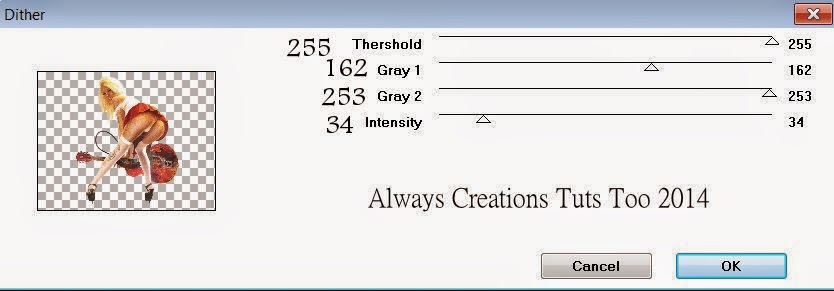
effects/visual manipulation/dither with these setting/click ok


lower opacity to 68 %/copy/paste tube of choice again/place on top of 
first tube/lower/opacity to 96/add drop shadow to bottom tube

add any other elements you wish to use/resize if needed/add drop 
shadow to each element/place where they will look best

add your watermark and copyright credits/give it a slight gradient 
glow.....now give your tag to a friend.

You're done...thank you for trying my tutorial
please send me a copy so that I can show case it on my blog

3/10/14

CDO BabyCakes Scraps and Gaetano Di Falco - Girls With Guitars

Girls With Guitars

This tutorial was written on March 10,2014. 
Any similarities to another tutorial is purely coincidental.
All my tutorial are register with My Free Copyright. 
Please do not claim as your own.
This tutorial writer assumes you have a working 
knowledge of using Paint Shop Pro.
This tutorial was done in Paint Shop Pro9,
but can be adapted to use in other 
Paint Shop Pro versions.


SUPPLIES NEEDED

Tube of choice: I'm using the awesome work of Gaetano DiFalco.
Please do not use unless you have a license to do so. 
Gaetano DiFalco no longer sells his tubes

Scrapkit of Choice: I am using PTU Baby Cakes Scraps IB Gaetano DiFalco 2-2
You can purchase it HERE ...Thanks Lynne-This kit is no longer available

Template of choice:I am using Additive Pleasures CM Template #3 Music
You can download it HERE...Thanks Tamie

Animation of Choice: I am using Scrappy Bit of Fun Animation #321 and #326
You can download it HERE.... Thank You Simone

Filters used:Eye Candy 4000 gradient glow - HERE

Font for Name is Huxtable
Copy write is always done in Pixelette  HERE

Drop shadow use through out H-2/V-2/O-60/B-6.85

Please leave a thank you when you downloading for supplies.

my tag is just a guide...please use your imagination 
and make the tag your own you do not have to 
use any of the supplies I used.


     LET'S BEGIN

Open up Template and Shift D and close original...delete 
copyright layer

On the following raster layers follow these directions...

activate mask layer/selections/float/defloat/invert on mask layer
copy/paste paper of choice/resize/delete on paper layer

keep glittered circle as is/activated circle layer/copy/paste paper 
of choice/resize paper/selections/invert on circle layer/delete on 
paper layer/merge down/keep activated/copy/paste closeup tube/resize
by 120%/centered within circle/add drop shadow to both layers and
tube

leave the following layers as is
music note layer/leave black rectangle layer/copy of black rectangle 
layer/small text layer/copy of small text layer/double glittered 
rectangle layer/black double rectangle layer/and both double heart 
layers/pink word art layer/add drop shadow to all/delete music note 
layer

copy/paste element # 11/resize/place over top closeup tube/lower 
opacity to 72%/add drop shadow

copy/paste main tube of choice/place on left side of tag/add drop 
shadow

add any other elements you wish to use/resize if needed/add drop 
shadow to each element/place where they will look best

copy/paste word art that is in the kit/resize by 60%/effects/eye 
candy 4000/gradient glow/with these settings/add drop shadow 

add your watermark and copyright credits/give it a slight gradient 
glow.....

to animate

close the following layers
name/copyright/all elements
main tube/pink word art/and
double hearts

copy/paste/merge the rest  of the layers and paste into animation shop
as anew animation/open up animation 321 and 326/on new animation duplicate
for 21 frames/copy/edit/select all on animation #326/resize by half/copy 
into new animation 8x/ four on each side on top of black rectangle frames

so the the animation can have a continuting flow/animation 321 has 16 frames
we need 21/edit/select none/click on frame one/activate/copy/go to frame 16
click and paste as a new frame for 17 frames/ do this for frame 2 -4 always
going back to last frame to paste until you have 20 frames/for frame 21
go to frame 16/click to activate and copy/go to frame 20/click and paste/you
should now have 21 frames/select all/copy/paste into selected frame/place
on black double rectangle/now go back and mirror animation/select all/copy
paste into select frame on the other side of first animation

now go back to psp and close those layers and open all the rest/copy/merge
paste as a new animation/duplicate for 21 frames/place on top of animated
tag/position so pink wordart is in bottom rectangle box

view animation/if satisfied/save as gif....now give your tag to a friend.

You're done...thank you for trying my tutorial
please send me a copy so that I can show case it on my blog


4/2/13

PTU Foxy's Designz and Gaetano DiFalco

Alice


This tutorial was written on April 2,2013. 

Any similarities to another tutorial is purely coincidental.
All my tutorial are register with My Free Copyright. 
Please do not claim as your own.
This tutorial writer assumes you have a working 
knowledge of using Paint Shop Pro.
This tutorial was done in Paint Shop Pro9,
but can be adapted to use in other 
Paint Shop Pro versions.


SUPPLIES NEEDED


Tube of choice: I'm using the awesome work of Gaetano DiFalco.

Please do not use unless you have a license to do so. 
You can get her tubes HERE


Scrapkit of Choice: I am using PTU Foxy's Designs Gaetano DiFalco IB_5-1

You can purchase it HERE ...Thanks Ann


Template of choice:I am using MilliePSPMadnessTemplate #214

You can download it HERE...Thanks Millie


Mask of Choice: I am using Insatiable Dreams mask #503

You can download it HERE...Thanks Cat


Filters used:Eye Candy 4000 gradient glow - HERE

Xero: radiance....HERE


Font for Name is Kelmscott

Copy write is always done in Pixelette  HERE


Dropshadow use through out H-2/V-2/O-50/B-5.00


Please leave a thank you when you downloading for supplies.


my tag is just a guide...please use your imagination 

and make the tag your own you do not have to 
use any of the supplies I used.


     LET'S BEGIN


Open up Template and ShiftD and close original...delete 

copyright layer/close all layers/copy/paste paper of choice
resize to fit canvas/layers/load/save mask/find your mask
and set with these setting/click ok/delete background


On the following raster layers follow these directions...


activate large circle layer/copy/paste paper of choice/resize

paper/selections/invert on large circle layer/delete on paper
layer/merge down/add drop shadow/copy/paste element of choice
resize to fit/add drop shadow


leave small circle1 and sm circle2 as is/copy/paste element of 

choice/resize to fit/add drop shadow to all


activate square1 layer/copy/paste paper of choice/resize paper

selections/invert on square1 layer/delete on paper layer/merge
down/add drop shadow/copy/paste element of choice/resize/place
in middle/add drop shadow


activate square2 layer/copy/paste paper of choice/resize paper

selections/invert on square2 layer/delete on paper layer/merge
down/copy/paste element of choice/resize if needed/place in
the middle of square/add drop shadow


activate strip1 layer/copy/paste paper of choice/resize paper

selections/invert on strip1 layer/delete on paper layer/merge
down/add drop shadow/copy/paste element of choice/resize/place
in the middle/add drop shadow


activate strip2 layer/copy/paste paper of choice/resize paper

selections/invert on strip2 layer/delete on paper layer/merge
down/add drop shadow/copy/paste element of choice/resize/place
in the middle/add drop shadow


activate square layer/copy/paste paper of choice/resize paper

selections/invert on square layer/delete on paper layer/merge
down/add drop shadow/keep activated/copy/paste closeup tube of 
choice/resize to fit/delete on tube layer/effects/xero/radiance
with these settings/click ok/add drop shadow


copy/paste word art/add drop shadow


copy/paste your tube of choice/resize if needed/place on your 

tag where it will look best/add drop shadow


add any other elements you wish to use/resize/add drop shadow

to each/place where they will look best


add your watermark and copyright credits/give it a slight 

gradient glow ...now give your tag to a friend.


You're done...thank you for trying my tutorial

please send me a copy so that I can show case it on my blog