4/29/13

PTU Diva Designz

Attitude Look Good On Me

This tutorial was written on April 29,2013. 
Any similarities to another tutorial is purely coincidental.
All my tutorial are register with My Free Copyright. 
Please do not claim as your own.
This tutorial writer assumes you have a working 
knowledge of using Paint Shop Pro.
This tutorial was done in Paint Shop Pro9,
but can be adapted to use in other 
Paint Shop Pro versions.


SUPPLIES NEEDED

Tube of choice: I'm using the awesome work of Diva Designz
Please do not use unless you have a permission to do so. 
You can get her tubes HERE

Scrapkit of Choice: I am using PTU Diva Designz Black and White Kit
You can purchase it HERE ...Thanks Mandy

Template of choice:I am using AquaRebel315 Dsnz Template #81
You can download HERE........Thanks Aqua

Mask of Choice: I am using Insatiable Dreams mask #2
You can download it Here...Thanks Cat

Filters used:Eye Candy 4000 gradient glow - HERE

Font for Name is Late Night
Copy write is always done in Pixelette  HERE


Dropshadow use through out H-2/V-2/O-50/B-5.00

Please leave a thank you when you downloading for supplies.


my tag is just a guide...please use your imagination 
and make the tag your own you do not have to 
use any of the supplies I used.


     LET'S BEGIN

Open up Template and ShiftD and close original...delete copyright
layer/close all layers/copy/paste paper of choice/resize to fit 
canvas/layers/load/save mask/find your mask and set with these 
setting/click ok/delete background


On the following raster layers follow these directions...

leave glittered square1 and square2 as is/activate square1 layer
copy/paste paper of choice/resize paper/selections/invert on 
square1 layer/delete on paper layer/merge down/add drop shadow

activate square2 layer/copy/paste paper of choice/resize paper
selections/invert on square2 layer/delete on paper layer/merge 
down/add drop shadow/change color on dotted circle1 and circle2 
to white

leave rectangle1 and rectangle2 layer as is/copy/paste element
of choice/resize/place on end of rectangle1/duplicate/flip
mirror/place on end of rectangle2/add drop shadow to both

change glittered circle1 to white/glittered circle2 to black
add drop shadow to white circle/change color on circle layer
to color from one of the elements/add drop shadow

leave square 1.square2 and square3 as is/also leave all three
square frames as is/add drop shadow to frames

copy/paste your tube of choice/resize if needed/place your 
tag where it will look best/add drop shadow

add any other elements you wish to use/resize/add drop shadow
to each/place where they will look best

change color on attitude from wordart to match the tag/add
drop shadow

add your watermark and copyright credits/give it a slight 
gradient glow ...now give your tag to a friend.

You're done...thank you for trying my tutorial
please send me a copy so that I can show case it on my blog
send to.... riggsbee53@gmail.com

PTU LadyHawwk Designs and Markia

Carnation

This tutorial was written on April 28,2013. 
Any similarities to another tutorial is purely coincidental.
All my tutorial are register with My Free Copyright. 
Please do not claim as your own.
This tutorial writer assumes you have a working 
knowledge of using Paint Shop Pro.
This tutorial was done in Paint Shop Pro9,
but can be adapted to use in other 
Paint Shop Pro versions.


SUPPLIES NEEDED

Tube of choice: I'm using the awesome work of Marika,(3 tubes)
Please do not use unless you have a license to do so. 
You can get her tubes HERE

Scrapkit of Choice: I am using PTU LadyHawwk Designs Flower Kit Carnation
You can purchase it HERE ...Thanks Cathy

Template of choice:I am using Dezigns by Ali Template #81
Ali is not longer on the web,please use another...Thanks Ali

Mask of Choice: I am using Designs by Vaybs mask #72
You can download it Here...Thanks Vaybs

Filters used:Eye Candy 4000 gradient glow - HERE

Font for Name is Rechtman
Copy write is always done in Pixelette  HERE


Dropshadow use through out H-2/V-2/O-50/B-5.00

Please leave a thank you when you downloading for supplies.


my tag is just a guide...please use your imagination 
and make the tag your own you do not have to 
use any of the supplies I used.


     LET'S BEGIN

Open up Template and ShiftD and close original...delete 
copyright layer/close all layers/copy/paste paper of choice
resize to fit canvas/layers/load/save mask/find your mask
and set with these setting/click ok/delete background


On the following raster layers follow these directions...

activate circle1 layer/copy/paste paper of choice/resize
paper/selection/invert on circle1 layer/delete on paper
layer/merge down/add drop shadow/keep activated/copy/paste
closeup tube of choice/resize to fit/delete on tube
duplicate/on original layer/blend/overlay/place duplicate 
underneath original/add drop shadow/leave frame as is

activate circle2 layer/copy/paste paper of choice/resize
paper/selection/invert on circle2 layer/delete on paper
layer/merge down/add drop shadow/keep activated/copy/paste
closeup tube of choice/resize to fit/delete on tube
duplicate/on original layer/blend/hard light/place duplicate 
underneath original/add drop shadow/leave frame as is

activate circle3 layer/copy/paste paper of choice/resize
paper/selection/invert on circle3 layer/delete on paper
layer/merge down/add drop shadow/keep activated/copy/paste
closeup tube of choice/resize to fit/delete on tube
duplicate/on original layer/blend/soft light/place duplicate 
underneath original/add drop shadow/leave frame as is

activate square1 layer/copy/paste paper of choice/resize
paper/selection/invert on square1 layer/delete on paper
layer/merge down/add drop shadow/copy/paste element of choice
resize/place near top/add drop shadow

delete the second square/and chrome dots/copy/paste word art
add drop shadow

copy/paste your tube of choice/resize if needed/place your 
tag where it will look best/add drop shadow

add any other elements you wish to use/resize/add drop shadow
to each/place where they will look best

add your watermark and copyright credits/give it a slight 
gradient glow ...now give your tag to a friend.

You're done...thank you for trying my tutorial
please send me a copy so that I can show case it on my blog
send to.... riggsbee53@gmail.com

4/28/13

PTU Foxy's Designz and Jamie Kid/Anna Marine

Plumeria

This tutorial was written on April 28,2013. 
Any similarities to another tutorial is purely coincidental.
All my tutorial are register with My Free Copyright. 
Please do not claim as your own.
This tutorial writer assumes you have a working 
knowledge of using Paint Shop Pro.
This tutorial was done in Paint Shop Pro9,
but can be adapted to use in other 
Paint Shop Pro versions.


SUPPLIES NEEDED

Tube of choice: I'm using the awesome work of Jamie Kidd.
Please do not use unless you have a license to do so. 
You can get his tubes HERE

Scrapkit of Choice: I am using PTU Foxy's Designz Flower Kit-Plumeria
... You can purchase it HERE ...Thank you Cat

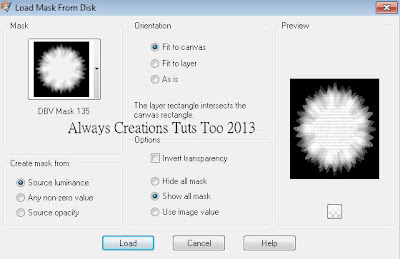
Mask of Choice: I am using Designs by Vabys Mask# 135
You can download it Here...Thanks Vabys

Filters used:Eye Candy 4000 gradient glow - HERE

Font for Name is Prime Script
Copy write is always done in Pixelette  HERE


Dropshadow use through out H-2/V-2/O-50/B-5.00

Please leave a thank you when you downloading for supplies.


my tag is just a guide...please use your imagination 
and make the tag your own you do not have to 
use any of the supplies I used.


     LET'S BEGIN

Open up Template and ShiftD and close original...delete 
copyright layer/close all layers/copy/paste paper of choice
resize to fit canvas/layers/load/save mask/find your mask
and set with these setting/click ok/delete background


On the following raster layers follow these directions...

To begin you need to make a cluster frame,because I can not 
supply the one I made/copy/paste frame of choice/now choose
any elements you want to make the frame/be creative/every 
tag should be different,but yet simiral to mine/add drop
shadow to each element

once your cluster is made/copy/paste either a paper or a 
element for inside the frame/if you use a paper/copy/paste
paper/resize paper/selections/modtify/expand by 8/invert 
on frame layer/delete on paper layer/place underneath frame
add drop shadow to frame

keep this layer activated/copy/paste tube of choice/resize
if needed/place where it will look best/add drop shadow

add any other elements you want to use/add drop shadow to 
each element/add your main tube/resize if needed/add drop 
shadow/place where it will look best

add your watermark and copyright credits/give it a slight 
gradient glow ...now give your tag to a friend.

You're done...thank you for trying my tutorial
please send me a copy so that I can show case it on my blog
send to.... riggsbee53@gmail.com


4/26/13

Amy Marie and Alex Prihodko


Butterfly Beauty

This tutorial was written on April 20,2013.
Any similarities to another tutorial is purely coincidental.
All my tutorial are register with My Free Copyright.
Please do not claim as your own.
This tutorial writer assumes you have a working
knowledge of using Paint Shop Pro.
This tutorial was done in Paint Shop Pro9,
but can be adapted to use in other
Paint Shop Pro versions.


SUPPLIES NEEDED

Tube of choice: I'm using the awesome work of Alex Prihodko .
Please do not use unless you have a license to do so.
You can get his tubes HERE

Scrapkit of Choice: I am using PTU Amy Marie Aquamarine Butterfly
You can purchase it HERE ...Thanks Amy Marie

Template of choice:I am using Punky Butts Template #127
You can download it HERE...Thanks Punky

Mask of Choice: I am using Insatiable Dreams mask #298
You can download it Here...Thanks Cat

Filters used:Eye Candy 4000 gradient glow - HERE
Xero: Radiance and Xero: Porcelaid - HERE

Animation shop 3.0 or some other animation program....HERE

Animation of Choice: I am using Animation by Scrappy Bit of Fun #294
You can download HERE.....Thank You Simone
                                                                                                       
Font for Name is Majestic
Copy write is always done in Pixelette  HERE


Drop shadow use through out H-2/V-2/O-50/B-5.00

Please leave a thank you when you downloading for supplies.


my tag is just a guide...please use your imagination
and make the tag your own you do not have to
use any of the supplies I used.


     LET'S BEGIN

Open up Template and ShiftD and close original...delete
copyright layer/close all layers/copy/paste paper of choice
resize to fit canvas/layers/load/save mask/find your mask
and set with these setting/click ok/delete background/lower
opacity to 50%


On the following raster layers follow these directions...

activate strip blue layer/copy/paste paper of choice/resize
paper/selection/invert on strip blue layer/delete on paper
layer/merge down/add drop shadow

activate strip black layer/copy/paste paper of choice/resize
paper/selection/invert on strip black layer/delete on paper
layer/merge down/add drop shadow

activate circle left layer/copy/paste paper of choice/resize
paper/selection/invert on circle left layer/delete on paper
layer/merge down

activate circle left frame/choose a dark color from one of
the papers/selections/modify/smooth with these setting/click
ok/fill frame with the dark color/add drop shadow to frame

activate circle right layer/copy/paste paper of choice/resize
paper/selection/invert on circle right layer/delete on paper
layer/merge down

activate circle right frame/choose a dark color from one of
the papers/selections/modify/smooth with these setting/click
ok/fill frame with the dark color/selections/none/add drop
shadow to frame


activate bottom rectangle layer/choose two color from your papers
in the kit/go to color pallet and select gradient/go to gradient
editor with these setting/click close/then yes/click ok on material
properties/it should look like this


Activate bottom rectangle frame/choose a light color from paper in
kit/selections/modify/smooth with the same setting as before/click
ok/fill frame with color/selections/none/add drop shadow to frame

activate top rectangle layer/choose same colors from your papers
in the kit/go to color pallet and select gradient/go to gradient
editor with these setting/click close/then yes/click ok on material
properties/it should look like this


Activate top rectangle frame/choose a light color from paper in kit
selections/modify/smooth with the same setting as before/click
ok/fill frame with color/selections/none/add drop shadow to frame

activate large circle layer/copy/paste paper of choice/resize paper
selection/invert on large circle layer/delete on paper layer/keep
activated/copy/paste tube of choice/resize so that most of her face
is in the circle/delete on tube layer/erase all excess tube/xero
radiance with these setting/add drop shadow


Activate strip/choose a same dark color from paper in kit
selections/modify/smooth with the same setting as before/click
ok/fill strip with color/selections/none/add drop shadow to strip
color diamond dots  and circle frame the same color/add drop shadow
to both

activate top sm circle layer/copy/paste paper of choice/resize
paper/selection/invert on top sm circle layer/delete on paper
layer/merge down/color sm circle frame with light color/color top
circle frame with dark color/add drop shadow to top frame and light
frame

activate bottom sm circle layer/copy/paste paper of choice/resize
paper/selection/invert on bottom sm circle layer/delete on paper
layer/merge down/color sm circle frame with light color/color top
circle frame with dark color/add drop shadow to top frame and light
frame

activate large square layer/copy/paste paper of choice/resize paper
selection/invert on large square layer/delete on paper layer/keep
activated/copy/paste tube of choice/resize so that her face and
shoulder is in the square/delete on tube layer/erase all excess tube
xero/porcelaid with these setting/add drop shadow


add any other elements you wish to use/resize/add drop shadow
to each/place where they will look best

add your watermark and copyright credits/give it a slight
gradient glow ...put a friend's name on your tag


now to animate

copy/merge and take to animation shop/edit/duplicate tag 21 times
find your animation/edit/select all on animation/edit select all
on your tag/copy/paste animation into your tag/place animation
where you want it near the bottom/
now on your animation /make sure you edit select all/animation
reverse framee/edit/select all/copy/paste into your tag near
the top/click view animation to make sure it's working properly
save as gif and give to your friend

You're done...thank you for trying my tutorial
please send me a copy so that I can show case it on my blog


4/19/13

PTU Schnegge Scraps and Caron Vinson

Forget Me Not
This tutorial was written on April 18,2013.
Any similarities to another tutorial is purely coincidental.
All my tutorial are register with My Free Copyright.
Please do not claim as your own.
This tutorial writer assumes you have a working
knowledge of using Paint Shop Pro,and it's componets.
This tutorial was done in Paint Shop Pro9,
but can be adapted to use in other
Paint Shop Pro versions.

SUPPLIES NEEDED
Tube of choice: I'm using the awesome work of Marika.
Please do not use unless you have a license to do so.
You can get her tubes HERE

Scrapkit of Choice: I am using PTU Schnegge Flower kit-Forget me Not
You can purchase it HERE ...Thanks Angela

Template of choice:I am using Denz Designz Template #118
You can download it HERE ...Thanks Denz

Filters used:Eye Candy 4000 gradient glow - HERE

Font for Name is Prime Script
Copy write is always done in Pixelette HERE

Dropshadow use through out H-2/V-2/O-50/B-5.00

Please leave a thank you when you downloading for supplies.
my tag is just a guide...please use your imagination
and make the tag your own you do not have to
use any of the supplies I used.

LET'S BEGIN

Open up Template and ShiftD and close original...delete
copyright layer/close all layers/chose two colors from
the papers in the kit/add colors to material pallet
recolor background layer/you will use these
two colors threw out directions

On the following raster layers follow these directions...

activate main rectangle layer/choose a color from one of the
papers/recolor main rectangle/add drop shadow

activate small rectangle layer/choose another color from one
of the papers/recolor small rectangle/now click inside rectangle
copy/paste paper you chose color from/resize paper/selections
invert on rectangle layer/delete on paper layer/merge down/add
drop shadow

activate dotted lines 1 and 2/recolor with first color

activate bottom circle layer/choose first color from one of the
papers/recolor bottom circle/now click inside circle/copy/paste
paper you chose color from/resize paper/selections/invert on
circle layer/delete on paper layer/merge down/add drop shadow

activate top circle layer/choose first color from one of the
papers/recolor top circle/now click inside circle/copy/paste
paper you chose color from/resize paper/selections/invert on
circle layer/delete on paper layer/merge down/add drop shadow

activate left strip layer/recolor with second color/add drop
shadow/copy/paste word art/add drop shadow

copy/paste your tube of choice/resize if needed/place your
tag where it will look best/add drop shadow

add any elements you wish to use/resize/add drop shadow
to each/place where they will look best

add your watermark and copyright credits/give it a slight
gradient glow ...now give your tag to a friend.

You're done...thank you for trying my tutorial
please send me a copy so that I can show case it on my blog


4/16/13

PTU Gina King and Foxy's Designz

Beauty

This tutorial was written on April 11, 2013.Any similarities  
to another tutorial is purely coincidental.
All my tutorial are register with My Free Copyright. 
Please do not claim as your own.
This tutorial writer assumes you have a working 
knowledge of using Paint Shop Pro.
This tutorial was done in Paint Shop Pro9,but 
can be adapted to use in other Paint Shop Pro versions.


SUPPLIES NEEDED

Tube of Choice:I'm using the amazing work of Gina King
You can not use without the proper license number. You can
purchase HERE

Scrapkit of Choice: I am using Foxy's Designz_Gina King IB-2-2
You can purchase it HERE....Thank you Foxy

Mask of Choice: I am using Insatiable Dreams mask #5
You can download it HERE....Thank you Cat

Filters Used: Eye Candy 4000 gradient glow - HERE

Font for name is New Romantics
copy write is always done in Pixelette ... 
Get them HERE

Drop shadow use through out H-2/V-2/O-65/B-6.00

Please leave a thank you when you downloading for supplies.


my tag is just a guide...please use your imagination and make 
the tag your own
you do not have to use any of the supplies I used.

With a three piece set,the avatar,forum tag and signature tag looks alike.
please do not take the signature tag and try to stretch or shrink it. 
You must make each tag separate. 


     LET'S BEGIN


Signature Tag 

Open up frame 1 from kit/shift/D/close original/resize canvas 888 x 920
Close frame layer/copy/paste paper of choice/resize to fit canvas
place underneath frame layer/layers/load/save mask/locate your mask
copy with these setting/click ok


copy/paste first element of choice/resize to fit/duplicate and mirror
add drop shadow to both/copy/paste 2nd element of choice/resize to
fit/duplicate and mirror/add drop shadow to both/copy/paste 3rd
element of choice/resize to fit/duplicate and mirror/add drop shadow
to both

open frame layer/resize frame by 140%/magic wand/click inside/copy
paste paper of choice/selections/invert on frame layer/delete on
paper layer/ place paper underneath frame/keep activated/copy/paste
tube of choice/ resize to have a closeup shot/delete on tube/add
drop shadow to frame and tube

using your font of choice write out beauty and place on tag/resize 
if needed and add drop shadow

now add the rest of your elements where you want them/make the tag 
your own/Have fun with it/make sure you add a drop shadow to each 
element.

Forum Tag


Open up a new raster 600 x 200/duplicate the exact layers as the tag
please do not resize the tag/re sizing will only blur the tag/you need 
to make from the beginning

Avatar


open new raster layer/170 x 170/copy/paste same paper as used in both 
tags/copy/paste frame/resize to fit/copy/paste tube/resize to fit

add your watermark and copyright credits to all three tags...
give your forum set to a friend

You're done...thank you for trying my tutorial
please send me a copy so that I can show case it on my blog
riggsbee53@gmail.com

4/12/13

PTU Amy Marie and Alex Prihodko

Butterfly Spring

This tutorial was written on April 12,2013. 
Any similarities to another tutorial is purely coincidental.
All my tutorial are register with My Free Copyright. 
Please do not claim as your own.
This tutorial writer assumes you have a working 
knowledge of using Paint Shop Pro.
This tutorial was done in Paint Shop Pro9,
but can be adapted to use in other 
Paint Shop Pro versions.


SUPPLIES NEEDED

Tube of choice: I'm using the awesome work of Alex Prihodko.
Please do not use unless you have a license to do so. 
You can get her tubes HERE

Scrapkit of Choice: I am using PTU Amy Marie's Scraps Spring
Butterfly....You can purchase it HERE ...Thanks Amy

Template of choice:I am using Toxic Desirez Template #171
You can download it HERE...Thanks Kristin

Mask of Choice: I am using  Weescotslass Creations mask # 219
You can download it Here...Thanks Chelle

Filters used:Eye Candy 4000 gradient glow - HERE

Font for Name is Van der Velde Script
Copy write is always done in Pixelette  HERE


Dropshadow use through out H-2/V-2/O-50/B-5.00

Please leave a thank you when you downloading for supplies.

my tag is just a guide...please use your imagination 
and make the tag your own you do not have to 
use any of the supplies I used.


     LET'S BEGIN

Open up Template and ShiftD and close original...delete 
copyright layer/close all layers/copy/paste paper of choice
resize to fit canvas/layers/load/save mask/find your mask
and set with these setting/click ok/delete background


On the following raster layers follow these directions...

activate black top circle layer/copy/paste paper of choice/resize
paper/selection/invert on black top circle layer/delete on paper
layer/merge down/add drop shadow/copy/paste element of choice
resize to fit/place where you can see part of it/add drop shadow

activate black bottom layer/copy/paste paper of choice/resize
paper/selection/invert on black bottom layer/delete on paper
layer/merge down/add drop shadow/copy/paste element of choice
resize/place where you can see part of it/add drop shadow

activate green top layer/copy/paste paper of choice/resize
paper/selection/invert on green top layer/delete on paper
layer/merge down/copy/paste element of choice/resize if 
needed/place where you can see part ofit/add drop shadow

activate green bottom layer/copy/paste paper of choice/resize
paper/selection/invert on green bottom layer/delete on paper
layer/merge down/add drop shadow/copy/paste element of choice
resize/place at top right/add drop shadow

activate purple top layer/copy/paste paper of choice/resize
paper/selection/invert on purple top layer/delete on paper
layer/merge down/add drop shadow/copy/paste element of choice
resize/place at top right/add drop shadow

activate purple bottom layer/copy/paste paper of choice/resize
paper/selection/invert on purple bottom layer/delete on paper
layer/merge down/add drop shadow/copy/paste element of choice
resize/place at top right/add drop shadow

activate green top square layer/copy/paste paper of choice/resize
paper/selection/invert on green top square layer/delete on paper
layer/merge down/add drop shadow/copy/paste element of choice
resize/place at top right/add drop shadow

activate green bottom square layer/copy/paste paper of choice/resize
paper/selection/invert on green bottom square layer/delete on paper
layer/merge down/add drop shadow/copy/paste element of choice
resize/place at top right/add drop shadow

activate rounded rectangle layer/copy/paste paper of choice
resize paper/selection/invert on rounded rectangle layer
delete on paper layer/merge down/add drop shadow/copy/paste 
element of choice/resize to/place on both sides/add drop 
shadow

activate large circle layer/copy/paste paper of choice/resize
paper/selection/invert on large circle layer/delete on paper
layer/merge down/keep activated/copy/paste tube of choice
resize by 70%/delete on tube layer/duplicate/leave original as
is/on duplicate layer/blend/hard light/lower opacity to 66%
place duplicate on top of original/add drop shadow

copy/paste your main tube of choice/resize if needed/place your 
tag where it will look best/add drop shadow

add any other elements you wish to use/resize/add drop shadow
to each/place where they will look best

add your watermark and copyright credits/give it a slight 
gradient glow ...now give your tag to a friend.

You're done...thank you for trying my tutorial
please send me a copy so that I can show case it on my blog
send to.... riggsbee53@gmail.com

PTU Amy Marie and Alex Prihodko

Spring Butterfly


This tutorial was written on April 12,2013. 

Any similarities to another tutorial is purely coincidental.
All my tutorial are register with My Free Copyright. 
Please do not claim as your own.
This tutorial writer assumes you have a working 
knowledge of using Paint Shop Pro.
This tutorial was done in Paint Shop Pro9,
but can be adapted to use in other 
Paint Shop Pro versions.


SUPPLIES NEEDED


Tube of choice: I'm using the awesome work of Alex Prihodko. 

This is an exclusive for Pics for Design. You can get her tubes HERE


Scrapkit of Choice: I am using PTU Amy Marie Spring Butterfly

You can purchase it HERE ...Thanks Amy


Cluster Frame of choice:I am using mine frame Spring Butterfly

You can download it HERE...Please do not share or claim as your own


Filters used:Eye Candy 4000 gradient glow - HERE


Font for Name is Neuropol

Copy write is always done in Pixelette  HERE


Drop shadow use through out H-2/V-2/O-50/B-5.00


Please leave a thank you when you downloading for supplies.


my tag is just a guide...please use your imagination 

and make the tag your own you do not have to 
use any of the supplies I used.


     LET'S BEGIN


you can either make your own cluster from the kit or use mine.


to make your own/first choose a frame/resize/add any element

you wish to use/resize each element/place your elements where 
you want to make them look best/add drop shadow


copy/paste cluster frame/resize if needed/click inside frame

copy/paste paper of choice/resize/selections/modify by 10 on 
frame layer/invert/delete on paper layer/place paper underneath
frame


keep activated/copy/paste tube of choice/resize if needed

delete on tube layer/you want just the face showing in the middle
duplicate tube/on orignal tube/blend/overlay/place duplicate tube
underneath original tube/blend/hard light/add drop shadow to frame 
and tubes 


copy/paste paper of choice/resize to fit canvas/place underneath

cluster frame


add any other elements you wish to use/resize if needed/add

drop shadow/resize tag


add your watermark and copyright credits/give it a slight 

gradient glow ...now give your tag to a friend.


You're done...thank you for trying my tutorial

please send me a copy so that I can show case it on my blog
send to.... riggsbee53@gmail.com


4/9/13

PTU LadyHawwk Designs and Caron Vinson

Here Comes Spring

This tutorial was written on April 8,2013. 
Any similarities to another tutorial is purely coincidental.
All my tutorial are register with My Free Copyright. 
Please do not claim as your own.
This tutorial writer assumes you have a working 
knowledge of using Paint Shop Pro.
This tutorial was done in Paint Shop Pro9,
but can be adapted to use in other 
Paint Shop Pro versions.


SUPPLIES NEEDED

Tube of choice: I'm using the awesome work of Caron Vinson.
Please do not use unless you have a license to do so. 
You can get her tubes HERE

Scrapkit of Choice: I am using PTU LadyHawwk Designs Spring 
Mini Kit... You can purchase it HERE ...Thank you Cat

Mask of Choice: I am using Insatiable Dreams Mask#2
You can download it Here...Thanks Cat

Filters used:Eye Candy 4000 gradient glow - HERE

Font for Name is Kingthings Petrock
Copy write is always done in Pixelette  HERE


Drop shadow use through out H-2/V-2/O-50/B-5.00

Please leave a thank you when you downloading for supplies.


my tag is just a guide...please use your imagination 
and make the tag your own you do not have to 
use any of the supplies I used.


     LET'S BEGIN

Open up Template and ShiftD and close original...delete 
copyright layer/close all layers/copy/paste paper of choice
resize to fit canvas/layers/load/save mask/find your mask
and set with these setting/click ok/delete background


On the following raster layers follow these directions...

To begin you need to make a cluster frame,because I can not 
supply the one I made/copy/paste frame of choice/now choose
any elements you want to make the frame/be creative/every 
tag should be different,but yet simiral to mine/add drop
shadow to each element

once your cluster is made/copy/paste either a paper or a 
element for inside the frame/if you use a paper/copy/paste
paper/resize paper/selections/modtify/expand by 8/invert 
on frame layer/delete on paper layer/place underneath frame
add drop shadow to frame

keep this layer activated/copy/paste tube of choice/resize
if needed/place where it will look best/add drop shadow

add your watermark and copyright credits/give it a slight 
gradient glow ...now give your tag to a friend.

You're done...thank you for trying my tutorial
please send me a copy so that I can show case it on my blog
send to.... riggsbee53@gmail.com


4/6/13

PTU Schnegge Scraps and BamBam

Diva OMG

This tutorial was written on April 5,2013. 
Any similarities to another tutorial is purely coincidental.
All my tutorial are register with My Free Copyright. 
Please do not claim as your own.
This tutorial writer assumes you have a working 
knowledge of using Paint Shop Pro.
This tutorial was done in Paint Shop Pro9,
but can be adapted to use in other 
Paint Shop Pro versions.


SUPPLIES NEEDED

Tube of choice: I'm using the awesome work of Bam Bam.
Please do not use unless you have a license to do so. 
You can get his tubes HERE

Scrapkit of Choice: I am using PTU Schnegge Scraps Bam Bam IB 27-3
You can purchase it HERE ...Thanks Angela

Template of choice:I am using Designs by Ali Template #115
Ali blog is no longer available,please use another...Thanks Ali

Mask of Choice: I am using Insatiable Dreams mask #536
You can download it HERE...Thanks Cat

Filters used:Eye Candy 4000 gradient glow - HERE

Font for Name is Prime Script 
Copy write is always done in Pixelette  HERE

Dropshadow use through out H-2/V-2/O-50/B-5.00

Please leave a thank you when you downloading for supplies.

my tag is just a guide...please use your imagination 
and make the tag your own you do not have to 
use any of the supplies I used.


     LET'S BEGIN

Open up Template and ShiftD and close original...delete 
copyright layer/close all layers/copy/paste paper of choice
resize to fit canvas/layers/load/save mask/find your mask
and set with these setting/click ok/delete background


On the following raster layers follow these directions...

activate large circle layer/copy/paste paper of choice/resize
paper/selection/invert on large circle layer/delete on paper
layer/merge down/keep activated/copy/paste tube of choice
resize if needed/delete on tube layer/position tube in the
middle of circle/duplicate/on original layer/blend/overlay
place duplicate beneath original and lower opacity to 60%
add drop shadow to all

activate circle frame layer/selections/modify/smooth with
these setting/change color to black/selections/none/copy
paste/circle frame of choice/resize to fit circle/add
drop shadow


activate three strip layer/copy/paste paper of choice/resize
paper/selection/invert on three strip layer/delete on paper
layer/merge down/copy/paste elements of choice/resize if 
needed/place near bottom of strip/I used three/add drop shadow
to each

activate sm circle layer/copy/paste paper of choice/resize
paper/selection/invert on sm circle layer/delete on paper
layer/merge down/add drop shadow/copy/paste element of choice
resize/place in the middle of circle/add drop shadow

activate sm circle frame layer/selections/modify/smooth with
these setting/change color to black/selections/none/copy
paste/circle frame of choice/resize to fit circle/add
drop shadow


copy/paste your tube of choice/resize if needed/place in front 
strip layer/duplicate/place behind strip layer/eraser tool/on
top layer/erase the bottom part in front of the strip layer
add drop shadow

add any other elements you wish to use/resize/add drop shadow
to each/place where they will look best

add your watermark and copyright credits/give it a slight 
gradient glow ...now give your tag to a friend.

You're done...thank you for trying my tutorial
please send me a copy so that I can show case it on my blog
send to.... riggsbee53@gmail.com

4/2/13

PTU Foxy's Designz and Gaetano DiFalco

Alice


This tutorial was written on April 2,2013. 

Any similarities to another tutorial is purely coincidental.
All my tutorial are register with My Free Copyright. 
Please do not claim as your own.
This tutorial writer assumes you have a working 
knowledge of using Paint Shop Pro.
This tutorial was done in Paint Shop Pro9,
but can be adapted to use in other 
Paint Shop Pro versions.


SUPPLIES NEEDED


Tube of choice: I'm using the awesome work of Gaetano DiFalco.

Please do not use unless you have a license to do so. 
You can get her tubes HERE


Scrapkit of Choice: I am using PTU Foxy's Designs Gaetano DiFalco IB_5-1

You can purchase it HERE ...Thanks Ann


Template of choice:I am using MilliePSPMadnessTemplate #214

You can download it HERE...Thanks Millie


Mask of Choice: I am using Insatiable Dreams mask #503

You can download it HERE...Thanks Cat


Filters used:Eye Candy 4000 gradient glow - HERE

Xero: radiance....HERE


Font for Name is Kelmscott

Copy write is always done in Pixelette  HERE


Dropshadow use through out H-2/V-2/O-50/B-5.00


Please leave a thank you when you downloading for supplies.


my tag is just a guide...please use your imagination 

and make the tag your own you do not have to 
use any of the supplies I used.


     LET'S BEGIN


Open up Template and ShiftD and close original...delete 

copyright layer/close all layers/copy/paste paper of choice
resize to fit canvas/layers/load/save mask/find your mask
and set with these setting/click ok/delete background


On the following raster layers follow these directions...


activate large circle layer/copy/paste paper of choice/resize

paper/selections/invert on large circle layer/delete on paper
layer/merge down/add drop shadow/copy/paste element of choice
resize to fit/add drop shadow


leave small circle1 and sm circle2 as is/copy/paste element of 

choice/resize to fit/add drop shadow to all


activate square1 layer/copy/paste paper of choice/resize paper

selections/invert on square1 layer/delete on paper layer/merge
down/add drop shadow/copy/paste element of choice/resize/place
in middle/add drop shadow


activate square2 layer/copy/paste paper of choice/resize paper

selections/invert on square2 layer/delete on paper layer/merge
down/copy/paste element of choice/resize if needed/place in
the middle of square/add drop shadow


activate strip1 layer/copy/paste paper of choice/resize paper

selections/invert on strip1 layer/delete on paper layer/merge
down/add drop shadow/copy/paste element of choice/resize/place
in the middle/add drop shadow


activate strip2 layer/copy/paste paper of choice/resize paper

selections/invert on strip2 layer/delete on paper layer/merge
down/add drop shadow/copy/paste element of choice/resize/place
in the middle/add drop shadow


activate square layer/copy/paste paper of choice/resize paper

selections/invert on square layer/delete on paper layer/merge
down/add drop shadow/keep activated/copy/paste closeup tube of 
choice/resize to fit/delete on tube layer/effects/xero/radiance
with these settings/click ok/add drop shadow


copy/paste word art/add drop shadow


copy/paste your tube of choice/resize if needed/place on your 

tag where it will look best/add drop shadow


add any other elements you wish to use/resize/add drop shadow

to each/place where they will look best


add your watermark and copyright credits/give it a slight 

gradient glow ...now give your tag to a friend.


You're done...thank you for trying my tutorial

please send me a copy so that I can show case it on my blog

PTU Scrap Schnegge and Cartoon Pink

Glamour Girl


This tutorial was written on April 2,2013. 

Any similarities to another tutorial is purely coincidental.
All my tutorial are register with My Free Copyright. 
Please do not claim as your own.
This tutorial writer assumes you have a working 
knowledge of using Paint Shop Pro.
This tutorial was done in Paint Shop Pro9
but can be adapted to use in other 
Paint Shop Pro versions.


SUPPLIES NEEDED


Tube of choice: I'm using the awesome work of Cartoon Pink.

Please do not use unless you have a license to do so. 
You can get her tubes HERE


Scrapkit of Choice: I am using PTU Scrap Schnegge IB_Amy Matthews 16-2

You can purchase it HERE ...Thanks Angela


Template of choice:I am using Template Additive Pleasures #40

You can download it HERE...Thanks Tamie


Mask of choice: I am using Insatiable Dreams Mask #37

You can download HERE...Thanks Cat


Filters used:Eye Candy 4000 gradient glow - HERE


Font for Name is Redressed

Copy write is always done in Pixelette  HERE

Drop shadow use through out H-2/V-2/O-50/B-5.00


Please leave a thank you when you downloading for supplies.


my tag is just a guide...please use your imagination 
and make the tag your own you do not have to 
use any of the supplies I used.

     LET'S BEGIN


Open up Template and ShiftD and close original...delete 

copyright layer/close all layers/copy/paste paper of choice
resize to fit canvas/layers/load/save mask/find your mask
and set with these setting/click ok


On the following raster layers follow these directions...


activate rectangle1 layer/copy/paste paper of choice/resize

paper/selections/invert on rectangle1 layer/delete on paper
layer/merge down/add drop shadow


activate strip layer/copy/paste paper of choice/resize paper

selections/invert on strip layer/delete on paper layer/merge
down/add drop shadow


activate rectangle layer/copy/paste paper of choice/resize

paper/selections/invert on rectangle layer/delete on paper
layer/merge down/add drop shadow


activate rectangle2 layer/copy/paste paper of choice/resize

paper/selections/invert on rectangle2 layer/delete on paper
layer/merge down/add drop shadow/copy/paste element of choice
resize/duplicate element and place on both sides of the circle
add drop shadow to elements


activate circle layer/copy/paste paper of choice/resize paper

selections/invert on circle layer/delete on paper layer/merge
down/keep activated/copy/paste close up tube of choice/delete
on tubed layer/duplicate/on original layer/blend/overlay/place
duplicate layer underneath original layer/add drop shadow to both


activate rectangle layer/copy/paste paper of choice/resize paper

paper/selections/invert on rectangle layer/delete on paper layer
merge down


remove word art layers/replace with word art that is supplied in 

kit/place both words on one line/resize to fit/duplicate twice
merging down each time/now duplicate again/place where previous
word art was/add drop shadow to both


activate circle2 layer/copy/paste paper of choice/resize paper

selections/invert on circle2 layer/delete on paper layer/merge
down/copy/paste element of choice/resize to fit/add drop shadow


copy/paste your main tube of choice/resize if needed/place where

it will look best/add drop shadow


add any other elements you wish to use/resize/add drop shadow

to each/place where they will look best


add your watermark and copyright credits/give it a slight 

gradient glow ...now give your tag to a friend.


You're done...thank you for trying my tutorial

please send me a copy so that I can show case it on my blog