11/27/13

PTU Honor Scraps and Alex Prihodko

Beauty of Nature

This tutorial was written on November 26,2013. 
Any similarities to another tutorial is purely coincidental.
All my tutorial are register with My Free Copyright. 
Please do not claim as your own.
This tutorial writer assumes you have a working 
knowledge of using Paint Shop Pro.
This tutorial was done in Paint Shop Pro9,
but can be adapted to use in other 
Paint Shop Pro versions.


SUPPLIES NEEDED

Tube of choice: I'm using the awesome work of Alex Prihodko.
Please do not use unless you have a license to do so. 
Get Them HERE

Scrapkit of Choice: I am using PTU Honored Scraps Harvest Blessings
You can purchase it HERE ...Thanks Patty

Template of choice:I am using Millie's PSP Madness Template #410
You can download it HERE...Thanks Millie

Mask of Choice: I am using Dees'Sign Depot Mask Fall#8
You can download it HERE.... Thank You Dee

Filters used:Eye Candy 4000 gradient glow - HERE

Font for Name is Segoe Print
Copy write is always done in Pixelette  HERE

Dropshadow use through out H-2/V-2/O-50/B-5.00

Please leave a thank you when you downloading for supplies.

my tag is just a guide...please use your imagination 
and make the tag your own you do not have to 
use any of the supplies I used.


     LET'S BEGIN

Open up Template and ShiftD and close original...delete copyright 
layer/close all layers/copy/paste paper of choice resize to fit 
canvas/layers/load/save mask/find your mask and set with these 
setting/click ok


On the following raster layers follow these directions...


activited rounded large square1 layer/copy/paste paper of choice/resize 
paper/selections/invert on square layer/delete on paper layer/merge 
down/add drop shadow 

activate rounded rectangle layer/copy/paste paper of choice/resize paper
selections/invert on rectangle layer/delete on paper layer/merge down
add drop shadow

activited rounded large square2 layer/copy/paste paper of choice/resize 
paper/selections/invert on square layer/delete on paper layer/merge 
down/add drop shadow

activited round large square1 layer/copy/paste paper of choice/resize 
paper/selections/invert on square layer/delete on paper layer/merge 
down/add drop shadow

activited round large square2 layer/copy/paste paper of choice/resize 
paper/selections/invert on square layer/delete on paper layer/merge 
down/add drop shadow

activate large circle layer/copy/paste paper of choice/resize paper
selections/invert on large circle layer/delete on paper layer/merge 
down/keep activate/copy/paste tube of choice/resize/place witin circle
so that top part of tube is shown/selections/invert on paper layer/delete
on tube layer/selections/none/duplicate tube/on original tube/blend/hard
light/place duplicate underneath original/add drop shadow to bottom tube

copy/paste oval frame #1/place on top of tubes/resize frame to fit circle
add drop shadow to frame

add any other elements you wish to use/resize/add drop shadow to each element
place where they will look best

copy/paste main tube of choice/resize to fit/place tube on left side of tag
position where you like/add drop shadow to tube

choose a word art from the kit/place near the top of tag/effects/ eye candy 4000
gradient glow/with these setting/click ok/add drop shadow


add your watermark and copyright credits/give it a slight gradient glow.....now 
give your tag to a friend.

You're done...thank you for trying my tutorial
please send me a copy so that I can show case it on my blog


PTU Hungry Hills Scraps and Elias Chatzoudis

Harvest

This tutorial was written on November 25, 2013. 
Any similarities to another tutorial is purely coincidental.
All my tutorial are register with My Free Copyright. 
Please do not claim as your own.
This tutorial writer assumes you have a working 
knowledge of using Paint Shop Pro.
This tutorial was done in Paint Shop Pro9,
but can be adapted to use in other 
Paint Shop Pro versions.


SUPPLIES NEEDED

Tube of choice: I'm using the awesome work of Elias Chatzoudis.
Please do not use unless you have a license to do so. 
Get Them HERE

Scrapkit of Choice: I am using PTU Hungry Hills Falling For You
You can purchase it HERE ...Thanks Alison

Template of choice:I am using Dees'Sign Depot Template Harvest
You can download it HERE...Thanks Dee

Mask of Choice: I am using Dees'Sign Depot Fall Mask #2
You can download it HERE.... Thank You Dee

Filters used:Eye Candy 4000 gradient glow - HERE

Font for Name is Andantino Script
Copy write is always done in Pixelette  HERE

Dropshadow use through out H-2/V-2/O-50/B-5.00

Please leave a thank you when you downloading for supplies.

my tag is just a guide...please use your imagination 
and make the tag your own you do not have to 
use any of the supplies I used.


     LET'S BEGIN

Open up Template and ShiftD and close original...delete 
copyright layer/close all layers/copy/paste paper of choice
resize to fit canvas/layers/load/save mask/find your mask
and set with these setting/click ok


On the following raster layers follow these directions...

activited bottom red square layer/copy/paste paper of choice/resize 
paper/selections/invert on red square layer/delete on paper layer
merge down/add drop shadow

activate yellow square layer/copy/paste paper of choice/resize paper
selections/invert on yellow square layer/delete on paper layer/merge 
down/add drop shadow

activited top red square layer/copy/paste paper of choice/resize 
paper/selections/invert on red square layer/delete on paper layer
merge down/add drop shadow

activited green square layer/copy/paste paper of choice/resize 
paper/selections/invert on green square layer/delete on paper layer
merge down/add drop shadow

leave all leave cluster and overlays as is/add drop shadow to both

activited right yellow circle layer/copy/paste paper of choice/resize 
paper/selections/invert on yellow circle layer/delete on paper layer
merge down/add drop shadow

activited top yellow circle layer/copy/paste paper of choice/resize 
paper/selections/invert on yellow circle layer/delete on paper layer
merge down/leave to white dotted circle as is/add slight down shadow

activited left red square layer/copy/paste paper of choice/resize 
paper/selections/invert on red square layer/delete on paper layer
merge down/add drop shadow

activited orange oval layer/copy/paste paper of choice/resize paper
selections/invert on orange oval layer/delete on paper layer/merge
merge down/leave white oval frame as is/click inside oval frame
selections/invert/copy/paste tube of choice/resize if needed/delete
on tube layer/duplicate 2x/place bottom tube underneath frame/on
top top/blend/hard light/place middle tube layer underneath top
tube layer/add drop shadow to tube that is under frame

activited small yellow circle layer/copy/paste paper of choice/resize 
paper/selections/invert on yellow circle layer/delete on paper layer
merge down/add drop shadow/leave small white dotted circle as is/add
a slight drop shadow

leave white squares as is/activate green squares/copy/paste paper of
choice/resize paper/selections/invert on green squares/delete on paper
layer/merge down/add drop shadow to both

add any other elements you wish to use/resize/add drop shadow to each 
element/place where they will look best

copy/paste main tube of choice/place where it will look best/add drop
shadow

add your watermark and copyright credits/give it a slight 
gradient glow.....now give your tag to a friend.

You're done...thank you for trying my tutorial
please send me a copy so that I can show case it on my blog


11/24/13

PTU Hungry Hills Scraps and Ismael Rac

Holiday Cheer

This tutorial was written on November 23,2013. 
Any similarities to another tutorial is purely coincidental.
All my tutorial are register with My Free Copyright. 
Please do not claim as your own.
This tutorial writer assumes you have a working 
knowledge of using Paint Shop Pro.
This tutorial was done in Paint Shop Pro9,
but can be adapted to use in other 
Paint Shop Pro versions.


SUPPLIES NEEDED

Tube of choice: I'm using the awesome work of Ismael Rac.
Please do not use unless you have a license to do so. 
Get Them HERE

Scrapkit of Choice: I am using PTU Hungry Hills Crimbo
You can purchase it HERE ...Thanks Alison

Template of choice:I am using Millie PSP Madness Misfit 
Christmas # 05...You can download it HERE...Thanks Millie

Mask of Choice: I am using Weescotslass  Creations Mask #362
You can download it HERE.... Thank You Chell

Filters used:Eye Candy 4000 gradient glow - HERE

Font for Name is Baltar
Copy write is always done in Pixelette  HERE

Dropshadow use through out H-2/V-2/O-50/B-5.00

Please leave a thank you when you downloading for supplies.

my tag is just a guide...please use your imagination 
and make the tag your own you do not have to 
use any of the supplies I used.


     LET'S BEGIN

Open up Template and ShiftD and close original...delete 
copyright layer/close all layers/copy/paste paper of choice
resize to fit canvas/layers/load/save mask/find your mask
and set with these setting/click ok


On the following raster layers follow these directions...

activate large circle layer/copy/paste paper of choice/resize
paper/selections/invert on large circle layer/delete on paper 
layer/merge down/selection/none/add drop shadow 

activited large rounded rectangle layer/copy/paste paper of 
choice/resize paper/selections/invert on rect layer/delete on 
paper layer/merge down/selections/none/add drop shadow 

activate large square layer/copy/paste paper of choice/resize 
paper/selections/invert on large square layer/delete on paper 
layer/merge down/selections/none/add drop shadow

activate medium circle layer/copy/paste paper of choice/resize 
paper/selections/invert on medium circle layer/delete on paper 
layer/merge down/selections/none/add drop shadow

activited medium rounded rectangle layer/copy/paste paper of 
choice/resize paper/selections/invert on rect layer/delete on 
paper layer/merge down/selections/none/add drop shadow 

activate small square layer/copy/paste paper of choice/resize 
paper/selections/invert on small square layer/delete on paper 
layer/merge down/selections/none/add drop shadow

activate small square2 layer/copy/paste paper of choice/resize 
paper/selections/invert on small square2 layer/delete on paper 
layer/merge down/selections/none/add drop shadow

activate 1st and 3rd small framed square/copy/paste paper of
choice/resize paper/selections/invert on framed squares/delete
on paper layers/merge down/selections/none/add drop shadow on frame

leave the 2nd and 4th framed squares and word at as is/add drop
shadow to all three

copy/paste tubes ofchoice/resize if needed/position where they will
look best/add drop shadow to each

add any other elements you wish to use/resize/add drop shadow 
to each element/place where they will look best

add your watermark and copyright credits/give it a slight 
gradient glow.....now give your tag to a friend.

You're done...thank you for trying my tutorial
please send me a copy so that I can show case it on my blog

11/20/13

PTU Honored Scraps and Medi Evil Creations

Spreading Christmas Cheers

This tutorial was written on November 20,2013. 
Any similarities to another tutorial is purely coincidental.
All my tutorial are register with My Free Copyright. 
Please do not claim as your own.
This tutorial writer assumes you have a working 
knowledge of using Paint Shop Pro.
This tutorial was done in Paint Shop Pro9,
but can be adapted to use in other 
Paint Shop Pro versions.


SUPPLIES NEEDED

Tube of choice: I'm using the awesome work of Medi Evil Creations.
Please do not use unless you have a license to do so. Get Them HERE

Scrapkit of Choice: I am using PTU Honored Scraps Christmas Wishes
You can purchase it HERE ...Thanks Patty

Template of choice:I am using Milliepspmadness Template #132
You can download it HERE...Thanks Millie

Mask of Choice: I am using Vix PSP Mask # 9
You can download it HERE.... Thank You Cat

Filters used:Eye Candy 4000 gradient glow - HERE

Font for Name is St Nicholas
Copy write is always done in Pixelette  HERE

Dropshadow use through out H-2/V-2/O-50/B-5.00

Please leave a thank you when you downloading for supplies.

my tag is just a guide...please use your imagination and make
the tag your own you do not have to use any of the supplies I 
used.

     LET'S BEGIN

Open up Template and ShiftD and close original...delete copyright
layer/close all layers/copy/paste paper of choice/resize to fit 
canvas/layers/load/save mask/find your mask/and set with these 
setting/click ok


On the following raster layers follow these directions...

activate large circle layer/copy/paste paper of choice/resize to 
fit/selections/invert on circle layer/delete on paper layer/merge 
down/add drop shadow to circle layer/

leave white circle layer as is/activate middle circle layer/copy
paste/paper of choice/resize to fit/selections/invert on circle layer
delete on paper layer/merge down/add drop shadow to circle layer

leave word art layer as is

activate 1st small circle layer/copy/paste paper of choice/resize to 
fit circle/selections/invert on circle layer/delete on paper layer/merge
down/add drop shadow to circle layer

activate 2nd and 3rd circles layer/copy/paste/paper of choice/resize to fit
selections/invert on circles layer/delete on paper layer/merge down/add drop 
shadow to circles layer

activate large rectangle/copy paste paper ofchoice/resize/selections/invert 
on rectangle/delete on paper layer/merge down/add drop shadow/delete small
rectangle and expand frame to fit large rectangle

add any other elements you wish to use/resize/add drop shadow to each element
place where they will look best

copy/and paste your main tubes/resize to your liking/place where you think
it will look the best/adddrop shadow

add your watermark and copyright credits/give it a slight gradient glow....
now give your tag to a friend.

You're done...thank you for trying my tutorial
please send me a copy so that I can show case it on my blog

PTU Honored Scraps and Xeracx

Who Needs Visa

This tutorial was written on November 20,2013. 
Any similarities to another tutorial is purely coincidental.
All my tutorial are register with My Free Copyright. 
Please do not claim as your own.
This tutorial writer assumes you have a working 
knowledge of using Paint Shop Pro.
This tutorial was done in Paint Shop Pro9,
but can be adapted to use in other 
Paint Shop Pro versions.


SUPPLIES NEEDED

Tube of choice: I'm using the awesome work of Xeracx.
Please do not use unless you have a license to do so. 
Get Them HERE

Scrapkit of Choice: I am using PTU Honored Scraps Christmas 
Treasures Tagger...You can purchase it HERE ...Thanks Patty

Template of choice:I am using A Kan-Dee Christmas Collab 2012 
Template #5....You can download it HERE.. or HERE .Thanks Kandi 
and Dee

Mask of Choice: I am using Insatiable Dreams Mask # 375
You can download it HERE.... Thank You Cat

Filters used:Eye Candy 4000 gradient glow - HERE

Font for Name is Santa's Sleigh
Copy write is always done in Pixelette  HERE

Dropshadow use through out H-2/V-2/O-50/B-5.00

Please leave a thank you when you downloading for supplies.

my tag is just a guide...please use your imagination and make
the tag your own you do not have to use any of the supplies I 
used.

     LET'S BEGIN

Open up Template and ShiftD and close original...delete copyright
layer/close all layers/copy/paste paper of choice/resize to fit 
canvas/layers/load/save mask/find your mask/and set with these 
setting/click ok


On the following raster layers follow these directions...

leave white rect layer as is/activate gold rect layer/copy/paste
paper of choice/resize to fit/selections/invert on rect layer
delete on paper layer/merge down/add drop shadow to rect layer

leave white rect layer as is/activate green rect layer/copy/paste
paper of choice/resize to fit/selections/invert on rect layer
delete on paper layer/merge down/add drop shadow to rect layer

activate large red rect layer/copy/paste paper of choice/resize to 
fit rect/selections/invert on rect layer/delete on paper layer/merge
down/add drop shadow to rect layer

leave large gold circle layer as is/activate green circle layer/copy
paste/paper of choice/resize to fit/selections/invert on circle layer
delete on paper layer/merge down/add drop shadow to circle layer

copy/paste circle frame/resize and place on top of green circle/activate
the green circle layer/copy/paste close up tube/place within circle
resize to fit most of her face/selections/invert on circle layer/delete
pn tube layer/erase all excess tube from around circle/selections/none
duplicate tube/on original tube/blend/screen/place duplicate underneath
original tube/add drop shadow to frame and bottom tube

leave star layer and white ring layer as is/activate red circle/copy
paste paper ofchoice/resize/selections/invert on red circle/delete on
paper layer/merge down/leave small white ring as is/add drop shadow to
circle and ring/leave small gold circle as is/add drop shadow

leave card and word art as is/ merge the two word art layers/separate 
the top word art from the bottom/move top word art up on left hand
side/(see my tag) add drop shadow to both

copy/and paste your main tube/resize to your liking/place where you think
it will look the best/adddrop shadow

add any other elements you wish to use/resize/add drop shadow 
to each element/place where they will look best

add your watermark and copyright credits/give it a slight 
gradient glow.....now give your tag to a friend.

You're done...thank you for trying my tutorial
please send me a copy so that I can show case it on my blog
send to.... riggsbee53@gmail.com


11/19/13

PTU Honored Scraps and Myka Jelina

Blood Red

This tutorial was written on November 18,2013. 
Any similarities to another tutorial is purely coincidental.
All my tutorial are register with My Free Copyright. 
Please do not claim as your own.
This tutorial writer assumes you have a working 
knowledge of using Paint Shop Pro.
This tutorial was done in Paint Shop Pro9,
but can be adapted to use in other 
Paint Shop Pro versions.


SUPPLIES NEEDED

Tube of choice: I'm using the awesome work of Myka Jelina.
Please do not use unless you have a license to do so. 
Get Them HERE

Scrapkit of Choice: I am using PTU Honored Scraps - Blood Red
You can purchase it HERE ...Thanks Patty

Mask of Choice: I am using Insatiable Dreams Mask # 154
You can download it HERE.... Thank You Cat

Filters used:Eye Candy 4000 gradient glow - HERE
Mura Meister: Copies - HERE

Font for Name is Lauren Script
Copy write is always done in Pixelette  HERE

Dropshadow use through out H-2/V-2/O-50/B-5.00

Please leave a thank you when you downloading for supplies.

my tag is just a guide...please use your imagination 
and make the tag your own you do not have to 
use any of the supplies I used.


     LET'S BEGIN


Open new raster layer 800 x 800/copy/paste element #16/resize by 50% 
twice/recolor with these setting/click ok


effects/mura copies/with these setting/click ok/resize by 70%


Copy/paste element #17/resize by 50%/twice/effects mura copies/with 
these setting/click ok/resze by 70%/add drop shadow


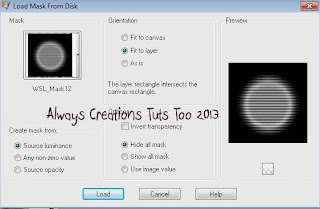
copy/paste paper of choice/resize to fit/load/save mask/find your mask
and set with these setting/click ok


On frame layer/click inside frame/selections/modify/expand by 10/copy
paste/paper of choice/resize to fit canvas/selections/invert on frame
delete on paper layer/place paper underneath frame/add drop shadow 
to frame.

copy/paste close up tube of choice/resize to fit frame so that the top 
of the tube is on top part of the frame/duplicate tube/place duplicate
under frame/close original tube for now/go to frame layer/selections
modify/expand by 10/invert on frame/delete on duplicate tube/now open 
original tube/make sure it's on top of frame/now take eraser and erase
the bottom part of the tube/(see my tag)/add drop shadow to duplicate
tube

add any other elements you wish to use/resize/add drop shadow to
each element/place where they will look best/resize tag

add your watermark and copyright credits/give it a slight gradient
glow.....now give your tag to a friend.

You're done...thank you for trying my tutorial
please send me a copy so that I can show case it on my blog


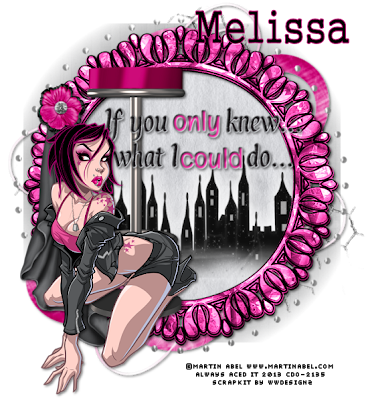
PTU WWDesignz and Martin Abel

Don't Ask- Won't Tell

This tutorial was written on November 18,2013. 
Any similarities to another tutorial is purely coincidental.
All my tutorial are register with My Free Copyright. 
Please do not claim as your own.
This tutorial writer assumes you have a working 
knowledge of using Paint Shop Pro.
This tutorial was done in Paint Shop Pro9,
but can be adapted to use in other 
Paint Shop Pro versions.


SUPPLIES NEEDED

Tube of choice: I'm using the awesome work of Martin Abel.
Please do not use unless you have a license to do so. 
Get Them HERE

Scrapkit of Choice: I am using PTU WWDesignz Martin Abel IB 13-1
You can purchase it HERE ...Thanks Melissa

Mask of Choice: I am using Insatiable Dreams Mask # 154
You can download it HERE.... Thank You Cat

Filters used:Eye Candy 4000 gradient glow - HERE

Font for Name is Gungsuh
Copy write is always done in Pixelette  HERE

Dropshadow use through out H-2/V-2/O-50/B-5.00

Please leave a thank you when you downloading for supplies.

my tag is just a guide...please use your imagination 
and make the tag your own you do not have to 
use any of the supplies I used.


     LET'S BEGIN

Open frame of choice/shiftD/close original/resize canvas for 
room to workcopy/paste paper of choice/resize to fit canvas
layers/load/save mask/find your mask/and set with these setting
click ok


On the following raster layers follow these directions...

click inside frame/selections/modify/expand by 10/copy/paste 
paper of choice/resize to fit canvas/selections/invert on frame
delete on paper layer/place paper underneath frame/add drop shadow 
to frame.

copy/paste/city back ground/put inside frame/reszize to fit/copy
paste word from kit/place inside frame/resize to fit/add drop
shadow

copy/paste bar stool element/resize and place on left hand side
add drop shadow

copy/paste tube of choice/resize tube to fit/place on top of bar 
stool/add drop shadow

add any other elements you wish to use/resize/add drop shadow to
each element/place where they will look best

add your watermark and copyright credits/give it a slight gradient
glow.....now give your tag to a friend.

You're done...thank you for trying my tutorial
please send me a copy so that I can show case it on my blog


11/11/13

PTU Schnegge Scraps

Sugar

This tutorial was written on November 8,2013. 
Any similarities to another tutorial is purely coincidental.
All my tutorial are register with My Free Copyright. 
Please do not claim as your own.
This tutorial writer assumes you have a working 
knowledge of using Paint Shop Pro.
This tutorial was done in Paint Shop Pro9,
but can be adapted to use in other 
Paint Shop Pro versions.


SUPPLIES NEEDED

Animation Shop of Choice HERE or another animation program

Tube of choice: I'm using the dog tube that is in the kit.

Scrapkit of Choice: I am using PTU Schnegge Scraps Sugar
You can purchase it HERE ...Thanks Angela

Mask of Choice: I am using Weescotslass Creations Mask #12
You can download it HERE.... Thank You Chell

Animation of choice: I am using Scrappy Bit of Fun Animation #216
You can download it HERE.....Thank you Simone

Filters used:Eye Candy 4000 gradient glow - HERE
AAA Frame: Foto Frame - HERE

Font for Name is Boopee
Copy write is always done in Pixelette  HERE

Drop shadow use through out H-2/V-2/O-50/B-5.00

Please leave a thank you when you downloading for supplies.

my tag is just a guide...please use your imagination 
and make the tag your own you do not have to 
use any of the supplies I used.


     LET'S BEGIN

Open up frame1 and ShiftD and close original...copy/paste 
paper of choice/resize to fit layer/layers/load/save mask
find your mask/and set with these setting/click ok


open new raster layer/place underneath mask layer/flood
fill with the color white/effect/AAA Frame/foto frame with these setting


On the following raster layers follow these directions...

activate inside frame/selections/expand/expand by 10/copy/paste
paper of choice/resize/selections/invert on frame/delete on
paper/place paper underneath frame/selections/none/drop shadow 
on frame

copy/paste dog element/ place underneath frame,but on top of
paper/resize by 130%/center in middle of frame/add drop shadow

add any other elements you wish to use/resize/add drop shadow 
to each element/place where they will look best

place word art where it will look best/add drop shadow

add your watermark and copyright credits/give it a slight 
gradient glow.....now give your tag to a friend.


To animate

go to animation shop/open up animation that you are using for 
this tag/edit/select all/go to psp

Close all layers except foto frame and mask/copy/merge paste
as a new layer in animation shop/edit/select all/edit/duplicate 
5x/then click on frame/duplicate 3x/click on frame/dplicate 2x
you should have 23 frames

go to animation you chose/click copy/paste into selected frame
youwilldo this twice/one on either side at the bottom/now go
back to the animation you chose/animation/flip/copy/paste
into selected frame 2x at the top/close this animation

go back to psp/copy frame background/paste into animation shop
as a new animation/edit/select all/edit/duplicate 5x/click on 
frame/duplicate 3x/click onframe/duplicate 2x/copy/openup your
first animation/paste into selected frame/place in the middle 
of mask/go to animation your using/animation/flip/copy/into
selected frame 2x/place on background frame near bottom and top

go back to psp/copy/merge all layers except aaa frame/mask and
frame background/paste into animation shop as a new animation
duplicate 23x as previously shown/copy/paste into selected frame
place directly over frame background/view animation/if satisfied
save as gif/if not you need to redo

You're done...thank you for trying my tutorial
please send me a copy so that I can show case it on my blog


11/8/13

PTU BabyCakes Scraps and Marika

Sexy and I Know It

This tutorial was written on November 8,2013. 
Any similarities to another tutorial is purely coincidental.
All my tutorial are register with My Free Copyright. 
Please do not claim as your own.
This tutorial writer assumes you have a working 
knowledge of using Paint Shop Pro.
This tutorial was done in Paint Shop Pro9,
but can be adapted to use in other 
Paint Shop Pro versions.


SUPPLIES NEEDED

Animation Shop or program of choice HERE

Tube of choice: I'm using the awesome work of Marika.
Please do not use unless you have a license to do so. 
Get Them HERE

Scrapkit of Choice: I am using PTU Baby Cakes IB Marika 4-1
You can purchase it HERE ...Thanks Lynne

Template of choice:I am using Additive Pleasures Template #49
You can download it HERE...Thanks Tamie

Mask of Choice: I am using Vix PSP Mask #365
You can download it HERE.... Thank You Vix

Animation of choice: I am using Scrappy Bit of Fun Animation # 249
You can download HERE - Thank you Simone 

Filters used:Eye Candy 4000 gradient glow - HERE

Font for Name is Organic Elements 
Copy write is always done in Pixelette  HERE

Drop shadow use through out H-2/V-2/O-50/B-5.00

Please leave a thank you when you downloading for supplies.

my tag is just a guide...please use your imagination 
and make the tag your own you do not have to 
use any of the supplies I used.


     LET'S BEGIN

Open up Template and ShiftD and close original...delete 
copyright layer/close all layers/copy/paste paper of choice
resize to fit canvas/effects/AAA effects/AAA frame 
with these  setting

copy/paste paper of choice resize to fit 
canvas/layers/load/save mask/find your mask
and set with these setting/click ok


On the following raster layers follow these directions...

leave dotted rect layer as is/leave glittered strip as is/add drop 
shadow

activate rectangle 2 layer/copy/paste paper of choice/resize paper
selections/invert on rectangle layer/delete on paper layer/merge 
down/add drop shadow

activate rectangle 3 layer/copy/paste paper of choice/resize paper
selections/invert on rectangle layer/delete on paper layer/merge 
down/add drop shadow/leave dotted shape as is

activate oval layer/copy/paste paper of choice/resize paper/selections
invert on oval layer/delete on paper layer/merge down/keep activated
copy/paste closeup tube/resize so face fits oval/delete on tube
duplicate tube/on original layer/blend/overlay/place duplicate layer
underneath original/add drop shadow

activate circle layer/copy/paste paper of choice/resize paper/selections
invert on circle layer/delete on paper layer/merge down/add drop shadow

activate strip layer/copy/paste paper of choice/resize paper/selections
invert on strip layer/delete on paper layer/merge down/adjust/add noise
with these setting


add drop shadow/delete word art

leave small circle as is/keep activated copy/paste closeup tube/resize 
so face fits circle/delete on tube/duplicate tube/on original layer/blend
hard light/place duplicate layer underneath original/add drop shadow

recolor hearts to match tag/add drop shadow/add word art from kit/resize 
to fit tag/add fat gradient glow and drop shadow

add any other elements you wish to use/resize/add drop shadow 
to each element/place where they will look best

add your watermark and copyright credits/give it a slight 
gradient glow.....now give your tag to a friend.

You're done...thank you for trying my tutorial
please send me a copy so that I can show case it on my blog