Showing posts with label Autumn. Show all posts

10/20/14

PTU Honored Scraps and Arthur Crowe - Autumn Princess

Autumn Princess

This tutorial was written on October 20,2014. 
Any similarities to another tutorial is purely coincidental.
All my tutorial are register with My Free Copyright. 
Please do not claim as your own.
This tutorial writer assumes you have a working 
knowledge of using Paint Shop Pro.
This tutorial was done in Paint Shop Pro9,
but can be adapted to use in other 
Paint Shop Pro versions.


SUPPLIES NEEDED

Tube of choice: I'm using the awesome work of Arthur Crowe.
Please do not use unless you have a license to do so. 
Get Them HERE

Scrapkit of Choice: I am using PTU Honored Scraps - Enchanted Fall
You can purchase it HERE ...Thank You Patty

Template of choice:I am using Millie's PSP Madness Template #50
You can download it HERE...Thanks Millie

background:You can download it HERE...Please do not claim as your own
for personal use only

Filters used:Eye Candy 4000 gradient glow - HERE
Blend - Hard Light

Font for Name is Ming Li U
Copy write is always done in Pixelette  HERE

Drop shadow use through out H-2/V-2/O-60/B-6.85

Please leave a thank you when you downloading for supplies.

my tag is just a guide...please use your imagination 
and make the tag your own you do not have to 
use any of the supplies I used.


     LET'S BEGIN

Open up Template and ShiftD and close original...delete 
copyright layer/close all layers/open background and paste
in center of canvas

On the following raster layers follow these directions...

activate large circle layer/copy/paste paper of choice/resize
paper/selections/invert on circle layer/delete on paper layer
merge down/keep activated/copy/paste close up tube 2/delete on
tube layer/add drop shadow to paper and tube

activate rounded rectangle layer/copy/paste paper of choice resize 
paper/selections/invert on rectangle layer/delete on paper layer
merge down/add drop shadow

activate 2nd rectangle layer/copy/paste paper of choice resize paper
selections/invert on rectangle layer/delete on paper layer/merge 
down/add drop shadow

activate medium circle layer/leave this layer as is/copy/paste close
up tube/see tag for position/delete on tube layer/add drop shadow

activate square layer/leave this layer as is/copy/paste main tube
place on top of square layer/add drop shadow

add any other elements you wish to use/resize if needed/add drop shadow
to each element/place where they will look best

move word art to where it will look best on your tag

add your watermark and copyright credits/give it a slight gradient 
glow.....now give your tag to a friend.

You're done...thank you for trying my tutorial
please send me a copy so that I can show case it on my blog

9/4/14

CDO Rebel Dezigns and Gaetano DiFalco - Autumn Romance

Autumn Romance

This tutorial was written on September 4,2014. 
Any similarities to another tutorial is purely coincidental.
All my tutorial are register with My Free Copyright.
Please do not claim as your own.
This tutorial writer assumes you have a working
knowledge of using Paint Shop Pro.
This tutorial was done in Paint Shop Pro9,
but can be adapted to use in other
Paint Shop Pro versions.


SUPPLIES NEEDED
Animation Shop3 ....HERE

Animation of Choice: I am using Rebel Dezigns Animation pack 13 #38
you can download HERE .... Thank you Rene'

Tube of choice: I'm using the awesome work of Gaetano DiFalco.
Please do not use unless you have a license to do so.
He is no longer selling his tubes.Please use another tube/Thank you

Scrapkit of Choice: I am using PTU Rebel Dezigns Autumn Whispers
You can purchase it HERE ...Thanks Rene'

Template of choice:I am using Punky Butts Template #141
You can download it HERE...Thanks Punky

Mask of Choice: I am using Dees'Sign Depot Mask #8
You can download it HERE.... Thank You Dee

Filters used:Eye Candy 4000 gradient glow - HERE
Xero- Soft Mood and Radiance  - HERE

Font for Name is Impact
Copy write is always done in Pixelette  HERE

Drop shadow use through out H-2/V-2/O-60/B-6.00


Please leave a thank you when you downloading for supplies.

my tag is just a guide...please use your imagination
and make the tag your own you do not have to
use any of the supplies I used.

     LET'S BEGIN

Open up Template and Shift D and close original...delete
copyright layer/close all layers/copy/paste paper of
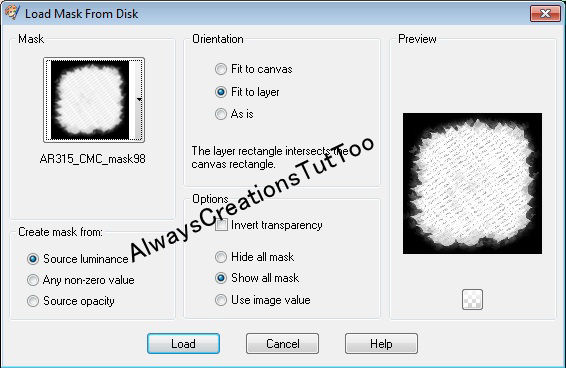
choice/resize to fit canvas/layers/load/save mask/find
your mask and set with these setting/click ok


On the following raster layers follow these directions...

On all frames choose a paper from the kit/change all
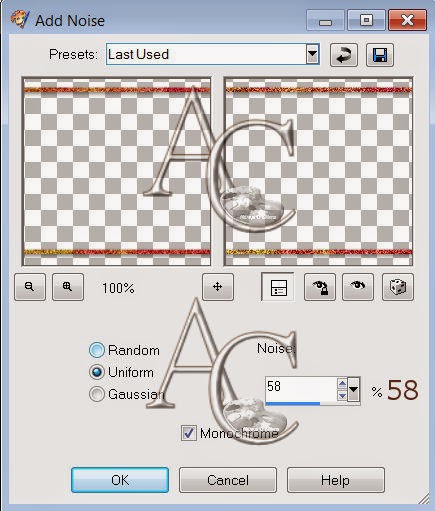
frames/adjust/add noise with these setting for all frames
add drop shadow


activate left square layer/copy/paste paper of choice
resize paper/selections/invert on square layer/delete on
paper layer/merge down/add drop shadow/see above for frame

activate right square layer/copy/paste paper of choice
resize paper/selections/invert on square layer/delete on
paper layer/merge down/add drop shadow/see above for frame

activate left rectangle layer/copy/paste paper of choice
resize paper/selections/invert on rectangle layer/delete
on paper layer/merge down/add drop shadow/see above for
frame

activate large circle layer/chose a color from paper #5/ on
material pallet/place that color in top box/null bottom box
selections/modify/smooth with these setting/click ok


add
color to circle layer/keep activated/copy/paste closeup tube
of choice/resize tube by 80%/delete on tube layer/effect
xero/radiance with these setting on tube


click ok/add drop
shadow/see above for frame

activate left circle layer/copy/paste paper of choice/resize
paper/selections/invert on circle layer/delete on paper layer
merge down/add drop shadow/see above for frame

activate right circle layer/copy/paste paper of choice/resize
paper/selections/invert on circle layer/delete on paper layer
merge down/keep activated/copy/paste closeup tube again/resize
by 90%/delete on tube layer/effects/xero/soft mood with these
settings


click ok/add drop shadow/see above for frame

activate right rectangle layer/copy/paste paper of choice/resize
paper/selections/invert on rectangle layer/delete on paper layer
merge down/add drop shadow/see above for frame

activate large rectangle layer/copy/paste paper of choice/resize
paper/selections/invert on rectangle layer/delete on paper layer
merge down/add drop shadow/see above for frame

On word art I colored the letters different colors from the papers
in the kit,mix it up to have fall colors/add drop shadow to frame
do the same with the name.

Copy/paste main tube of choice/place on left side of tag/resize
if needed/add some element to cover the bottom of tube/(see my
tag for reference)add drop shadow to all

now add any other elements you wish to use/resize if needed/have
fun creating to suit your taste/add drop shadow to each element
place where they will look best to you

add your watermark and copyright credits/give it a slight gradient
glow.....

To animate

close all layers except
right circle
left circle
large circle
left rectangle frame
left rectangle
right square frame
right square
left square frame
left square 
mask layer
Background

copy/merge/paste as new animation/duplicate for 25 frames
edit select all on animation/copy/into selected frame of tag
I placed leafs 4 x on bottom and 4x in the middle
see my tag for placement
animation/frame property/30%
go back to psp/close layers that are open
open layers that are closed
copy/merge/paste as new animation/duplicate for 25 frames
edit/select all/paste into selection/place on top
view animation/if satisfied/save as gif

now give your tag to a friend.

You're done...thank you for trying my tutorial
please send me a copy so that I can show case it on my blog
send to.... riggsbee53@gmail.com

Here's another tag using the same kit.

8/26/14

CDO Honor Scraps and Anna Marine - Autumn Girl

Autumn Girl

This tutorial was written on August 26,2014.
Any similarities to another tutorial is purely coincidental.
All my tutorial are register with My Free Copyright.
Please do not claim as your own.
This tutorial writer assumes you have a working
knowledge of using Paint Shop Pro.
This tutorial was done in Paint Shop Pro9,
but can be adapted to use in other
Paint Shop Pro versions.


SUPPLIES NEEDED

Tube of choice: I'm using the awesome work of Anna Marine.
Please do not use unless you have a license to do so.
Get Them HERE

Scrapkit of Choice: I am using PTU Honored Scraps Autumn Dreams
You can purchase it HERE ...Thanks Patty

Template of choice:I am using Millie PSP Madness Template #84
You can download it HERE...Thanks Millie

Mask of Choice: I am using Dees'Sign Depot Fall Mask #2
You can download it HERE.... Thank You Dee

Filters used:Eye Candy 4000 gradient glow - HERE

Font for Name is Centeria Script Demo
Copy write is always done in Pixelette  HERE

Drop shadow use through out H-2/V-2/O-60/B-6.85

Please leave a thank you when you downloading for supplies.

my tag is just a guide...please use your imagination
and make the tag your own you do not have to
use any of the supplies I used.

     LET'S BEGIN

Open up Template and Shift D and close original...delete
copyright layer/close all layers/copy/paste paper of choice
resize to fit canvas/layers/load/save mask/find your mask
and set with these setting/click ok


On the following raster layers follow these directions...

activate small left rectangle layer/copy/paste paper of choice
resize paper/selections/invert on rectangle layer/delete on paper
layer/merge down/add drop shadow

activate large circle layer/copy/paste paper of choice/resize
paper/selections/invert on circle layer/delete on paper layer
merge down/keep activated/copy/paste tube closeup/delete on
tube layer/place on far right side of circle/add drop shadow
to both

activate small rounded square layer/copy/paste paper of choice
resize paper/selections/invert on square layer/delete on paper
layer/merge down/add drop shadow

activate large rectangle layer/copy/paste paper of choice/resize
paper/selections/invert on rectangle layer/delete on paper/layer
merge down/add drop shadow

activate medium rectangle layer/copy/paste paper of choice/resize
paper/selections/invert on rectangle layer/delete on paper
layer/merge down/add drop shadow

leave both small circle layers as is/activate right side circle/copy
paste tube of choice/delete on tube layer/duplicate tube/on original
layer/blend/screen/lower opacity to 70%/place duplicate underneath
original/add drop shadow to both

activate 2nd large rectangle layer/copy/paste paper of choice/resize
paper/selections/invert on rectangle layer/delete on paper/layer/merge
down/add drop shadow

activate 2nd small rounded square layer/copy/paste paper of choice
resize paper/selections/invert on square layer/delete on paper/layer
merge down/keep activated/copy/paste tube choice/resize/delete on tube
duplicate tube/on original tube/blend/overlay/lower opacity to 50%/place
duplicate tube underneath original tube/add drop shadow to all

activate small rounded rectangle frame/choose a color from tag and recolor
frame/add drop shadow

on wordart layer/pick a light color/add gradient glow 2x on word art
and also on name/add drop shadow

copy/paste main tube of choice/resize if needed/place on left side of tag
add drop shadow

add any other elements you wish to use/resize if needed/add drop shadow
to each element/place where they will look best

add your watermark and copyright credits/give it a slight gradient glow.....
now give your tag to a friend.

You're done...thank you for trying my tutorial
please send me a copy so that I can show case it on my blog
send to.... riggsbee53@gmail.com


8/25/14

CDO BabyCakes Scraps and Marika - Autumn Leaves Me Breathless

Autumn Leaves Me Breathless

This tutorial was written on August 25,2014.
Any similarities to another tutorial is purely coincidental.
All my tutorial are register with My Free Copyright.
Please do not claim as your own.
This tutorial writer assumes you have a working
knowledge of using Paint Shop Pro.
This tutorial was done in Paint Shop Pro9,
but can be adapted to use in other
Paint Shop Pro versions.


SUPPLIES NEEDED

Tube of choice: I'm using the awesome work of Marika.
Please do not use unless you have a license to do so.
Get Them HERE

Scrapkit of Choice: I am using PTU Baby Cake Scraps IB Marika 12-3
You can purchase it HERE ...Thanks Lynne

Template of choice:I am using Dees'Sign Depot Autumn Leaves Me Breathless
You can download it HERE...Thanks Dee

Mask of Choice: I am using CM-Mythical Designs Mask #10
You can download it HERE.... Thank You Myth

Filters used:Eye Candy 4000 gradient glow - HERE

Font for Name is Impact
Copy write is always done in Pixelette  HERE

Drop  shadow use through out H-2/V-2/O-60/B-6.85

Please leave a thank you when you downloading for supplies.

my tag is just a guide...please use your imagination
and make the tag your own you do not have to
use any of the supplies I used.


     LET'S BEGIN

Open up Template and ShiftD and close original...delete
copyright layer/close all layers/copy/paste paper of choice
resize to fit canvas/layers/load/save mask/find your mask
and set with these setting/click ok


On the following raster layers follow these directions...

activate right blue strip layer/copy/paste paper of choice
resize paper/selections/invert on strip layer/delete on paper
layer/merge down/add drop shadow

activate purple strip layer/copy/paste paper of choice
resize paper/selections/invert on strip layer/delete on paper
layer/merge down/add drop shadow

activate orange strip layer/copy/paste paper of choice
resize paper/selections/invert on strip layer/delete on paper
layer/merge down/add drop shadow

activate green strip layer/copy/paste paper of choice/resize
paper/selections/invert on strip layer/delete on paper/layer
merge down/add drop shadow

activate left blue strip layer/copy/paste paper of choice
resize paper/selections/invert on strip layer/delete on paper
layer/merge down/add drop shadow/leave white square as is/add
drop shadow

activate purple square layer/copy/paste paper of choice/resize
paper/selections/invert on square layer/delete on paper layer
merge down/add drop shadow

activate outside green oval layer/layers/new raster layer/choose
lighter orange color#e3954f from template/flood fill oval layer with
that color/adjust/noise with these setting


click ok/merge down
leave white oval as is/add drop shadow

activate inside green oval layer/layers/new raster layer/choose
darker orange color#ca6c1a from template/flood fill oval layer with
that color/keep activated/copy/paste close up tube/resize by 70%
delete on tube layer/leave white and orange oval layer as is/add
drop shadow all

leave white square as is/add drop shadow/activate blue square layer
copy/paste paper of choice/resize paper/selections/invert on square
layer/delete on paper layer/merge down/add drop shadow

merge down word art layers/add drop shadow to both
Copy/paste main tube of choice/place tube so that the leaves are in
between word art/add drop shadow

add any other elements you wish to use/resize if needed/add drop
shadow to each element/place where they will look best

add your watermark and copyright credits/give it a slight gradient
glow.....now give your tag to a friend.

You're done...thank you for trying my tutorial
please send me a copy so that I can show case it on my blog
send to.... riggsbee53@gmail.com


12/9/13

CDO Hungry Hills Scraps and Marika - Autumn Splendor II

Autumn Splendor II

This tutorial was written on December 9, 2013. 
Any similarities to another tutorial is purely coincidental.
All my tutorial are register with My Free Copyright. 
Please do not claim as your own.
This tutorial writer assumes you have a working 
knowledge of using Paint Shop Pro.
This tutorial was done in Paint Shop Pro9,
but can be adapted to use in other 
Paint Shop Pro versions.


SUPPLIES NEEDED

Tube of choice: I'm using the awesome work of Marika.
Please do not use unless you have a license to do so. 
This is an exclusive to CDO....Get it HERE

Scrapkit of Choice: I am using PTU Hungry Hills Autumn Glow
You can purchase it HERE ...Thanks Ali

Template of choice:I am using Dees'Sign Depot- Autumn Splendor
Template #17....You can download it HERE...Thanks Dee

Mask of Choice: I am using Vix's PSP Mask #45
You can download it HERE.... Thank You Vix

Filters used:Eye Candy 4000 gradient glow - HERE

Font for Name is Lauren Script
Copy write is always done in Pixelette  HERE

Drop shadow use through out H-2/V-2/O-60/B-6.85

Please leave a thank you when you down loading for supplies.

my tag is just a guide...please use your imagination 
and make the tag your own you do not have to 
use any of the supplies I used.


     LET'S BEGIN

Open up Template and ShiftD and close original...delete 
copyright layer/close all layers/copy/paste paper of choice
resize to fit canvas/layers/load/save mask/find your mask
and set with these setting/click ok


On the following raster layers follow these directions...

activate blue strip/copy paste paper of choice/resize paper
selections/invert on blue strip layer/delete on paper layer
merge down/add drop shadow

activate rust strip layer/copy/paste paper of choice/resize 
paper/selections/invert on rust strip layer/delete on paper 
layer/merge down/add drop shadow

recolor leaves and overlay leaves to match tag

activate cream circle layer/copy/paste paper of choice/resize
paper/selections/invert on cream circle layer/delete on paper
layer/merge down/add drop shadow/leave medium cream circle as 
is/add drop shadow

activate brown circle layer/copy/paste paper of choice/resize
paper/selections/invert on brown circle layer/delete on paper
layer/merge down/keep activated/copy paste tube of choice
resize/place tube so face is showing/selections/invert on 
circle/delete on tube layer/duplicate tube/on original layer
blend/soft light/place duplicate underneath/add drop shadow

activate blue circle layer/copy/paste paper of choice/resize 
paper/selections/invert on circle layer/delete on paper layer
merge down/keep activated/copy/paste tube of choice/resize if 
needed/selections/invert on circle/delete on tube layer/add
drop shadow/leave dotted circle as is

activate rust circle layer/copy/paste paper of choice/resize
paper/selections/invert on rust circle layer/delete on paper
layer/merge down/keep activated/copy paste tube of choice
resize/place tube so face is showing/selections/invert on 
circle/delete on tube layer/duplicate tube/on original layer
blend/soft light/place duplicate underneath/add drop shadow
to tube/leave white open circle as is

activate green strip layer/copy/paste paper of choice/resize 
paper/selections/invert on green strip layer/delete on paper 
layer/merge down/add drop shadow

copy/paste your main tube of choice/resize if needed/place 
where it will look best/add drop shadow

add any other elements you wish to use/resize if needed/add 
drop shadow to each element/place where they will look best
recolor "Splendor" word art to match tag

add your watermark and copyright credits/give it a slight 
gradient glow.....now give your tag to a friend.

You're done...thank you for trying my tutorial
please send me a copy so that I can show case it on my 
blog....send to.... riggsbee53@gmail.com


11/27/13

PTU Honor Scraps and Alex Prihodko

Beauty of Nature

This tutorial was written on November 26,2013. 
Any similarities to another tutorial is purely coincidental.
All my tutorial are register with My Free Copyright. 
Please do not claim as your own.
This tutorial writer assumes you have a working 
knowledge of using Paint Shop Pro.
This tutorial was done in Paint Shop Pro9,
but can be adapted to use in other 
Paint Shop Pro versions.


SUPPLIES NEEDED

Tube of choice: I'm using the awesome work of Alex Prihodko.
Please do not use unless you have a license to do so. 
Get Them HERE

Scrapkit of Choice: I am using PTU Honored Scraps Harvest Blessings
You can purchase it HERE ...Thanks Patty

Template of choice:I am using Millie's PSP Madness Template #410
You can download it HERE...Thanks Millie

Mask of Choice: I am using Dees'Sign Depot Mask Fall#8
You can download it HERE.... Thank You Dee

Filters used:Eye Candy 4000 gradient glow - HERE

Font for Name is Segoe Print
Copy write is always done in Pixelette  HERE

Dropshadow use through out H-2/V-2/O-50/B-5.00

Please leave a thank you when you downloading for supplies.

my tag is just a guide...please use your imagination 
and make the tag your own you do not have to 
use any of the supplies I used.


     LET'S BEGIN

Open up Template and ShiftD and close original...delete copyright 
layer/close all layers/copy/paste paper of choice resize to fit 
canvas/layers/load/save mask/find your mask and set with these 
setting/click ok


On the following raster layers follow these directions...


activited rounded large square1 layer/copy/paste paper of choice/resize 
paper/selections/invert on square layer/delete on paper layer/merge 
down/add drop shadow 

activate rounded rectangle layer/copy/paste paper of choice/resize paper
selections/invert on rectangle layer/delete on paper layer/merge down
add drop shadow

activited rounded large square2 layer/copy/paste paper of choice/resize 
paper/selections/invert on square layer/delete on paper layer/merge 
down/add drop shadow

activited round large square1 layer/copy/paste paper of choice/resize 
paper/selections/invert on square layer/delete on paper layer/merge 
down/add drop shadow

activited round large square2 layer/copy/paste paper of choice/resize 
paper/selections/invert on square layer/delete on paper layer/merge 
down/add drop shadow

activate large circle layer/copy/paste paper of choice/resize paper
selections/invert on large circle layer/delete on paper layer/merge 
down/keep activate/copy/paste tube of choice/resize/place witin circle
so that top part of tube is shown/selections/invert on paper layer/delete
on tube layer/selections/none/duplicate tube/on original tube/blend/hard
light/place duplicate underneath original/add drop shadow to bottom tube

copy/paste oval frame #1/place on top of tubes/resize frame to fit circle
add drop shadow to frame

add any other elements you wish to use/resize/add drop shadow to each element
place where they will look best

copy/paste main tube of choice/resize to fit/place tube on left side of tag
position where you like/add drop shadow to tube

choose a word art from the kit/place near the top of tag/effects/ eye candy 4000
gradient glow/with these setting/click ok/add drop shadow


add your watermark and copyright credits/give it a slight gradient glow.....now 
give your tag to a friend.

You're done...thank you for trying my tutorial
please send me a copy so that I can show case it on my blog


PTU Hungry Hills Scraps and Elias Chatzoudis

Harvest

This tutorial was written on November 25, 2013. 
Any similarities to another tutorial is purely coincidental.
All my tutorial are register with My Free Copyright. 
Please do not claim as your own.
This tutorial writer assumes you have a working 
knowledge of using Paint Shop Pro.
This tutorial was done in Paint Shop Pro9,
but can be adapted to use in other 
Paint Shop Pro versions.


SUPPLIES NEEDED

Tube of choice: I'm using the awesome work of Elias Chatzoudis.
Please do not use unless you have a license to do so. 
Get Them HERE

Scrapkit of Choice: I am using PTU Hungry Hills Falling For You
You can purchase it HERE ...Thanks Alison

Template of choice:I am using Dees'Sign Depot Template Harvest
You can download it HERE...Thanks Dee

Mask of Choice: I am using Dees'Sign Depot Fall Mask #2
You can download it HERE.... Thank You Dee

Filters used:Eye Candy 4000 gradient glow - HERE

Font for Name is Andantino Script
Copy write is always done in Pixelette  HERE

Dropshadow use through out H-2/V-2/O-50/B-5.00

Please leave a thank you when you downloading for supplies.

my tag is just a guide...please use your imagination 
and make the tag your own you do not have to 
use any of the supplies I used.


     LET'S BEGIN

Open up Template and ShiftD and close original...delete 
copyright layer/close all layers/copy/paste paper of choice
resize to fit canvas/layers/load/save mask/find your mask
and set with these setting/click ok


On the following raster layers follow these directions...

activited bottom red square layer/copy/paste paper of choice/resize 
paper/selections/invert on red square layer/delete on paper layer
merge down/add drop shadow

activate yellow square layer/copy/paste paper of choice/resize paper
selections/invert on yellow square layer/delete on paper layer/merge 
down/add drop shadow

activited top red square layer/copy/paste paper of choice/resize 
paper/selections/invert on red square layer/delete on paper layer
merge down/add drop shadow

activited green square layer/copy/paste paper of choice/resize 
paper/selections/invert on green square layer/delete on paper layer
merge down/add drop shadow

leave all leave cluster and overlays as is/add drop shadow to both

activited right yellow circle layer/copy/paste paper of choice/resize 
paper/selections/invert on yellow circle layer/delete on paper layer
merge down/add drop shadow

activited top yellow circle layer/copy/paste paper of choice/resize 
paper/selections/invert on yellow circle layer/delete on paper layer
merge down/leave to white dotted circle as is/add slight down shadow

activited left red square layer/copy/paste paper of choice/resize 
paper/selections/invert on red square layer/delete on paper layer
merge down/add drop shadow

activited orange oval layer/copy/paste paper of choice/resize paper
selections/invert on orange oval layer/delete on paper layer/merge
merge down/leave white oval frame as is/click inside oval frame
selections/invert/copy/paste tube of choice/resize if needed/delete
on tube layer/duplicate 2x/place bottom tube underneath frame/on
top top/blend/hard light/place middle tube layer underneath top
tube layer/add drop shadow to tube that is under frame

activited small yellow circle layer/copy/paste paper of choice/resize 
paper/selections/invert on yellow circle layer/delete on paper layer
merge down/add drop shadow/leave small white dotted circle as is/add
a slight drop shadow

leave white squares as is/activate green squares/copy/paste paper of
choice/resize paper/selections/invert on green squares/delete on paper
layer/merge down/add drop shadow to both

add any other elements you wish to use/resize/add drop shadow to each 
element/place where they will look best

copy/paste main tube of choice/place where it will look best/add drop
shadow

add your watermark and copyright credits/give it a slight 
gradient glow.....now give your tag to a friend.

You're done...thank you for trying my tutorial
please send me a copy so that I can show case it on my blog


8/19/13

PTU Abstract Creations and Anna Marine

Falling Leaves

This tutorial was written on August 19,2013. 
Any similarities to another tutorial is purely coincidental.
All my tutorial are register with My Free Copyright. 
Please do not claim as your own.
This tutorial writer assumes you have a working 
knowledge of using Paint Shop Pro.
This tutorial was done in Paint Shop Pro9,
but can be adapted to use in other 
Paint Shop Pro versions.


SUPPLIES NEEDED

Animation Shop 3: Get it HERE

Tube of choice: I'm using the awesome work of Anna Marine.
Please do not use unless you have a license to do so. 
Get Them HERE

Scrapkit of Choice: I am using PTU Abstract Creations - Falling Leaves
You can purchase it HERE ...Thanks Cassie

Animation of Choice: I am using Scrappy  Bit Of Fun Animation #126 & 127
You can download HERE..... Thanks Simone

Filters used:Eye Candy 4000 gradient glow - HERE
AAA Frame: Foto Frame - HERE

Font for Name is Bella Donna
Copy write is always done in Pixelette  HERE

Drop shadow use through out H-2/V-2/O-50/B-5.00

Please leave a thank you when you downloading for supplies.

my tag is just a guide...please use your imagination 
and make the tag your own you do not have to 
use any of the supplies I used.


     LET'S BEGIN

Open up new canvas 800x800/we will resize later/copy/paste paper 
of choice/resize to fit canvas/effects/AAA Frame/foto frame with 
these setting/click ok


On the following raster layers follow these directions...

using preset tool/circle/any color/draw out a medium size circle
292x292/convert to raster/duplicate/mirror/flip/bring top circle 
down so that it overlaps the first circle


using selection tool/rounded rectangle/draw out rectangle 220x320
floodfill will any color/conver to raster/image/rotate left by 15
duplicate/mirror/flip/overlap on first rectangle


activate circle 1 layer/copy/paste paper of choice/resize paper
selections/invert on circle 1 layer/delete on paper layer/merge 
down/add drop shadow

activate circle 2 layer/copy/paste paper of choice/resize paper
selections/invert on circle 2 layer/delete on paper layer/merge
down/add drop shadow

activate rectangle 1 layer/copy/paste paper of choice/resize paper
selections/invert on rectangle 1 layer/delete on paper layer/merge 
down/keep activated/copy/paste tube of choice/resize/duplicate/close
this layer/delete on tube layer/duplicate/erase excess tube but her 
hair/add drop shadow

activate rectangle 2 layer/copy/paste paper of choice/resize paper
selections/invert on rectangle 2 layer/delete on paper layer/merge 
down/keep activated/copy/paste tube of choice/resize so you get most
of her head/duplicate/close this layer/delete on tube layer/open
duplicate layer/erase all excess tube except her hair/merge down
add drop shadow

add any other elements you wish to use/resize/add drop shadow 
to each element/place where they will look best

add word art 

add your watermark and copyright credits/give it a slight 
gradient glow.....

To animate

open animation shop 3
find both animations 126 & 127
on animation 126/resize/285x132
on animation 127/resize/600x503

because the falling leaves animation has 31 frames and the bush
animation has 19 frames/you will get a blank out when you combine 
the two/so to make it continually flow you need to make the bush
animation 31 frames too/so select last frame/duplicate 12 times

go to psp closed all layers except nut/acorn/falling leaves/bird
feed/butterfly and background
copy/merge/paste into animation shop as new animation
duplicate 6x/click on last frame and delete 2x/select all
go to falling leaves animation/select all/paste into selected frame
place toward sqraul

go back to psp and close those 6 layers and open all except brush 
and copyright layer
copy/merge/paste into animation shop as new animation
duplicate 6x/click last frame and delete 2x
select all/copy into selected frame/paste close to line near the
bottom

go back to psp and close those layers and open bush and copyright
layer
paste into animation shop as a new layer
duplicate 6x/click on last frame and delete 2x

select animated bush 126 /select all/copy into selected frame/place 
next to the mushrooms
select all/bush with copyright/ paste into selected frame/place on 
top of animated bush/make sure the top of animated bush is showing
view animation/if satisfied save as gif

now give your tag to a friend.

You're done...thank you for trying my tutorial
please send me a copy so that I can show case it on my blog


1/9/13

PTU Crazy Carita and Anna Marine

Not What you Look At

This tutorial was written on January 8,2013.
Any similarities to another tutorial is purely coincidental.
All my tutorial are register with My Free Copyright.
Please do not claim as your own.
This tutorial writer assumes you have a working
knowledge of using Paint Shop Pro.
This tutorial was done in Paint Shop Pro9,
but can be adapted to use in other

Paint Shop Pro versions.


SUPPLIES NEEDED
Tube of choice: I'm using the awesome work of Anna Marine.
Please do not use unless you have a license to do so.
You can get her tubes HERE


Scrapkit of Choice: I am using Crazy Carita PTU Anna Marine
IB 11-3....You can purchase it HERE ...Thanks Carita


Word art of choice: I am using Miss Scarlett’s Word Art-Not
What You Look At...You can download HERE...Thank you Judy


Mask of Choice: I am using Weescotlass Mask #
You can download it Here...Thank you Chell


Filters used:Eye Candy 4000 gradient glow - HERE
Font for Name is Inscription LET
Copy write is always done in Pixelette  HERE

Drop shadow use through out H-2/V-2/O-50/B-5.00
Please leave a thank you when you downloading for supplies.

my tag is just a guide...please use your imagination
and make the tag your own you do not have to
use any of the supplies I used.


     LET'S BEGIN
Close all layers except background layer/copy/paste paper of
choice/resize to fit canvas/layers/load/save mask/find your mask
and set with these setting/click ok/delete background


On the following raster layers follow these directions...
Copy/paste from kit your first frame of choice/resize the frame
by 50%/and then 70%/click inside frame to activate/selections
modify/expand with these setting/click ok


keep activated/copy
paste your tube image/resize to fit/make sure some of the back
ground image is showing/deactivate/place underneath frame/give
frame a slight drop shadow/
now decorate this frame with
elements from the kit/resize each element/use as many elements
 as you need,but don't use add too many/add drop shadow
 to each/when your finish close all layers/except the elements
and merge visible/open all layers/
copy/paste another frame from the kit/with this frame you're going
to resize 50% an then 90%/you want this frame to be a little larger
than the first/now image/rotate with these setting/click ok


his frame should be on an angle (see my tag)/move the second frame

underneath the elements of the first frame only/this frame should
be overlapping the first frame/click inside second frame with magic
wand/selections/modify/expand with same setting as before/copy/paste
paper of choice/resize paper/selections/invert on frame layer/delete
on paper layer/keep activated/copy your tube this time/resize to
fit/delete/add drop shadow
copy/paste the first frame again/resize by 70% and 90%/place this
frame underneath the first frame on the other side/click inside
frame with magic wand/follow expand setting as before/copy/paste
paper of choice/resize/selections/invert on frame layer/delete on
paper layer/copy paste/tube again/this time your tube will be on
the right side of the frame/delete on tube layer/duplicate tube
on original layer/blend/screen/do this again on duplicate tube
add drop shadow to both
add any other elements to make your tag your own/add drop
shadow on each element/resize your tag
add your word art of choice/give it a white gradient glow
and drop shadow

add your watermark and copyright credits/give it a slight gradient
glow ...now give your tag to a friend.
You're done...thank you for trying my tutorial
please send me a copy so that I can show case it on my blog
send to....
riggsbee53@gmail.com

1/26/12

PTU Mythical Designs and Fred Winkler- Show Off Tag

Here's a tag I did using Mythical Designs PTU Autumn Becomes Winter
Scrap kit. You can purchase this awesome scrap kit HERE


9/12/11

PTU Hungry Hills and Pinuptoons


Autumn Leaves

This tutorial was written on September 10th 2011. 
Any similarities to another tutorial is purely coincidental.

All my tutorial are register with My Free Copyright. 
Please do not claim as your own.
This tutorial writer assumes you have a 
working knowledge of using Paint Shop Pro.

This tutorial was done in Paint Shop Pro9,
but can be adapted to use in other

Paint Shop Pro versions.


                                                                     SUPPLIES NEEDED


                                Tube of Choice: I am using the awesome artwork of Pinuptoons..
                      You can purchase his tubes HERE...you will need a closeup and regular tube
                                            Please do not use without a license to do so


                     Scrapkit of Choice: I am using a Sarah Hungry Hills PTU Scrapkit- Subtle Autumn .
                                         You can purchase it HERE....Thank you Sarah


                              Template of Choice: I'm using a template by Blissfully Beth #9. 
                                        You can get it HERE. Thank you  for the Share Beth


                                 Mask of Choice: I'm using Creative Misfit Autumn Collection. 
                               Place in your mask folder. You can get it HERE. Thanks Aqua

                              Filter Used:Eye Candy 4000-Gradient Glow...You can get it HERE
                            Gradient: Autumn Gradient from Eleven Sword...You can get it HERE

                                         Font for name is HT Trattona and copy write is always 
                                                   done in Pixelette ... Get them HERE


                                                         animation fallen leaves...Here


                                              Drop shadow use through out H-2/V-2/O-50/B-5.00
                                      Please leave a thank you when you downloading for supplies.

                                       my tag is just a guide...please use your imagination and make
                                    the tag your own you do not have to use any of the supplies I used.

                                                                                LET'S BEGIN
                        Open template/Image resize all layer to 600x600/shiftD/close original template.
                     Remove background and credits.Close out every layer. Choose paper of choice/
                      paste underneath all layers.Go to layers/load/save mask/load mask from disk/
                              find your mask of choice and paste with these setting.merge group


Do the following task to layers 1-7/merge down after each task and add a drop shadow

copy/paste paper of choice/go to the layer/invert/go to paper layer and delete

put the tree behind layer 6/add a drop shadow.

add any other elements you wish to use/make sure you add a drop shadow to each element.
place your main tube where you want it/add drop shadow.(see my tag if needed)

Resize if needed/Add your copyright and watermark-(I put a slight gradient glow on mine)


now it's time to animate

copy merge/paste your tag into animation shop/open up your animation leaves into
animation shop/duplicate your tag with the same number of layers as the animation
you should have 27 layers/edit/select all/animation/frame properties/30
save as gif

thank you for trying my tutorial..please send me a copy of what you did
so I can showcase it...riggsbee53@gmail.com