Showing posts with label PFD. Show all posts

6/20/14

PTU BabyCakes Scraps and Alex Prihodko - Spring Into Spring

Spring Into Spring

This tutorial was written on June 20,2013.
Any similarities to another tutorial is purely coincidental.
All my tutorial are register with My Free Copyright.
Please do not claim as your own.
This tutorial writer assumes you have a working
knowledge of using Paint Shop Pro.
This tutorial was done in Paint Shop Pro9,
but can be adapted to use in other
Paint Shop Pro versions.


SUPPLIES NEEDED

Tube of choice: I'm using the awesome work of Alex Prihodko.
Please do not use unless you have a license to do so.
Get Them HERE

Scrapkit of Choice: I am using PTU BabyCakes Scraps- Spring Into Spring
You can purchase it HERE ...Thanks Veronica

Template of choice:I am using Punky Butts Template 126
You can download it HERE...Thanks Punky

Mask of Choice: I am using Weescotslass Creation Mask #221
You can download it HERE.... Thank You Chell

Filters used:Eye Candy 4000 gradient glow - HERE

Font for Name is Impact
Copy write is always done in Pixelette  HERE

Drop shadow use through out H-2/V-2/O-60/B-6.85

Please leave a thank you when you downloading for supplies.

my tag is just a guide...please use your imagination
and make the tag your own you do not have to
use any of the supplies I used.

     LET'S BEGIN

Open up Template and Shift D and close original...delete copyright
layer and word art layers/close all layers/delete background layer
copy/paste paper of choice/resize to fit canvas/layers/load/save
mask/find your mask and set with these setting/click ok


On the following raster layers follow these directions...

activate left rectangle layer/copy/paste paper of choice/resize
paper/selections/invert on rectangle layer/delete on paper layer
merge down/recolor frame to match the rectangle/add drop shadow

activate right rectangle layer/copy/paste paper of choice/resize
paper/selections/invert on rectangle layer/delete on paper layer
merge down/recolor frame to match the rectangle/add drop shadow

activate left circle layer/recolor circle to match tag/remove
frame to match circle/add drop shadow

activate right circle layer/recolor circle to match tag/remove
frame to match circle/add drop shadow

activate large circle layer/recolor circle to match tag/new raster
layer on circle frame/recolor frame to match tag/merge down new layer
add drop shadow

activate strip 2 layer/copy/paste paper of choice/resize paper/selections
invert on strip 2 layer/delete on paper layer /merge down/recolor frame
to match the strip/add drop shadow

activate 4 squares layer/recolor squares to match tag/recolor frame to
match tag/add drop shadow

add any other elements you wish to use/resize if needed/add drop
shadow to each element/place where they will look best

copy/paste tube of choice/resize if needed/place tube on top of flowers
(see my tag for placement) add drop shadow

add your watermark and copyright credits/give it a slight gradient
glow.....now give your tag to a friend.

You're done...thank you for trying my tutorial
please send me a copy so that I can show case it on my blog
send to.... riggsbee53@gmail.com


7/7/13

PTU Amy Marie and Alex Prihodko

Blue Emo

This tutorial was written on July 6,2013. 
Any similarities to another tutorial is purely coincidental.
All my tutorial are register with My Free Copyright. 
Please do not claim as your own.
This tutorial writer assumes you have a working 
knowledge of using Paint Shop Pro.
This tutorial was done in Paint Shop Pro9,
but can be adapted to use in other 
Paint Shop Pro versions.


SUPPLIES NEEDED

Tube of choice: I'm using the awesome work of Alex Prihodko.
Please do not use unless you have a license to do so. 
You can get is tubes HERE

Scrapkit of Choice: I am using PTU Amy Marie - Emo Blue
You can purchase it HERE ...Thanks Amy

Template of choice:I am using Additive Pleasure Template #91
You can download it HERE...Thanks Tamie

Mask of Choice: I am using Weescotlass Creations mask# 250
You can download it HERE...Thanks Chell

Filters used:Eye Candy 4000 gradient glow - HERE

Font for Name and word art is Biondi
Copy write is always done in Pixelette  HERE


Drop shadow use through out H-2/V-2/O-50/B-5.00

Please leave a thank you when you downloading for supplies.


my tag is just a guide...please use your imagination 
and make the tag your own you do not have to 
use any of the supplies I used.


     LET'S BEGIN

Open up Template and ShiftD and close original...delete 
copyright layer/close all layers/copy/paste paper of choice
resize to fit canvas/layers/load/save mask/find your mask
and set with these setting/click ok


On the following raster layers follow these directions...

leave black strip and wordart as is/activated strip2/copy
paste paper of choice/delete on paper layer/resize paper
selections/invert on strip2 layer/delete on paper layer
merge down/add drop shadow

activated strip3/copy paste paper of choice/delete on paper 
layer/resize paper/selections/invert on strip3 layer/delete 
on paper layer/merge down/add drop shadow

activate square1/copy paste paper of choice/delete on paper 
layer/resize paper/selections/invert on square1 layer/delete 
on paper layer/merge down/add drop shadow/leave circle layer
as is/add drop shadow

activate long rectangle/copy paste paper of choice/delete on 
paper layer/resize paper/selections/invert on long rectangle 
layer/delete on paper layer/merge down/add drop shadow

activate small circle1/copy paste paper of choice/delete on 
paper layer/resize paper/selections/invert on small circle1 
layer/delete on paper layer/keep activated/copy/paste tube
of choice/resize tube/delete on tube layer/merge down/leave 
frame as is/add drop shadow

activate square2/copy paste paper of choice/delete on paper 
layer/resize paper/selections/invert on square2 layer/delete 
on paper layer/merge down/leave frame as is/add drop shadow

activate square3/copy paste paper of choice/delete on paper 
layer/resize paper/selections/invert on square3 layer/delete 
on paper layer/merge down/leave frame as is/add drop shadow

activate square4/copy paste paper of choice/delete on paper 
layer/resize paper/selections/invert on square4 layer/delete 
on paper layer/merge down/leave frame as is/add drop shadow

activate small circle2/copy paste paper of choice/delete on 
paper layer/resize paper/selections/invert on small circle2 
layer/delete on paper layer/keep activated/copy/paste tube
of choice/resize tube/delete on tube layer/merge down/leave 
frame as is/add drop shadow

activate three small circle/copy/paste paper of choice/delete
on paper layer/resize paper/selections/invert on three circles
layer/delete on circle layer/merge down/leave glitter layer
as/add drop shadow

copy/paste your tube of choice/resize if needed/place on your 
tag where it will look best/add drop shadow

add any other elements you wish to use/resize/add drop shadow 
to each element/place where they will look best

add your watermark and copyright credits/give it a slight 
gradient glow.....now give your tag to a friend.

You're done...thank you for trying my tutorial
please send me a copy so that I can show case it on my blog


6/29/13

PTU Amy Marie and Alex Prihodko

Blue Eyed Beauty

This tutorial was written on June 29,2013. 
Any similarities to another tutorial is purely coincidental.
All my tutorial are register with My Free Copyright. 
Please do not claim as your own.
This tutorial writer assumes you have a working 
knowledge of using Paint Shop Pro.
This tutorial was done in Paint Shop Pro9,
but can be adapted to use in other 
Paint Shop Pro versions.


SUPPLIES NEEDED

Tube of choice: I'm using the awesome work of Alex Prihodko.
Please do not use unless you have a license to do so. 
You can get is tubes HERE

Scrapkit of Choice: I am using PTU Amy Marie - Blue Eyed Beauty
You can purchase it HERE ...Thanks Amy

Template of choice:I am using ALGT Template #148
You can download it HERE...Thanks Leah

Mask of Choice: I am using Vix mask# 16
You can download it HERE...Thanks Vix

Filters used:Eye Candy 4000 gradient glow - HERE

Font for Name and word art is Blondi
Copy write is always done in Pixelette  HERE


Dropshadow use through out H-2/V-2/O-50/B-5.00

Please leave a thank you when you downloading for supplies.


my tag is just a guide...please use your imagination 
and make the tag your own you do not have to 
use any of the supplies I used.


     LET'S BEGIN

Open up Template and ShiftD and close original...delete 
copyright layer/close all layers/copy/paste paper of choice
resize to fit canvas/layers/load/save mask/find your mask
and set with these setting/click ok


On the following raster layers follow these directions..

activate left rectangle layer/copy/paste paper of choice
resize paper/selections/invert on left rectangle layer/delete
on paper layer/merge down/add drop shadow

activate right rectangle layer/copy/paste paper of choice
resize paper/selections/invert on right rectangle layer/delete
on paper layer/merge down/add drop shadow

activate circle layer/copy/paste paper of choice/resize paper
selections/invert on circle layer/delete on paper layer/merge 
down/add drop shadow

activate small circle 1 layer/copy/paste paper of choice/resize 
paper/selections/invert on small circle 1 layer/delete on paper 
layer/merge down/add drop shadow

activate small circle 2 layer/copy/paste paper of choice/resize 
paper/selections/invert on small circle 2 layer/delete on paper 
layer/merge down/add drop shadow

activate large rectangle layer/copy/paste paper of choice
resize paper/selections/invert on large rectangle layer/delete
on paper layer/merge down/add drop shadow

activate medium circle layer/copy/paste paper of choice/resize 
paper/selections/invert on medium circle layer/delete on paper 
layer/merge down/keep activated/copy/paste tube of choice
selections/invert on paper layer/delete on tube layer/delete excess
tube/add drop shadow

copy/paste your tube of choice/resize if needed/place on your 
tag where it will look best/add drop shadow

add any other elements you wish to use/resize/add drop shadow 
to each element/place where they will look best

make a word art for your tag using font of choice/add some elements
of choice/add drop shadow

add your watermark and copyright credits/give it a slight 
gradient glow.....now give your tag to a friend.

You're done...thank you for trying my tutorial
please send me a copy so that I can show case it on my blog

4/1/13

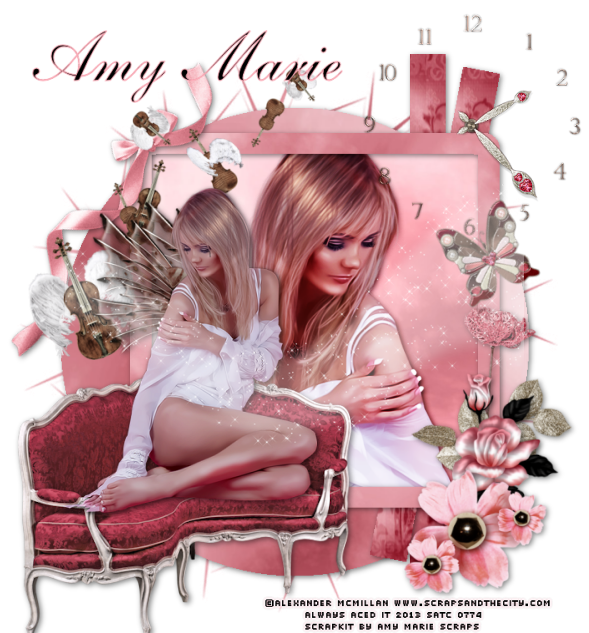
PTU Amy Marie and Alexander McMillan

Wings of Love 

This tutorial was written on March 20,2013. 
Any similarities to another tutorial is purely coincidental.
All my tutorial are register with My Free Copyright. 
Please do not claim as your own.
This tutorial writer assumes you have a working 
knowledge of using Paint Shop Pro.
This tutorial was done in Paint Shop Pro9,
but can be adapted to use in other 
Paint Shop Pro versions.


SUPPLIES NEEDED

Tube of choice: I'm using the awesome work of Alexander McMillan.
Please do not use unless you have a license to do so. 
You can get her tubes HERE

Scrapkit of Choice: I am using PTU Amy Marie Wings of Love
You can purchase it HERE  or HERE...Thanks Amy

Template of choice:I am using Bel Vidotti #26
Bel Vidotti no longer has her site up..please
 use another template, thanks...Thanks Bel Vidotti

Mask of Choice: I am using Vix Mask #166
You can download it Here...Thanks Vix

Filters used:Eye Candy 4000 gradient glow - HERE

Font for Name is Freebooter Script 
Copy write is always done in Pixelette  HERE

Drop shadow use through out H-2/V-2/O-50/B-5.00

Please leave a thank you when you downloading for supplies.

my tag is just a guide...please use your imagination 
and make the tag your own you do not have to 
use any of the supplies I used.

     LET'S BEGIN

Open up Template and ShiftD and close original...delete 
copyright layer/close all layers/copy/paste paper of choice
resize to fit canvas/layers/load/save mask/find your mask
and set with these setting/click ok/delete background


On the following raster layers follow these directions...

activate large circle layer/copy/paste paper of choice/resize
paper/selection/invert on large circle layer/delete on paper
layer/merge down/add drop shadow

activate thin rectangle2 layer/copy/paste paper of choice/resize
paper/selection/invert on thin rectangle2 layer/delete on paper
layer/merge down/add drop shadow

activate thin rectangle1 layer/copy/paste paper of choice/resize
paper/selection/invert on thin rectangle1 layer/delete on paper
layer/merge down/add drop shadow

activate frame back layer/copy/paste paper of choice/resize paper
selection/invert on frame back layer/delete on paper layer/merge
down/keep activated/copy/paste close up tube/resize to fit/delete
on tube layer/duplicate/on original layer /blend/overlay/place
duplicate layer underneath/add drop shadow to both tubes

activate frame layer/copy/paste paper of choice/resize paper
selection/invert on frame layer/delete on paper layer/merge
down/add drop shadow

add any other elements you wish to use/resize/add drop shadow to
each/place where they will look best

copy/paste main tube/resize/position so that she is sitting on 
the chaise chair/add drop shadow

add your watermark and copyright credits/give it a slight 
gradient glow ...now give your tag to a friend.
You're done...thank you for trying my tutorial
please send me a copy so that I can show case it on my blog


Here's another tag I did with the kit


3/18/13

PTU Amy Marie and Alex Prihodko

Spring

This tutorial was written on March 17,2013. 
Any similarities to another tutorial is purely coincidental.
All my tutorial are register with My Free Copyright. 
Please do not claim as your own.
This tutorial writer assumes you have a working 
knowledge of using Paint Shop Pro.
This tutorial was done in Paint Shop Pro9,
but can be adapted to use in other 
Paint Shop Pro versions.


SUPPLIES NEEDED

Tube of choice: I'm using the awesome work of Alex Prihodko.
Please do not use unless you have a license to do so. 
You can get his tubes HERE

Scrapkit of Choice: I am using PTU Amy Marie Linda
You can purchase it HERE ...Thanks Amy

Template of choice:I am using MilliePSPMadness #4
You can download it HERE...Thanks Millie

Mask of Choice: I am using Enchanted By Darkness Mask #62
You can download it HERE...Thanks 

Filters used:Eye Candy 4000 gradient glow - HERE

Xero : Porcelain- HERE

Font for Name is Riesling HERE

Copy write is always done in Pixelette  HERE

Drop shadow use through out H-2/V-2/O-50/B-5.00

Please leave a thank you when you downloading for supplies.

my tag is just a guide...please use your imagination 
and make the tag your own you do not have to 
use any of the supplies I used.

     LET'S BEGIN

Open up Template and ShiftD and close original...delete 
copyright layer/close all layers/copy/paste paper of choice
resize to fit canvas/layers/load/save mask/find your mask
and set with these setting/click ok/delete background


On the following raster layers follow these directions...

activate circle1 layer/copy/paste paper of choice/resize
paper/selection/invert on circle1 layer/delete on paper
layer/add drop shadow/copy/paste element of choice/resize
to fit/adjust/sharpen/ add drop shadow

leave 4 circle as is/activate circle layer/copy/paste paper
of choice/resize paper/selection/invert on 4 circle layer
delete on paper layer/merge down/add drop shadow/copy/paste
element of choice/resize to fit/place an different element 
on each circle/add drop shadow

activate rectangle layer/copy/paste paper of choice/resize 
paper/selection/invert on circle3 layer/delete on paper layer
change frame color to white/add drop shadow

activate circle2 layer/copy/paste paper of choice/resize
paper/selection/invert on circle2 layer/delete on paper
layer/add drop shadow/keep activated/copy/paste tube of 
choice/resize to fit/delete on tube layer/effects/xero
porcelain with these setting/add drop shadow


copy/paste your tube of choice/resize if needed/place your 
tag where it will look best/add drop shadow

add any other element you wish to us/resize each element and
place where they will look best/add drop shadow to each

add your watermark and copyright credits/give it a slight 
gradient glow ...now give your tag to a friend.
You're done...thank you for trying my tutorial
please send me a copy so that I can show case it on my blog

2/15/13

PTU Tyger Tibits and Alehandra Vanhek

Greek Love
This tutorial was written on February 14,2013.
Any similarities to another tutorial is purely coincidental.
All my tutorial are register with My Free Copyright.
Please do not claim as your own.
This tutorial writer assumes you have a working

knowledge of using Paint Shop Pro.
This tutorial was done in Paint Shop Pro9,
but can be adapted to use in other
Paint Shop Pro versions.  


SUPPLIES NEEDED
Tube of choice: I'm using the awesome work of Alehandra Vanhek.
This is an exclusive for Picsfordesign. You can get her tubes HERE
Scrapkit of Choice: I am using PTU Tyger Tibits Greek Love
You can purchase it HERE ...Thanks Tyger
Cluster Frame of choice:I am using mine frame Greek Love#2
You can download it HERE...Please do not share or claim as your own
Mask of Choice: I am using Vix Big Mask #019
You can download it Here...Thanks Vix
Filters used:Eye Candy 4000 gradient glow - HERE
Font for Name is Redressed
Copy write is always done in Pixelette  HERE

Drop shadow use through out H-2/V-2/O-50/B-5.00
Please leave a thank you when you downloading for supplies.

my tag is just a guide...please use your imagination
and make the tag your own you do not have to
use any of the supplies I used.


     LET'S BEGIN
Open up Template and ShiftD and close original...delete
copyright layer/close all layers/copy/paste paper of choice
resize to fit canvas/layers/load/save mask/find your mask
and set with these setting/click ok/delete background


On the following raster layers follow these directions...
you can either make your own cluster from the kit or use mine.
to make your own/first choose a frame/resize/add any element
you wish to use/resize each element/place your elements where
you want to make them look best/add drop shadow
copy/paste cluster frame/resize if needed/click inside frame
copy/paste background of tube/resize to fit
Copy paste/tube of choice/resize/place on opposite side of the
frame/add drop shadow
add any other elements you wish to use/resize if needed/add
drop shadow/resize tag
add your watermark and copyright credits/give it a slight
gradient glow ...now give your tag to a friend.
You're done...thank you for trying my tutorial
please send me a copy so that I can show case it on my blog
send to....
riggsbee53@gmail.com

1/15/13

PTU Amy Marie and Very Many

Hearts and Roses
 
This tutorial was written on January 14,2013.
Any similarities to another tutorial is purely coincidental.
All my tutorial are register with My Free Copyright.
Please do not claim as your own.
This tutorial writer assumes you have a working
knowledge of using Paint Shop Pro.
This tutorial was done in Paint Shop Pro9,
but can be adapted to use in other
Paint Shop Pro versions.


SUPPLIES NEEDED
Tube of choice: I'm using the awesome work of Very Many.
Please do not use unless you have a license to do so.
You can get her tubes HERE
 
Scrapkit of Choice: I am using PTU Amy Marie Scraps
Hearts and Roses...You can purchase it HERE ..Amy
 
Template of choice:I am using Denz Designz Template #168
You can download it HERE...Thank you Denny
 
Mask of Choice: I am using Insatiable Dreams Mask 298
You can download it Here...Thanks Cat
 
Filters used:Eye Candy 4000 gradient glow - HERE
 
Font for Name and wordart is Bradley Gratis  
Copy write is always done in Pixelette  HERE

Dropshadow use through out H-2/V-2/O-50/B-5.00
Please leave a thank you when you downloading for supplies.

my tag is just a guide...please use your imagination
and make the tag your own you do not have to
use any of the supplies I used.


     LET'S BEGIN
Open up Template and ShiftD and close original...delete
copyright layer/close all layers/copy/paste paper of choice
resize to fit canvas/layers/load/save mask/find your mask
and set with these setting/click ok/delete background
 
 
On the following raster layers follow these directions...

activate rectangle layer/copy/paste paper of choice/resize
selection/invert on rectangle layer/delete on paper layer
merge down/copy/paste element of choice/resize if needed

place toward top/duplicate/move to the middle/duplicate/move
toward the bottom/merge down each time/add drop shadow
activate long wide rectangle layer/copy/paste paper of choice
resize paper/selection/invert on rectangle layer/delete on
paper layer/merge down/add drop shadow
 
activate long thin rectangle merged layer/copy/paste paper
of choice/resize paper/selection/invert on long thin rectangle
layer/delete on paper layer/merge down/copy/paste element of
choice/resize if needed/add drop shadow
 
activate short rectangle layer/copy/paste paper of choice
resize paper/selection/invert on  short rectangle layer/delete
on paper layer/merge down/copy/paste element of choice/resize
if needed/add drop shadow to all
 
activate top square layer/copy/paste paper of choice/resize
paper/selection/invert on square layer/delete on paper layer
merge down/keep activated/copy/paste tube of choice/resize
delete on tube layer/add drop shadow/leave dotted frame as
is/add drop shadow to all
 
recolor hearts and dotted circles to match your tags/add
drop shadow
 
activate circle layer/copy/paste paper of choice/resize
paper/selection/invert on circle layer/delete on paper
layer/merge down/keep activated/copy/paste tube of choice
add drop shadow to all
 
activate circle frame layer/copy/paste paper of choice/resize
paper/selection/invert on circle frame layer/delete on paper
layer/merge down/add drop shadow
 
add any other element you wish to use to make your tag your
own/add drop shadow to each element
using font/write hearts and roses in two colors from tag
add drop shadow
 
copy/paste main tube to your tag/place where it will look
best/resize if needed/add drop shadow
 
add your watermark and copyright credits/give it a slight
gradient glow ...now give your tag to a friend.
 
You're done...thank you for trying my tutorial
please send me a copy so that I can show case it on my blog
send to....
riggsbee53@gmail.com


10/24/12

PTU Kim's Korner and Zlata M

Biker Babe


This tutorial was written on August 27,2012.
Any similarities to another tutorial is purely coincidental.
All my tutorial are register with My Free Copyright.
Please do not claim as your own.
This tutorial writer assumes you have a working
knowledge of using Paint Shop Pro.
This tutorial was done in Paint Shop Pro9,
but can be adapted to use in other
Paint Shop Pro versions.


SUPPLIES NEEDED

Tube of choice: I'm using the awesome work of Zlata M .
Please do not use unless you have a license to do so.
You can get her tubes HERE

Scrapkit of Choice: I am using Kim's Korner PTU Biker Rally
You can purchase it HERE ...Kim

Template of choice:I am using Designs by Ali #154
Ali is no longer on the net...Thank you Ali

Mask of Choice: I am using Insatiable Dreams #117
You can download it Here...Thank you Cat

Filters used:Eye Candy 4000 gradient glow - HERE

Font for Name is DFKai-SB
Copy write is always done in Pixelette HERE

Dropshadow use through out H-2/V-2/O-50/B-5.00
Please leave a thank you when you downloading for supplies.

my tag is just a guide...please use your imagination
and make the tag your own you do not have to
use any of the supplies I used.


LET'S BEGIN

Open up Template and ShiftD and close original...delete
copyright layer/close all layers/choose paper of choice
copy/paste and put underneath background layer/go to mask
of choice with these setting and click ok/delete background
layer/change color to match tube/add drop shadow


On the following raster layers follow these directions...

activate circle layer/copy/paste paper of choice/resize
selection/invert on circle layer/delete on paperlayer/merge
down/keep activated/copy/paste tube of choice/selections
invert on circle layer/delete on tube layer/add drop shadow

activate long rectangle 1 layer/copy/paste paper of choice
resize/selection/invert on long rectangle 1 layer/delete on
paper layer/merge down

activate long rectangle 2 layer/copy/paste paper of choice
resize/selection/invert on long rectangle 2 layer/delete on
paper layer/merge down

activate long rectangle 3 layer/copy/paste paper of choice
resize/selection/invert on long rectangle 3 layer/delete on
paper layer/merge down

activate rectangle 1 layer/copy/paste paper of choice
resize/selection/invert on rectangle 1 layer/delete on paper
layer/merge down/add dropshadow/keep activated/copy/paste tube
resize/deleteon tube layer/duplicate/original layer/blend/hard
light/place duplicate tube layer underneath original/lower
opacity to 48/add drop shadow to both tubes

activate rectangle 2 layer/copy/paste paper of choice
resize/selection/invert on rectangle 2 layer/delete on paper
layer/merge down/add dropshadow/keep activated/copy/paste tube
resize/delete on tube layer/duplicate/original layer/blend
screen/place duplicate tube layer underneath original/lower
opacity to 52/add drop shadow to both tubes

add any other elements to make your tag your own/add drop shadow on
each element/resize your tag

copy/paste main tube/resizeif needed/place where it will look best
add drop shadow to tube

add your watermark and copyright credits/give it a slight gradient
glow ...now give your tag to a friend.

You're done...thank you for trying my tutorial
please send me a copy so that I can show case it on my blog

8/23/12

PTU SWA and Very Many

Punk Bitch
 
This tutorial was written on August 18,2012.
Any similarities to another tutorial is purely coincidental.
All my tutorial are register with My Free Copyright.
Please do not claim as your own.
This tutorial writer assumes you have a working
knowledge of using Paint Shop Pro.
This tutorial was done in Paint Shop Pro9,
but can be adapted to use in other
Paint Shop Pro versions.


SUPPLIES NEEDED
Tube of choice: I'm using the awesome work of Very Many .
Please do not use unless you have a license to do so.
You can get his tubes HERE
 
Scrapkit of Choice: I am using Scraps With Attitude PTU Scrap kit
Abbbey.You can download it HERE ...Thank you Missy
 
Template of choice:I am using Rosey Template #116
You can download it HERE...Thank you Rosey
 
Mask of Choice: I am using AquaRebel315 Mask #031
You can download it HERE....Thank you Cat
 
Filters used:Eye Candy 4000 gradient glow - HERE
Penta.con-Jeans HERE
 
Font for Name is Drury Lane  HERE
Copy write is always done in Pixelette  HERE

Dropshadow use through out H-2/V-2/O-50/B-5.00
Please leave a thank you when you downloading for supplies.

my tag is just a guide...please use your imagination
and make the tag your own you do not have to
use any of the supplies I used.


     LET'S BEGIN
Open up Template and ShiftD and close original...delete
copyright layer/close all layers/choose paper of choice
copy/paste and put underneath background layer/go to mask
of choice with these setting and click ok/delete background
layer/change color to match tube/add drop shadow


On the following raster layers follow these directions...
 
activate large pink circle layer/copy/paste paper of choice
resize/selection/invert on large pink circle layer/delete on paper
layer/merge down/add drop shadow

 
activate black circle layer/copy/paste paper of choice/resize
selections/invert on circle layer/delete on paper layer/merge down

change color to match tube/keep activated/copy/paste/tube closeup
place part that you want to show/delete on tube layer/deactivate
on tube layer/penta.com/jeans with these setting/click ok


activate purple rectangle layer/copy/paste paper of choice/resize
selection/invert on purplr rectangle layer/delete on paper layer
merge down/change the red stars to a color to match the tag/add
drop shadow

 
activate white rectangle layer/copy/paste paper of choice/resize
selection/invert on white rectangle layer/delete on paper layer/merge
down/change color to match tube/add drop shadow

 
activate small circle1 layer/copy/paste paper of choice/resize
selection/invert on small circle1 layer/delete on paper layer/merge
down/add drop shadoe/copy/paste element of choice/add drop shadow

 
activate small circle2 layer/copy/paste paper of choice/resize
selection/invert on small circle2 layer/delete on paperlayer/merge
down/add drop shadoe/copy/paste element of choice/add drop shadow

 
activate double strip layer/copy/paste paper of choice/resize
selection/invert on double strip layer/delete on paper layer/or
change the color to match tag/add drop shadow

 
activate left circle layer/copy/paste paper of choice/resize
selection/invert on left circle layer/delete on paper layer
change color of paper to match tag/merge down

 
activate right circle layer/copy/paste paper of choice/resize
selection/invert on right circle layer/delete on paper layer
change color of paper to match tag/merge down

leave left and right black squares as is and add drop shadow
 
activate middle circle layer/copy/paste paper of choice/resize
selection/invert on middle circle layer/delete on paper layer
change color of paper to match tag/merge down/keep activated/copy
paste closeup and resize to fit circle/duplicate/on original layer
blend/screen/place duplicate layer beneath original/add drop shadow
to both tubes

 
activate middle rectangle layer/copy/paste paper of choice/resize
selection/invert on middle rectangle layer/delete on paper layer
change color of paper to match tag/merge down/place element of choice
resize to fit/add drop shadow

leave light rectangle and frame as is/add drop shadow to frame
 
add your main tube/resize if needed/place where it will look best for
you/add drop shadow

 
now add any other element you wish to use to make your tag your
own/add drop shadow on each element/resize your tag

 
add your watermark and copyright credits/give it a slight gradient
glow ...now give your tag to a friend.

 
You're done...thank you for trying my tutorial
please send me a copy so that I can show case it on my blog

send to


3/26/12

FTU Inzpired Creationz and Eugene Rzhevskii

Punky Plaid

This tutorial was written on March 25,2012.
Any similarities to another tutorial is purely coincidental.
All my tutorial are register with My Free Copyright.
Please do not claim as your own.
This tutorial writer assumes you have a working
knowledge of using Paint Shop Pro.
This tutorial was done in Paint Shop Pro9,
but can be adapted to use in other
Paint Shop Pro versions.


SUPPLIES NEEDED

Tube of choice: I'm using the awesome work of Eugene Rzhevskii.
Please do not use unless you have a license to do so.
You can get her tubes HERE

Scrapkit of Choice: I am using FTU Inzpired Creationz Scrap kit
called Punk and Plaid...You can download it HERE..Thank you Nicky

Mask of choice:I am using Weescotslass mask #276...
You can download it HERE...Thank you Chelle

Template of Choice: I am using Additive Pleasures-Template #8
You can download it HERE....Thank you Tammi

Filters used:Eye Candy 4000 gradient glow and glass - HERE

Font for Name is Organic Elements...HERE
copy write is always done in Pixelette ...HERE

Drop shadow use through out H-2/V-2/O-65/B-6.00
Please leave a thank you when you downloading for supplies.

my tag is just a guide...please use your imagination
and make the tag your own you do not have to
use any of the supplies I used.

     LET'S BEGIN

Open up Template and ShiftD and close original...delete
copyright layer/close all layers/choose paper of choice
copy/paste and put underneath background layer/go to mask
of choice with these setting and click ok
delete background layer

On the following raster layers follow these directions...

Color rectangle1 and rectangle2 to match you color scheme of your
tag/add drop shadow to both

Leave thin rectangle1 and thin rectangle2 as is (or change color
to match your tag) /add drop shadow to both

activate circle layer/copy/paste paper of choice/go to circle layer
invert/go to paper layer and delete/merge down/keep activated

copy/paste tube/resize/place the part of the tube that you want to
show/on circle layer/invert/on tube layer/delete/deactivate
add drop shadow

copy/paste frame2/resize to fit circle layer
eyecandy 400-glass with these setting
add drop shadow/place over top of thin strip and rectangle

leave thin strip as is or change the color to suit your tag/add drop shadow

color rectangle to match your tag/I made mine a little darker/activate/
copy paste tube/place to the part you want showing/on rectangle layer
invert/on tube layer/delete/blend/overlay/add drop shadow

leave thin strip2 as is/add drop shadow

activate small circle/choose two colors that match your tag/ add gradient
to circle/change circle frame to white/add drop shadow

now add your main tube and place where you want it/add drop shadow

I change the colors of the word art to match my tag

now add any other element you wish to use to make your tag your own/add drop
shadow on each element/resize your tag if needed

add your watermark and copyright credits/give it a slight gradient glow
...now give your tag to a friend.

You're done...thank you for trying my tutorial
please send me a copy so that I can show case it on my blog
send to riggsbee53@gmail.com