11/27/12

PTU LadyHawwk Designs and Jessica Dougherty

Xmas Hottie


This tutorial was written on November 26,2012.
Any similarities to another tutorial is purely coincidental.
All my tutorial are register with My Free Copyright.
Please do not claim as your own.
This tutorial writer assumes you have a working
knowledge of using Paint Shop Pro.
This tutorial was done in Paint Shop Pro9,
but can be adapted to use in other
Paint Shop Pro versions.


SUPPLIES NEEDED

Tube of choice: I'm using the awesome work of Jessica Dougherty .
Please do not use unless you have a license to do so.
You can get her tubes HERE

Scrapkit of Choice: I am using Ladyhawwk Designs IB-JD 33-2
You can purchase it HERE ...Cathy

Template of choice:I am using Additive Pleasures Christmas #2
You can download it HERE...Thank you Tamie

Mask of Choice: I am using Vix Mask #10 Christmas 2010
You can download it Here...Thank you vix

Filters used:Eye Candy 4000 gradient glow - HERE

Font for Name is Neuropol
Copy write is always done in Pixelette HERE

Dropshadow use through out H-2/V-2/O-50/B-5.00
Please leave a thank you when you downloading for supplies.

my tag is just a guide...please use your imagination
and make the tag your own you do not have to
use any of the supplies I used.

LET'S BEGIN

Open up Template and ShiftD and close original...delete
copyright layer/close all layers/copy/paste paper of choice
layers/load/save mask/locate mask/set with these settings
below/click ok


On the following raster layers follow these directions...

activate glittered rectangle layer/leave as is/activate rectangle
layer/copy/paste paper of choice/resize if needed/selection/invert
on rectangle layer/delete on paper layer/add drop shadow/copy
paste element of choice/resize to fit/add drop shadow

activate glittered circle layer/add drop shadow/leave as is/activate
circle layer/copy/paste closeup tube/resize if needed/invert on circle
layer/delete on tube layer/duplicate tube/on original layer/blend/soft
light/on duplicate layer/place above original layer/lower opacity to
76%/add drop shadow to both

change color of strip2 layer to black/add drop shadow

activate left glittered circle layer/leave as is/activate circle layer
change color to black/add elements of choice/add drop shadow to all
elements and circle layer/leave strip layer as is

add any other elements to make your tag your own/add drop shadow on
each element/resize your tag

copy/paste main tube/resize if needed/place where it will look best
add drop shadow to tube

leave glittered part of word art as is/on word art layer /change
color of green letters to black letters/add drop shadow to glittered
word art.

add your watermark and copyright credits/give it a slight gradient
glow ...now give your tag to a friend.

when doing name alternate letters with same colors as word art/add fat
gradient glow to name/add drop shadow

You're done...thank you for trying my tutorial
please send me a copy so that I can show case it on my blog

PTU LadyHawwk Designs and Pinuptoons

Sexy Right Now


This tutorial was written on November 18,2012.
Any similarities to another tutorial is purely coincidental.
All my tutorial are register with My Free Copyright.
Please do not claim as your own.
This tutorial writer assumes you have a working
knowledge of using Paint Shop Pro.
This tutorial was done in Paint Shop Pro9,
but can be adapted to use in other
Paint Shop Pro versions.


SUPPLIES NEEDED

Tube of choice: I'm using the awesome work of Pinuptoons .
Please do not use unless you have a license to do so.
You can get his tubes HERE

Scrapkit of Choice: I am using Ladyhawwke Designs IB-PUT108
You can purchase it HERE ...Cat

Template of choice:I am using Additive Pleasures #5
You can download it HERE...Thank you Tamie

Mask of Choice: I am using Insatiable Dreams Mask #155
You can download it Here...Thank you Cat

Filters used:Eye Candy 4000 gradient glow - HERE

Font for Name is Impact
Copy write is always done in Pixelette HERE

Dropshadow use through out H-1/V-1/O-50/B-5.00

Please leave a thank you when you downloading for supplies.

my tag is just a guide...please use your imagination
and make the tag your own you do not have to
use any of the supplies I used.

LET'S BEGIN

Open up Template and ShiftD and close original...delete
copyright layer/close all layers/copy/paste paper of choice
layers/load/save mask/locate mask/set with these settings
below/click ok


On the following raster layers follow these directions...

activate strip layer/copy/paste paper of choice/resize
selection/invert on strip layer/delete on paper layer/merge
down/add drop shadow

activate strip2 layer/copy/paste paper of choice/resize
selection/invert on strip2 layer/delete on paper layer/merge
down/add drop shadow

activate rectangle layer/copy/paste paper of choice/resize
selection/invert on rectangle layer/delete on paper layer
merge down/add drop shadow

activate rectangle2 layer/copy/paste paper of choice/resize
selection/invert on rectangle2 layer/delete on paper layer
merge down/add drop shadow
recolor text from white to black

activate thin rectangle layer/copy/paste paper of choice
resize selection/invert on thin rectangle layer/delete on
paper layer/merge down/add drop shadow

activate circle layer/copy/paste paper of choice/resize
selection/invert on circle layer/delete on paper layer
merge down/if using the tea pot paper/magic wand/draw a
line point to point around the middle of the paper out
lining the middle section/copr/paste closeup of tube
resize to fit/selection/delete on tube layer/deactivate
circle frame layer as is/add drop shadow to frame/text2
layer as is

change color of word art and merge down onto background
add drop shadow to back ground

add any other elements to make your tag your own/add drop
shadow on each element/resize your tag

copy/paste tube of choice/resize if needed/place where it
will look best/add drop shadow

add your watermark and copyright credits/give it a slight
gradient glow ...now give your tag to a friend.

You're done...thank you for trying my tutorial/If you
try my tutorial/please send me a copy so that I can show
case it on my blog/send to.... riggsbee53@gmail.com

PTU LadyHawwk Designs and Marika

Practice Safe Hex


This tutorial was written on October 31st 2012.
Any similarities to another tutorial is purely coincidental.
All my tutorial are register with My Free Copyright.
Please do not claim as your own.
This tutorial writer assumes you have a working
 knowledge of using Paint Shop Pro.
This tutorial was done in Paint Shop Pro9,
but can be adapted to use in other
Paint Shop Pro versions.

SUPPLIES NEEDED

Tube of Choice: I am using the amazing artwork of
Marika.You can purchase her tubes HERE
Please do not use without a license to use

Scrapkit of Choice: I am using LadyHawwk_Marika-Package 10
You can purchase it HERE....Thank you Cat

 
Template for forum tag: I am using amyleahgimptastictuts #161
You can download it HERE....Thank you Leah
resize template for forum portion

Filters used: AAA Frame - HERE
 Eye Candy 4000 gradient glow - HERE

 
Font for name is Santa's Sleigh
copy write is always done in Pixelette ...
Get them HERE

Drop shadow use through out H-2/V-2/O-65/B-6.00
Please leave a thank you when you downloading for supplies.

my tag is just a guide...please use your imagination
 and make the tag your own
you do not have to use any of the supplies I used.
With a three piece set,the avatar,forum tag and sig tag looks alike.
please do not take the sig tag and try to stecth or shirk it.
You must make each tag separate.
LET'S BEGIN


Sig Tag
Open up Template and ShiftD and close original
delete copyright layer

close all layers/choose paper of choice/copy/paste
and put underneath rectangle layer
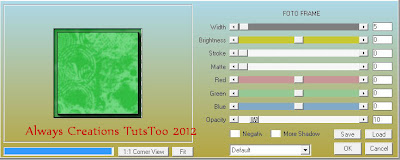
effects/AAA frame/foto frame with these setting


activate rectangle1 layer/copy/paste paper of choice
resize/selection/invert on rectangle1 layer
delete on paper layer/merge down/add drop

shadow/copy/paste element of choice/resize if
 needed/place where you want/add drop shadow

activate rectangle2 layer/copy/paste paper of choice
resize/selection/invert on rectangle2 layer
delete on paper layer/merge down/add drop

shadow/copy/paste element of choice/resize if
 needed/place where you want/add drop shadow

activate medium rectangle layer/copy/paste
 paper of choice/resize selection/invert on
medium rectangle layer/delete on paper layer
merge down/add drop shadow

activate square layer/copy/paste paper of choice
resize/selection/invert on square layer/delete on
paper layer/merge down/add drop

shadow/copy/paste element of choice/resize
if needed/place in center of square/add drop shadow

activate circle1 layer/copy/paste paper of choice
resize/selection/invert on circle1 layer/delete on
 paper layer/merge down/add drop

shadow/leave activated/copy/paste tube of choice
resize so that her head fits the circle1/invert on
circle layer/delete on tube layer adjust
sharpen/add drop shadow/duplicate tube
 and close this layer

activate large rectangle1 layer/copy/paste paper of
choice/resize selection/invert on large rectangle1 layer
delete on paper layer/merge down/add drop shadow
copy/paste element of choice/resize
if needed/place where you want/add drop shadow

activate circle2 layer/copy/paste paper of choice
resize/selection/invert on circle2 layer/delete on
 paper layer/merge down/add drop

shadow/leave activated/open duplicated tube
move to circle2 layer/mirror so that it's
 facing the opposit direction

activate large rectangle2 layer/copy/paste
paper of choice/resize/selection/invert on large
rectangle2 layer/delete on paper layer

merge down/add drop shadow/copy/paste
element of choice/resize if needed
place where you want/add drop shadow

activate small circle1 layer/copy/paste
paper of choice/resize/selection/invert on
 small circle1 layer/delete on paper layer
merge down/add drop shadow

activate small circle2 layer/copy/paste paper
 of choice/resize/selection/invert on small
circle2 layer/delete on paper layer
merge down/add drop shadow

invert on large circle layer/delete on paper
layer/merge down/add drop shadow
leave activated/copy/paste closeup tube of
choice/resize so that her head fits the
 circle/invert on circle layer/delete on tube
 layer/adjust/sharpen/add drop shadow

copy/paste umbella/resize/place underneath tube
add drop shadow

activate/circle ring/copy/paste paper of choice
resize/selection/invert on circle ring layer
delete on paper layer/add drop shadow

now go back and duplicate umbella/place on top
of circle ring/take eraser tool and erase
the handle of the umbella

copy/paste your main tube/resize if needed/place
on left side of  tag/add drop shadow/on word
art layer/color word art to match the color
of the tag/add drop shadow

now add the rest of your elements where you
 want them/make the tag your own/Have
fun with it/make sure you add a drop shadow
 to each element.


Forum Tag

Using same template/ShiftD and close original
delete copyright layer/Open up a new raster 600x200.
using model for template above/resize each layer
of the template to match the forum tag/copy
and place each layer one by one into the new
raster/follow directions above for signature tag when
making forum tag


Avatar

open new raster layer/170x170/copy/paste
 same paper as used in both tags
effects/AAA frame/foto frame with these setting


copy/paste an element of choice/resize to fit
place on right side of tag/add drop shadow
copy/paste tube/resize to fit/place
where you want it/add drop shadow


add your watermark and copyright credits
to all three tags...give your forum set to afriend

You're done...thank you for trying my tutorial
please send me a copy so that I can show case it on my blog

11/17/12

FTU Clarey Scraps and Ralph Macrey

Get Checked

 
This tutorial was written on October 18,2012.
Any similarities to another tutorial is purely coincidental.
All my tutorial are register with My Free Copyright.
Please do not claim as your own.
This tutorial writer assumes you have a working
knowledge of using Paint Shop Pro.
This tutorial was done in Paint Shop Pro9,
but can be adapted to use in other
Paint Shop Pro versions.


SUPPLIES NEEDED

Tube of choice: I am using the artwork of Ralph Macrey
Use of this tube is prohibited unless you have a license to
do so.You may purchase his tubes at Artistic Dreams Imaging

Scrapkit of Choice: I am using Clarey Awareness kit FTU
unfortunately Clarey no longer has her blog. Please use
another kit

Template of choice: I am using Brights Kreationz #18
BCA Template-You can download it HERE...Thank you Bright

Mask of Choice: I am using 0mask-011_LT...You can download it
Here.....If you know who made this mask please contact me at
the address below so that I may give credit

Filters used: Eye Candy 4000 gradient glow - HERE

Font for used: New Romans Times and Constantia
Copy write is always done in Pixelette
Get them HERE

Drop shadow use through out H-2/V-2/O-50/B-5.00
Please leave a thank you when you downloading for supplies.
this is a very simple tutorial, great for beginners

my tag is just a guide...please use your imagination
and make the tag your own. You do not have to
use any of the supplies I used.


LET'S BEGIN

Open up Template and ShiftD and close original...delete
copyright layer/close all layers/copy/paste paper of choice
layers/load/save mask/locate mask/set with these settings
below/click ok


layers/merge/merge group/change color to
match a color from your tube/add drop shadow

On the following raster layers follow these directions...

glittered rectangle layer as is/color rectangle layer to
match a color from your tube/add drop shadow

copy/paste tube of choice/duplicate and close/

bottom glittered rectangle layer as is/on bottom rectangle
layer/ color paper to match your tag/add drop shadow

top glittered rectangle layer as is/on top rectangle layer
color paper to match your tag/add drop shadow

change BCA word art color by alternating the letters/first using
magic wand click inside the letters you want for the first color
using fill tube fill those letters/deactivate those letters and
click into the remaining letters/using your fill tube fill these
letters with a different color/deactivate and add drop shadow

change Get Checked word art letterwith the darker color
add a drop shadow

add any other elements to make your tag your own/add drop
 shadow on each element/resize your tag

add your watermark and copyright credits/give it a slight gradient
glow ...now give your tag to a friend.

You're done...thank you for trying my tutorial
please send me a copy so that I can show case it on my blog

11/15/12

FTU Bluedreams Designs and Ralph Macrey

Beware


This tutorial was written on October 17,2012.
Any similarities to another tutorial is purely coincidental.
All my tutorial are register with My Free Copyright.
Please do not claim as your own.
This tutorial writer assumes you have a working
knowledge of using Paint Shop Pro.
This tutorial was done in Paint Shop Pro9,
but can be adapted to use in other
Paint Shop Pro versions.


SUPPLIES NEEDED

Tube of choice: I'm using the awesome work of Ralph Macrey .
Please do not use unless you have a license to do so.
You can get his tubes HERE

Scrapkit of Choice: I am using Bluedreams Designs FTU Breast
Cancer Awareness You can download it HERE ...Blue

Template of choice:I am using Temps by Tonya Beware
You can download it HERE...Thank you Tonya

Mask of Choice: I am using Insatible Dreams Mask #37
You can download it HERE...Thank you Cat

Filters used:Eye Candy 4000 gradient glow - HERE

Font for Name is Gabriola
Copy write is always done in Pixelette HERE

Dropshadow use through out H-2/V-2/O-50/B-5.00

Please leave a thank you when you downloading for supplies.

my tag is just a guide...please use your imagination
and make the tag your own you do not have to
use any of the supplies I used.

LET'S BEGIN

Open up Template and ShiftD and close original...delete
copyright layer/close all layers/copy/paste paper of choice
layers/load/save mask/locate mask/set with these settings
below/click ok


On the following raster layers follow these directions...

activate rectangle1 layer/copy/paste paper of choice/resize
selection/invert on rectangle1 layer/delete on paper layer
merge down/add drop shadow

activate rectangle2 layer/copy/paste paper of choice/resize
selection/invert on rectangle2 layer/delete on paper layer
merge down/add drop shadow

activate circle1 layer/copy/paste paper of choice/resize
selection/invert on circle1 layer/delete on paper layer
merge down/leave activated/copy/paste tube of choice
resize if needed/selections/delete on tube layer/dulplicate
tube/on original layer/blend/hard light on duplicate layer
lower opacity to 50%/place on top of original layer
add drop shadow

activate circle2 layer/copy/paste paper of choice/resize
selection/invert on circle2 layer/delete on paper layer
merge down/leave activated/copy/paste tube of choice
resize if needed/selections/delete on tube layer/dulplicate
tube/on original layer/blend/screen on duplicate layer
lower opacity to 76%/place on top of original layer
add drop shadow

activate rectangle background layer/copy/paste
 paper of choice/resize/invert on rectangle background
layer/delete on paper layer

merge down/copy/paste element of choice/resize
add drop shadow

copy/paste main tube/resize if needed/place where it will
look best/add drop shadow to tube

add any other elements to make your tag your
own/add drop  shadow on each element
resize your tag change wordart with word
art in kit/add drop shadow

add your watermark and copyright credits/give it a slight
gradient glow ...now give your tag to a friend.

You're done...thank you for trying my tutorial
please send me a copy so that I can show case it on my blog


FTU Bluedreams Designs and Ralph Macrey

Check Your Rack

This tutorial was written on October 16,2012.
Any similarities to another tutorial is purely coincidental.
All my tutorial are register with My Free Copyright.
Please do not claim as your own.
This tutorial writer assumes you have a working
knowledge of using Paint Shop Pro.
This tutorial was done in Paint Shop Pro9,
but can be adapted to use in other
Paint Shop Pro versions.


SUPPLIES NEEDED

Tube of choice: I'm using the awesome work of Ralph Macrey .
Please do not use unless you have a license to do so.
You can get his tubes HERE

Scrapkit of Choice: I am using Bluedreams Designs FTU BCA-2009
You can purchase it HERE ...Blue

Template of choice:I am using Designs by Vaybs 0710
You can download it HERE...Thank you Vaybs

Mask of Choice: I am using Insatible Dreams Mask #370
You can download it HERE...Thank you Cat

Filters used: Eye Candy 4000 gradient glow - HERE

Font for Name is Bella Donna
Copy write is always done in Pixelette HERE

Dropshadow use through out H-2/V-2/O-50/B-5.00
Please leave a thank you when you downloading for supplies.

my tag is just a guide...please use your imagination
and make the tag your own you do not have to
use any of the supplies I used.
LET'S BEGIN

 
Open up Template and ShiftD and close original...delete
copyright layer/close all layers/copy/paste paper of choice
layers/load/save mask/locate mask/set with these settings
below/click ok


On the following raster layers follow these directions...

activate square1 layer/copy/paste paper of choice/resize
selection/invert on square1 layer/delete on paper layer
merge down/leave bca layer as is/add drop shadow to square
layer/circle1 layer as is

activate circle2 layer/copy/paste paper of choice/resize
selection/invert on circle2 layer/delete on paper layer
merge down/leave activated/copy/paste tube of choice
resize if needed/selections/delete on tube layer/add drop
shadow/leave circle3 and circle4 as is/copy/paste element
of choice/ resize if needed/add drop shadow

activate square2 layer/copy/paste paper of choice/resize
invert on square2 layer/delete on paper layer/merge down
copy/paste element of choice/resize/add drop shadow

activate square3 layer/copy/paste paper of choice/resize
invert on square3 layer/delete on paper layer/merge down
copy/paste element of choice/resize/add drop shadow

activate circle5 layer/copy/paste paper of choice/resize
invert on circle5 layer/delete on paper layer/merge down
leave circle6 layer and circle7 layer as is/keep circle7
layer activated/copy/paste tube of choice/delete on tube
layer/duplicate tube/on original layer/blend/soft light
on duplicate layer lower opacity to 90%/place on top of
original layer/add drop shadow

leave circle8 and circle9 as is/add drop shadow/copy/paste
element of choice on each/resize/add drop shadow/leave
frame1 and frame2 as is/add drop shadow to each

copy/paste main tube/resize if needed/place where it will
look best/add drop shadow to tube

add any other elements to make your tag your own/add drop
shadow on each element/resize your tag
leave wordart as is/add drop shadow

add your watermark and copyright credits/give it a slight
gradient glow ...now give your tag to a friend.

You're done...thank you for trying my tutorial
please send me a copy so that I can show case it on my blog
send to.... riggsbee53@gmail.com

FTU Monti Playhouse and Elias Chatzoudis

Fight


This tutorial was written on October 11,2012.
Any similarities to another tutorial is purely coincidental.
All my tutorial are register with My Free Copyright.
Please do not claim as your own.
This tutorial writer assumes you have a working
knowledge of using Paint Shop Pro.
This tutorial was done in Paint Shop Pro9,
but can be adapted to use in other
Paint Shop Pro versions.


SUPPLIES NEEDED

Tube of choice: I'm using the awesome work of Elias Chatzoudis .
Please do not use unless you have a license to do so.
You can get his tubes HERE

Scrapkit of Choice: I am using FTU Monti Breast Cancer Awareness
You can download it HERE ...Thank you Monti

Template of choice:I am using Template Divine Intentionz #408
You can download it HERE...Thank you Missy

Mask of Choice: I am using Monti Blind mask
You can download it Here...Thank you Monti

Filters used:Eye Candy 4000 gradient glow - HERE

Font for Name is Inscription LET
Copy write is always done in Pixelette HERE
Dropshadow use through out H-2/V-2/O-50/B-5.00

Please leave a thank you when you downloading for supplies.

my tag is just a guide...please use your imagination
and make the tag your own you do not have to
use any of the supplies I used.

LET'S BEGIN

Open up Template and ShiftD and close original...delete
copyright layer/close all layers/copy/paste paper of choice
layers/load/save mask/locate mask/set with these settings
below/click ok


On the following raster layers follow these directions...
copy/paste paper of choice/resize if needed/place underneath
mask layer

activate rectangle layer/copy/paste paper of choice/resize
selection/on rectangle layer/invert/on paper layer delete
add element of choice/ resize if needed/add drop shadow to both
leave small rectangle as is/add drop shadow

activate left square layer/copy/paste paper of choice/resize
selection/ invert on square layer/delete on paper layer

activate right square layer/copy/paste paper of choice/resize
selection/ invert on square layer/delete on paper layer
add element of choice/add drop shadow

leave both med rectangle and long rectangle layers as is
add drop shadow

activate large square layer/recolor to match tag/copy/paste
tube of choice/resize as needed/selection/invert on square
layer/delete on tube layer/add drop shadow

activate medium square layer/recolor to match tag/copy/paste
element of choice/resize as needed/add drop shadow

activate small square layer/recolor to match tag/copy/paste
element of choice/resize as needed/add drop shadow
leave frames as is and add drop shadow

add any other elements to make your tag your own/add drop
shadow on each element/resize your tag

add main tube of choice/resize if needed/place where it will
look best/add drop shadow

add your watermark and copyright credits/give it a slight
gradient glow ...now give your tag to a friend.

You're done...thank you for trying my tutorial
please send me a copy so that I can show case it on my blog
send to.... riggsbee53@gmail.com