10/9/09

FTU Essence of Creativity and Ismael Rac - Chicks Rock It Better

This tutorial was written October 8 2009. Any similarities to another tutorial
is solely coincidental. All my tutorial are Free Copyright Protected so please read my tou before using....This is a easy tutorial to follow...Have fun with it
and use your imagination.It doesn't have to look like mine.It's just a guide.


Supplies Needed

Tube of Choice: I am using the awesome work of Ismael Rac. 

You can purchase his
great work HERE. Please do not use this tube without a license to do so.

Mask of Choice: I'm using Weelasscot WSL 204. You can download it Here. Thanks
Chell for the use of your mask.

Template of Choice: Missy of Misfit Scraps #159. She has some awesome templates.
Thank you Missy for your talented work. Get it HERE

Scrap Kit of Choice: The other half of Misfit Scraps-Yvette's FTU Scrap called
Rocker Chick. She has awesome scraps as well.a great team.Thanks Yvette.You can
Download her scrap HERE. Please show these ladies some love when you download.
                   
Drop Shadow V-6 H-5 O-52 B-10
Font is Rock It and Pixelette...get it HERE

Let's Begin

Open up Template ShiftD and close origunal.Delete copy layer.
Close all layers except white background. Go to scrap kit and Choose
paper of choice ...paste over top of background layer...Go to Layers
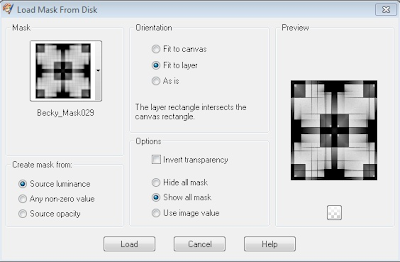
Load/save mask/load mask from disc and find mask WSL 204 with these
settings.....

Create mask from - Source luminance/Orienation-Fit to canvas
Options-Hide all mask...Click ok.layers/merge group

Open each layer on the template.Activate the layer/ Copy/paste paper of choice
Resize paper if needed...On the template layer/selection/invert then go to paper
layer and delete....merge downand add drop shadow. Repeat this process with each
layer until your template is finish.I resize each layer by 90%..
Now comes the fun part...
Select any element you wish for your tag...resize before placing/add dropshadow to
all your elements as you place them so you don't forget. Add your tube and resize
and add drop shadow....Resize the entire tag if your choose
Don't forget to add copyright and watermark. Be nice to a friend and gift the tag
with their name on it...Congrats you're done...

Thank you for using my tutorial!!!!

FTU Bel-Vidotti and Ismael Rac - I'm Hot You're Not

This tutorial was written by me on April 22,2009. 
Any similarities to another tutorial is purely coincidental.
This tutorial was written a while ago.
All my tutorial are register with Free Copyright Protection
,so please read my tou before using...
This tutorial writer assumes you have a working 
knowledge of using Paint Shop Pro. 
This tutorial was done in Paint Shop Pro9,
 but can be adapted to use in other Paint Shop Pro versions.

 photo IR_ImHot.gif


SUPPLIES NEEDED

Tube of Choice: I am using the awesome artwork of Ismael Rac.
you will need a total of 5 tubes
You can purchase his tubes HERE at AMI. 
Please do not use without a license to do so.

Scrapkit of Choice: I am using a FTU Scrapkit from 
Bel-Vidotti Scraps Called CHIC. you can find it HERE
Thanks  for the use of this awesome kit.

Mask of Choice: I'm using  EBD MASK #2 from
Enchanted by Darkness  - place in your mask folder in psp
You can get it from HERE
Thanks for the use of your mask Rachael

Template of Choice: I'm using Babes Designz -Template #1.
Thanks Babe for the Share

Font for text and name is Blue Plate Special SW
and copy write is always done in Pixelette
 Get Them ....HERE.

Drop shadow use throughout H-2/V-2/O-50/B-5

Plugin in used VM Natural-Sparkle..
if you don't have it...get it HERE

LET'S BEGIN

Open up Template and duplicate and then close original
 (we will resize later)
x out all layers except background.
 Go to scrapkit and choose paper #1
Copy and paste above white background
go to Layers...load/save mask...load mask from disk


Merge group down resize by 90% 


 un x the eclipse layer and resize by 90% 3 times
-using magic wand, click inside eclipse - 
Go to kit and choose paper of choice ( I chose paper #16) and paste as
a new layer/selections/invert and delete. add drop shadow..


Unclick rectangle and resize by 90% 2times

using magic wand again click inside rectangle
Choose another paper and paste as a new layer

Selection/invert and delete. 
Click on the frame layer and resize by 90% 2 times 
 using magic wand choose paper/copy and paste as a new layer
selection/invert/delete all frame except the first frame.

Take your first tube and copy/paste and resize to fit frame

invert and delete/now give it a drop shadow in the color of the tube. 
Repeat this step for each frame. 
Once you have finish go to the rectangle layer and add a drop shadow.

Add your main tube/resize to fit

 and place it where it will look best
give it a drop shadow

Go to your Girl's On Film layer and un click it

resize by 90% 2 times...
(I separated  the words putting one on top 
and one on the bottom depending on which
 tube you use for your main tube)

Now for the wordart layer- 

First go to your mask layer and click on it.
take your freehand selection tool with
 the following setting shown below


Go around the top circle and cut the top circle off. Now to to elipse tool with the following setting shown below...


foreground black/background null/draw out an eclipse around top circle. 
Take your text tool/point it until you see the a)
 and type the same saying as word art
"I'm Wanted,I'm Hot,I'm Everything You're Not"
in Font of Choice( I used Blue Plate Special SW ) size 24 - 
once it's in position go to layer convert.

Now delete the Original Word Art Layer. 

ok let spice it up a little.
Add some embellishments of your choosing

 and give each one a drop shadow.
Resize and add your copyright and signature

....or give as a gift..


 Now it's time to add some animation

merge visible all layers and duplicate twice
x off top two layers and activate bottom layer
Go to VM Natural-Sparkle with the following setting


Random Seed as ...bottom layer-77
x off bottom layer and open middle layer- 

change only the random seed to 135- click ok
x off middle layer and open top layer- 

change only the random seed to 18- click ok

NOW LET'S GO TO ANIMATION SHOP AND FINISH OUR TAG

close off the top two layer and activate the bottom layer

 copy and paste in animation shop as a new layer
Go back to PSP and close bottom layer and activate middle layer
copy and paste in animation shop after current frame
Go back to PSP and close middle layer and activate top layer
copy and paste into animation shop after current frame
Go to Edit/select all/animation/frame properties/15
view animation...if satisfied Save as gif and you're done!!!

 Hope you enjoyed doing my tutorial

If you try please send me a copy so
I can showcase on my blog
send to riggsbee53@gmail.com 

FTU Scrappity Scraps and More and Keith Garvey - Think Pink

This tutorial was written October 6,2009. 
Any similarities to another tutorial is purely coincidental.
All my tutorial are protected through  My Free Copyright
 so please read my tou before using
This is my Second Breast Awareness tutorial.
 I hope you enjoy using this tutorial.


Supplies needed

Tube of Choice: I am using one of Keith Garvey gorgeous tubes.
You can purchase his tubes HERE
You must have a license to use his art

Template of choice: I'm using one from Scrapity Scraps and More..
you can get it HERE.....Please leave
some love when you download from her site. Thank you

Scrap Kit of choice:  I'm using one from Nicole 
at Digital Artistry by Nicole...Thank you Nicole

Mask of Choice: I'm using Monti-Blinds Mask ...You can get it HERE..
Don't forget to leave some love....Thank you Monti

Drop shadow throughout is H-2 V-2 O-40 B-4 C- blk
Font is Mr.Leopolde and Pixelette which can be found HERE
No outside filters needed

Let's Begin

Open up Template/ Image canvas size 700x700/click ok
 flood fill background white (we will resize later)
delete copyright layer/x out all layers except background.
Go to scrapkit and choose paper of choice.
  Copy and paste above white background
go to Layers...load/save mask...load mask from disk

Merge group down and duplicate once...merge down

activate lg circle layer/copy/paste paper of choice
go to lg circle layer/invert/go to paper layer and delete
delete original circle layer/add drop shadow
leave dotted circle layer as is 
activate lg rectangle layer/copy/paste paper of choice
go to lg rectangle layer/invert/go to paper layer and delete
delete original layer/add drop shadow
leave middle circle white/add doodle/resize/add drop shadow

activate double diamond layer/copy/paste paper of choice
go to double diamond layer/invert/go to paper layer 
and delete/delete original layer/add drop shadow
 I left the diamond frame the way it was (white)

activate rectangle1 layer/copy/paste paper of choice
go to rectangle1 layer/invert/go to paper layer and delete
delete original layer/add drop shadow
activate rectangle2 layer/copy/paste paper of choice
go to rectangle2 layer/invert/go to paper layer and delete
delete original layer/add drop shadow
 
resize everything to your liking......
Add any element to make your tag your own..
I used the word art,bow,and doodle....drop shadow on everything
Add your tube on top of everything except wordart
 give it a drop shadow....resize your tag if needed
Add copyright and watermark..
Add a friends name and you're done!!!!!

Thank you for trying my tutorial!!!
If you use please send me a copy
so I can showcase it
send to riggsbee53@gmail.com

10/8/09

FTU Cazzie Scraps and Victor Jung - Save The Boobies

This tutorial was written October 6, 2009. 
Any similarities to another tutorial is purely coincidental.
All my tutorial are protected through  My Free Copyright,
 so please read my tou before using...
This is my First Breast Awareness tutorial. 
I hope you enjoy using this tutorial.


Supplies needed


Tube of Choice: I am using the awesome work of Victor Jung.
 You can find his fabulous art work HERE
Please do not use his art work unless you have a license to do so...


Template of choice: I'm using one from Scrapity 
Scraps and More..you can get it HERE.
Please leave some love when you download
 from their site. Thank you


Scrap Kit of choice: I'm using Cazzie Scraps,
Called Breast Cancer Awareness2009....you can
get it HERE...Please leave some Love.Thank you Cazzie


Mask of Choice: I'm using weescotslass WSL142...
You can get it HERE.
.Don't forget to leave some love.
Thank you Chell


Drop shadow throughout is H-2 V-2 O-40 B-4 C- blk

Font is Fireside ChatNF and Pixelette 
which can be found HERE
No outside filters needed


Let's Begin


Open up Template and go to Image canvas size 700x700 click ok
and flood fill background white (we will resize later)
delete copyright layer.x out all layers except background. 

Go to scrap kit and choose paper of choice.
Copy and paste above white background. go to Layers...
load/save mask...load mask from disk


Merge group down and duplicate once...merge down

activate rectangle layer/copy/paste paper of choice
rectangle layer/selections/ invert/paper layer
delete/add drop shadow

activate thin rectangle layer/copy/paste paper of choice
thin rectangle layer/selections/ invert/paper layer
delete/add drop shadow
 leave thin frame as is

activate rectangle1 layer/copy/paste paper of choice
rectangle1 layer/selections/ invert/paper layer
delete/add drop shadow

activate rectangle2 layer/copy/paste paper of choice
rectangle2 layer/selections/ invert/paper layer
delete/add drop shadow
 
activate large circle layer/copy/paste paper of choice
large circle  layer/selections/ invert/paper layer
delete/add drop shadow 

activate small circle layer/copy/paste paper of choice
small circle  layer/selections/ invert/paper layer
delete/add round frame from kit/add drop shadow 

(On half circle I left it white)
 I used the butterfly,rose,bow,frame and the survivor tag....drop shadow on everything....Add your tube on
 top of everything except word art
give it a drop shadow....resize your tag if needed

Add copyright and watermark..Add a friends
 name and you're done!!!!!

Thank you for trying my tutorial!!!