Showing posts with label Dirk Richter. Show all posts

9/25/15

CDO Monti Scraps and Dirk Richter

Asian Dreams

This tutorial was written on September 24,2015. 
Any similarities to another tutorial is purely coincidental.
All my tutorial are register with My Free Copyright. 
Please do not claim as your own.
This tutorial writer assumes you have a working 
knowledge of using Paint Shop Pro.
This tutorial was done in Paint Shop Pro9,
but can be adapted to use in other 
Paint Shop Pro versions.


SUPPLIES NEEDED

Tube of choice: I'm using the awesome work of Dirk Richter.
Please do not use unless you have a license to do so. 
Get Them HERE

Scrapkit of Choice: I am using CDO Monti Scraps-Asian Dreams/previously M 22-1
You can purchase it HERE ...Thanks Monti

Mask of Choice: I am using Vix Big Mask 019 and 020
You can download it HERE.... Thanks Vix

Filters used:Eye Candy 4000 gradient glow - HERE
Eye Candy 4000 Bevel Boss - HERE
Penta.com - Dot and Cross - HERE
Xero - Porcelain _ HERE

Font for Name is Bonzai - HERE
Copy write is always done in Pixelette  HERE

Drop shadow use through out H-4/V--4/O-50/B-7.00

Please leave a thank you when you downloading for supplies.

my tag is just a guide...please use your imagination 
and make the tag your own you do not have to 
use any of the supplies I used.


     LET'S BEGIN

Open up new raster layer 800x800/copy/paste paper of choice
resize to fit canvas/layers/load/save mask/find your mask
and set with these setting/click ok


copy/paste paper of choice/resize to fit canvas/layers/load
save mask/find your mask/and set with these setting/click ok


copy/paste element 8/resize by 70%/place on center of canvas
add drop shadow

copy/paste element 7/resize by 50% twice/place on left side of
screen/effects/penta.com/dot and cross with these settings/click
ok/add drop shadow


copy/paste element 22/ resize by 70%/place on right side of screen
add drop shadow

copy/paste element 1/resize by 65%/place in center of canvas/add
drop shadow

copy/paste element 3/resize by 50% twice and 70% once/place at the
bottom of element 22/add drop shadow

copy/paste tube of choice/resize by 70%/ place in center of canvas
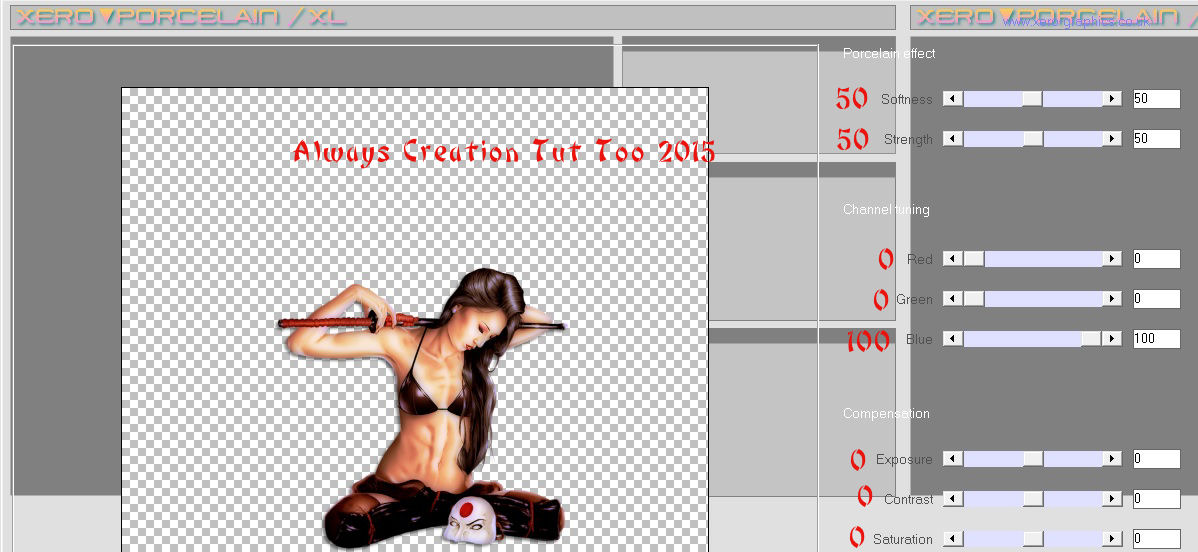
effects/xero/porcelain with these settings/click ok/add drop shadow


copy/paste element 11/ resize by 70%/place on left side of screen
add drop shadow

copy/paste element 5/ resize by 70%/place on right side of screen
add drop shadow

copy/paste element 17/ resize by 70%/place on right side of screen
add drop shadow

copy/paste element 18/ resize by 70%/place on right side of screen
add drop shadow

add any other elements you wish to use/resize if needed/add drop 
shadow to each element/place where they will look best

add word art if you wish/add fat gradient glow with these setting/add 
drop shadow


add your watermark and copyright credits/give it a slight gradient 
glow.....now give your tag to a friend/when doing the name use
these setting for gradient glow/click ok


You're done...thank you for trying my tutorial
please send me a copy so that I can show case it on my blog

3/15/13

PTU Foxy's Designz and Dirk Ritcher

I'm So Good at Being Bad

This tutorial was written on March 12,2013. 
Any similarities to another tutorial is purely coincidental.
All my tutorial are register with My Free Copyright. 
Please do not claim as your own.
This tutorial writer assumes you have a working 
knowledge of using Paint Shop Pro.
This tutorial was done in Paint Shop Pro9,
but can be adapted to use in other 
Paint Shop Pro versions.


SUPPLIES NEEDED

Tube of choice: I'm using the awesome work of Dirk Ritcher.
Please do not use unless you have a license to do so. 
You can get his tubes HERE

Scrapkit of Choice: I am using PTU Foxy Designs Dirk Ritcher IB-9-2
You can purchase it HERE ...Thanks Foxy

Template of choice:I am using Additive Pleasure Template #160
You can download it HERE...Thanks Tamie

Mask of Choice: I am using Creative Misfits Mask TBT #3
You can download it Here...Thanks Tonya

Filters used:Eye Candy 4000 gradient glow - HERE

Font for Name is Cage
Copy write is always done in Pixelette  HERE

Drop shadow use through out H-2/V-2/O-50/B-5.00

Please leave a thank you when you downloading for supplies.

my tag is just a guide...please use your imagination 
and make the tag your own you do not have to 
use any of the supplies I used.

     LET'S BEGIN

Open up Template and ShiftD and close original...delete 
copyright layer/close all layers/copy/paste paper of choice
resize to fit canvas/layers/load/save mask/find your mask
and set with these setting/click ok/delete background


Because there are a lot of layers it best to rename the layers
so you don't get confused/rename your layers like the picture
below


On the following raster layers follow these directions...

activate circle1 layer/copy/paste paper of choice/resize
paper/selection/invert on circle1 layer/delete on paper
layer/merge down/add drop shadow

activate circle2 layer/copy/paste paper of choice/resize
paper/selection/invert on circle2 layer/delete on paper
layer/merge down/add drop shadow/copy/paste element of choice
resize/add drop shadow

slant rec1 layer as is/copy/paste/element of choice/resize
place on right hand side/add drop shadow

activate slant rec2 layer/copy/paste paper of choice/resize
paper/selection/invert on slant rec2 layer/delete on paper
layer/merge down/copy/paste element of choice/resize if 
needed/place near top of rectangle/add drop shadow

activate lg rectangle1 layer/take a color from one of the 
papers/fill lg rectangle1 with this color/copy/paste frame1
resize to fit layer/add drop shadow

activate lg rectangle2 layer/take another color from one of 
the papers/fill lg rectangle1 with this color/add drop shadow

activate slant rec3 layer/copy/paste paper of choice/resize
paper/selection/invert on slant rec3 layer/delete on paper
layer/merge down/add drop shadow/copy/paste element of choice
resize/add drop shadow/leave slant rec4 and slat rec5 layers 
as is/add drop shadow/on slant rec5 layer/copy/paste element
of choice/resize/place at top/add drop shadow

activate slant rec6 layer/copy/paste paper of choice/resize
paper/selection/invert om slant rec6 layer/delete on paper
layer/merge down/keep activated/copy/paste tube of choice
resize to fit/delete on tube/add drop shadow to tube/leave
frame1 as is/add drop shadow to frame

activate slant rec7 layer/copy/paste paper of choice/resize
paper/selection/invert om slant rec7 layer/delete on paper
layer/merge down/keep activated/copy/paste tube of choice
resize to fit/delete on tube/add drop shadow to tube/leave
frame2 as is/add drop shadow to frame

copy/paste your tube of choice/resize if needed/place your 
tag where it will look best/add drop shadow

on word art layers 1-3-and4 change colors to match the tag
add drop shadow

add any other elements you wish to use/resize/add drop shadow
to each/place where they will look best

add your watermark and copyright credits/give it a slight 
gradient glow ...now give your tag to a friend.
You're done...thank you for trying my tutorial
please send me a copy so that I can show case it on my blog


12/3/12

PTU Hungry Hills Scraps and Dirk Richter

Joy
This tutorial was written on December 2,2012.
Any similarities to another tutorial is purely coincidental.
All my tutorial are register with My Free Copyright.
Please do not claim as your own.
This tutorial writer assumes you have a working
knowledge of using Paint Shop Pro.
This tutorial was done in Paint Shop Pro9,
but can be adapted to use in other
Paint Shop Pro versions.

SUPPLIES NEEDED

Tube of choice: I'm using the awesome work of Dirk Richter .
Please do not use unless you have a license to do so.
You can get her tubes HERE

Scrapkit of Choice: I am using Dirk Richter Tube/Bundle 7-2
This isno longer at CDO, please use another scrap kit

Template of choice:I am using Toxic Desirez #168
You can download it HERE...Thank you Kristin

Mask of Choice: I am using mask Vix #331
You can download it Here...Thank you Vix

Filters used:Eye Candy 4000 gradient glow - HERE

Font for Name is Biondi
Copy write is always done in Pixelette HERE

Dropshadow use through out H-2/V-2/O-50/B-5.00
Please leave a thank you when you downloading for supplies.

my tag is just a guide...please use your imagination
and make the tag your own you do not have to
use any of the supplies I used.


LET'S BEGIN

Open up Template and ShiftD and close original...copy/paste
paper of choice/resize to fit/layer/load/save mask/find your
mask/select/using these setting/click ok/merge group


On the following raster layers follow these directions...

activate left square layer/copy/paste paper of choice/resize
selection/invert on left square layer/delete on paper layer
add drop shadow

activate right square layer/copy/paste paper of choice/resize
selection/invert on right square layer/delete on paper layer
add drop shadow

copy/paste element of choice/resize if needed/add drop shadow

activate pink top layer/copy/paste paper of choice/resize/invert
on pink top layer/delete on paper layer/keep activated/copy
paste element of choice/resize to fit/deactivate/add drop shadow

activate pink bottom layer/copy/paste paper of choice/resize
invert on pink bottomlayer/delete on paper layer/keep activated
copy/paste element of choice/resize to fit/deactivate/add drop
shadow

activate blue top rectangle layer/copy/paste paper of choice/resize
invert on blue top rectangle layer/delete on paper layer/add
drop shadow

activate blue bottom rectangle layer/copy/paste paper of choice
resize/invert on blue bottom rectangle layer/delete on paper layer
add drop shadow

activate rounded rectangle/keep as is/copy/paste element of choice
resize if needed/add drop shadow

activate circle layer/change color to match your tag/copy/paste
round word art/ resize to fit/adjust/sharpen/lower opacity to 30%
keep activiated/copy/paste closeup tube/resize/selection/invert
on circle layer/delete on tube layer/add drop shadow

copy/paste main tube/mirror/resize/place where you want it/add
drop shadow

now add any other elements you wish to use/resize if needed/remember
to add drop shadow to each element

add your watermark and copyright credits/give it a slight gradient
glow ...now give your tag to a friend.

You're done...thank you for trying my tutorial
please send me a copy so that I can show case it on my blog