5/30/14

CDO Abstract Creations and Pinuptoon - Sexy Just Doesn't Cover It

Sexy Just Doesn't Cover It

This tutorial was written on May 30,2014. 
Any similarities to another tutorial is purely coincidental.
All my tutorial are register with My Free Copyright. 
Please do not claim as your own.
This tutorial writer assumes you have a working 
knowledge of using Paint Shop Pro.
This tutorial was done in Paint Shop Pro9,
but can be adapted to use in other 
Paint Shop Pro versions.


SUPPLIES NEEDED

Tube of choice: I'm using the awesome work of Pinuptoons.
Please do not use unless you have a license to do so. 
Get Them HERE

Scrapkit of Choice: I am using PTU Abstract Creations Pinuptoons May 2014 BT 
Bundle Pack 30....Abstract Creations is no longer with CDO,please use another kit.

Mask of Choice: I am using Redneck Tuts Mask 18
You can download it HERE.... Thank You Savage

Filters used:Eye Candy 4000 gradient glow - HERE
Penta.com - Dot and Cross - HERE
Toadies - Ommndawn - HERE

Font for Name is Consolas
Copy write is always done in Pixelette  HERE

Drop shadow use through out H-2/V-2/O-60/B-6.85

Please leave a thank you when you downloading for supplies.

my tag is just a guide...please use your imagination 
and make the tag your own you do not have to 
use any of the supplies I used.


     LET'S BEGIN

Open up new raster layer 800x800/copy/paste paper of choice
resize to fit canvas/layers/load/save mask/find your mask
and set with these setting/click ok


copy/paste element #14/resize by 85%/place on upper left side 
of canvas/add drop shadow

copy/paste paper #5/resize by x:353-y595/place in center/new layer
raster/recolor square using color from tube-#12d3b2/merge down

copy/paste paper #1/resize by x:258-y306/place in center/new layer
raster/recolor square using color from tube-#12d3b2/merge down
copy/paste element #23/resize by 70%/add drop shadow

copy/paste frame #2/resize by 60%/place over top of paper#1/copy/paste 
tube/resize by 120%/place on right side of frame/duplicate tube/close 
duplicate layer/on original tube layer erase tube at the waist-down
effects/toadies/ommadawn with these setting


open duplicate tube/erase
tube from waist down/effects/penta.com/dot and cross with these settings


add drop shadow to frame and both tubes

copy/paste tube of choice/mirror/resize by 90% twice/add drop shadow
copy/paste element #12/resize by 70%/place at the bottom of frame/cover
bottom of tube/duplicate/mirror/cover the bottom of other tube/add drop
shadow to both elements

add any other elements you wish to use/resize if needed/add drop shadow 
to each element/place where they will look best

add your own word art if you wish/or use word art within the kit/add fat 
gradient glow/add drop shadow

add your watermark and copyright credits/give it a slight gradient 
glow.....now give your tag to a friend.

You're done...thank you for trying my tutorial
please send me a copy so that I can show case it on my blog


5/28/14

CDO BabyCakes Scraps and Enamorte - Impossibilities

Impossibilities

This tutorial was written on May 28,2014. 
Any similarities to another tutorial is purely coincidental.
All my tutorial are register with My Free Copyright. 
Please do not claim as your own.
This tutorial writer assumes you have a working 
knowledge of using Paint Shop Pro.
This tutorial was done in Paint Shop Pro9,
but can be adapted to use in other 
Paint Shop Pro versions.


SUPPLIES NEEDED

Animation Shop - HERE

Animation of choice: I am using Scrappy Bit of fun Animation #419
you can get it HERE ... Thank you Simone

Tube of choice: I'm using the awesome work of Enamorte.
Please do not use unless you have a license to do so. 
Get Them HERE

Scrapkit of Choice: I am using PTU BabyCakes Scraps Enamorte IB 1-3
You can purchase it HERE ...Thanks Lynne

Mask of Choice: I am using Weescotslass Mask #12
You can download it HERE .... Thank You Chell

Filters used:Eye Candy 4000 gradient glow - HERE
AAA Frame - Foto Frame - HERE

Font for Name is Lighthouse Personal Use
Copy write is always done in Pixelette  HERE

Drop shadow use through out H-2/V-2/O-60/B-6.85

Please leave a thank you when you downloading for supplies.

my tag is just a guide...please use your imagination 
and make the tag your own you do not have to 
use any of the supplies I used.


     LET'S BEGIN

Open up new raster layer 800x800/copy/paste paper of choice
resize to fit canvas/layers/load/save mask/find your mask
and set with these setting/click ok


copy/paste element #28/resize if needed/add drop shadow/place
in center of mask

copy/paste flower element #22/resize if needed/add drop shadow
place on top of first element

copy/paste flower element #6/resize if needed/add drop shadow
place in front of first element/duplicate and place next to 
first flower/add drop shadow to both

copy/paste flower element #20/resize if needed/add drop shadow
duplicate and place next to first flower/add drop shadow to both

copy/paste element #27/resize if needed/add drop shadow/place
next to element 28/add drop shadow 

copy/paste butterfly element #4/resize if needed/add drop shadow
place on top of element #28 tto the right

copy/paste tube of choice/resize if needed/ place tube in front of 
flowers in the center

add any other elements you wish to use/resize if needed/add drop 
shadow to each element/place where they will look best

add wordart if you wish/add fat gradient glow/add drop shadow

add your watermark and copyright credits/give it a slight gradient 
glow.....you may animate or not

To Animate

new raster layer/copy/paste paper of choice/resize paper to fit canvas
effect/AAA Frame foto frame with these setting/click ok


closed the following layers
name
copyright
word art
grapes
mask
lantern
candle
orange flowers
tube

copy/merge remaining layers and paste into animation shop as a new animation
open up animation #419/on new animation/edit/duplicate tag for 21 frames/edit
select all/go to animation frame/edit/select all/paste into selected frame twice
in two different areas

go back to psp and close layers that are open/open layers that are closed/copy
merge layers/paste into animation shop as a new animation/edit/duplicate selected 
for 21 frame/edit select all/paste into selected frame/make sure you position
tag so it's align properly/view animation/if satisfied/save as gif

now give your tag to a friend.

You're done...thank you for trying my tutorial
please send me a copy so that I can show case it on my blog

Here's the tag without animation


5/23/14

PTU Foxy's Designz and Very Many - Dark and Fancy


Dark and Fancy


This tutorial was written on May 23,2014. 
Any similarities to another tutorial is purely coincidental.
All my tutorial are register with My Free Copyright. 
Please do not claim as your own.
This tutorial writer assumes you have a working 
knowledge of using Paint Shop Pro.
This tutorial was done in Paint Shop Pro9,
but can be adapted to use in other 
Paint Shop Pro versions.


SUPPLIES NEEDED

Tube of choice: I'm using the awesome work of Very Many.
Please do not use unless you have a license to do so. 
Get Them HERE

Scrapkit of Choice: I am using PTU Foxy's Designz -Dark and Fancy
You can purchase it HERE ...Thank You Ann

Template of choice:I am using Additive Pleasures Template #99
You can download it HERE...Thanks Tamie

Mask of Choice: I am using Vix's PSP Big Mask # 019
You can download it HERE.... Thank You Vix

Filters used:Eye Candy 4000 gradient glow - HERE
Penta.com-Dot and Cross - HERE

Font for Name is 0 Whoa DNA  HERE
Copy write is always done in Pixelette  HERE

Drop shadow use through out H-2/V-2/O-60/B-6.85

Please leave a thank you when you downloading for supplies.

my tag is just a guide...please use your imagination 
and make the tag your own you do not have to 
use any of the supplies I used.


     LET'S BEGIN

Open up Template and ShiftD and close original...delete 
copyright layer/close all layers/copy/paste paper of choice
resize to fit canvas/layers/load/save mask/find your mask
and set with these setting/click ok


On the following raster layers follow these directions...

Copy/paste Element #15/resize by 70%/place on top of mask

activate left circle layer 4/copy/paste paper of choice/resize
paper/selections/invert on circle layer/delete on paper layer
merge down/add drop shadow

copy/paste close up tube/resize by 70%/place so the top of the 
head is over the top of circle/add drop shadow

activate rectangle layer 1/copy/paste paper of choice resize paper
selections/invert on rectangle layer/delete on paper layer/merge 
down/add drop shadow

Copy/paste elements #11/resize by 70%/place on top of rectangle layer
deform tool/turn it on a left angle/add drop shadow

activate rectangle layer 7/copy/paste paper of choice resize paper
selections/invert on rectangle layer/delete on paper layer/merge 
down/add drop shadow

activate rectangle layer 2/copy/paste paper of choice resize paper
selections/invert on rectangle layer/delete on paper layer/merge 
down/add drop shadow

copy/paste close up tube/resize to fit/duplicate/close duplicated layer
on original layer/blend/overlay/effects/penta.com/dot and cross with these 
setting/click ok/


place duplicate underneath original layer/lower opacity 
to 62%/add drop shadow to both

activate rectangle layer 5/copy/paste paper of choice resize paper
selections/invert on rectangle layer/delete on paper layer/merge 
down/add drop shadow

Copy/paste elements #19/resize by 70%/place on top of rectangle layer 5

activate right circle layer 3/copy/paste paper of choice/resize
paper/selections/invert on circle layer/delete on paper layer
merge down

Copy/paste elements #1/resize by 70%/place inside circle/add drop shadow
recolor circle frame layer 9 to match tag/add drop shadow

activate small square layer 6/copy/paste paper of choice/resize paper
selections/invert on square layer/delete on paper layer/merge down
leave square frame as is/add drop shadow

copy/paste tube of choice/resize if needed/place on right side of tag
add drop shadow

add any other elements you wish to use/resize if needed/add drop 
shadow to each element/place where they will look best
using font 0 Whoa DNA/write dark and fancy/place where you want to place
add drop shadow

add your watermark and copyright credits/give it a slight gradient 
glow.....now give your tag to a friend.

You're done...thank you for trying my tutorial
please send me a copy so that I can show case it on my blog


5/22/14

FTU Tutorial Dean Yeagle - Damaged Beyond Repair

Damaged Beyond Repair

This tutorial was written on May 22,2014. 
Any similarities to another tutorial is purely coincidental.
All my tutorial are register with My Free Copyright. 
Please do not claim as your own.
This tutorial writer assumes you have a working 
knowledge of using Paint Shop Pro.
This tutorial was done in Paint Shop Pro9,
but can be adapted to use in other 
Paint Shop Pro versions.


SUPPLIES NEEDED

Tube of choice: I'm using the awesome work of Dean Yeagle.
Please do not use unless you have a license to do so. 
Get Them HERE

Mask of Choice: I am using Moonbeams and Spiderwebs Mask 22
You can download it HERE.... Thank You Staci

Brush of Choice: I am using a brush my Raven
You can download it HERE....Thank you Raven

Preset Shape of Choice: I am using SK Random 112
Preset Shape - Square-Oval
Clock and Telephone - HERE -thank you Cajoline-Scrap
Flowers - HERE -Colleen's Creations
Candle - HERE - Kittz Kreationz 
Word Art of Choice:

Filters used:Eye Candy 4000 gradient glow - HERE
Tramage - Tow the line - HERE
Dsb Flux-Blast - HERE


Font for Name is Night Sky
Copy write is always done in Pixelette  HERE

Drop shadow use through out H-2/V-2/O-60/B-6.85

Please leave a thank you when you downloading for supplies.

my tag is just a guide...please use your imagination 
and make the tag your own you do not have to 
use any of the supplies I used.


     LET'S BEGIN

Open up new raster layer 800x800/copy/paste paper of choice
resize to fit canvas/layers/load/save mask/find your mask
and set with these setting/click ok


download preset shape SK112 to your preset shape folder in paint 
shop pro/open up preset shape and find the shape you're looking 
for/make a medium size shape and place in upper left side near 
the top(see my tag for placement)

open square preset shape/make a large square using a dark color
from your tube of choice/effects/tramage/tow the line with these
setting


click ok/place toward left side center of tag over top 
first preset shape/add drop shadow

open oval preset shape/make a long oval using a contrasting color
from your tube of choice/place on top of square/add drop shadow

copy/paste tube of choice/place in center of oval shape/resize if 
needed/effects/dsb flux/blast/first right and then left/ with these 
settings


copy/paste tube of choice and place on top of blast image/resize if
needed/add drop shadow

add any other elements you wish to use/resize if needed/add drop 
shadow to each element/place where they will look best

add word art if you wish/add fat gradient glow/add drop shadow

add your watermark and copyright credits/give it a slight gradient 
glow.....now give your tag to a friend.

You're done...thank you for trying my tutorial
please send me a copy so that I can show case it on my blog


5/15/14

CDO LadyHawwk Designs and Caron Vinson - Friends

Friends

This tutorial was written on March 15, 2014.Any similarities 
to another tutorial is purely coincidental.
All my tutorial are register with My Free Copyright.
Please do not claim as your own.
This tutorial writer assumes you have a working
knowledge of using Paint Shop Pro.
This tutorial was done in Paint Shop Pro9,but
can be adapted to use in other Paint Shop Pro versions.


Sig Tag 


SUPPLIES NEEDED

Tube of Choice:I'm using the amazing work of Caron Vinson
You can not use without the proper license #. You can
purchase HERE

Mask of Choice: I am using Moonbeam and Spiderweb Mask #39
you can download it HERE...Thank you Staci

Scrapkit of Choice: I am using LadyHawwk_Subtle Hues
You can purchase it HERE....Thank you Cat

Template for forum tag: I am using MilliesPSPMadness Forum Set #128
You can download it HERE....Thank you Millie

Animation of Choice: I am using Scrappy Bit of Fun animation # 452
you can download it HERE....Thank you Simone

Filters used:AAA Frame - HERE & Eye Candy 4000 gradient glow - HERE

Font for name is Kingthings Petrock
copy write is always done in Pixelette ...
Get them HERE

Drop shadow use through out H-2/V-2/O-65/B-6.00
Please leave a thank you when you downloading for supplies.

my tag is just a guide...please use your imagination and make
the tag your own
you do not have to use any of the supplies I used.

With a three piece set,the avatar,forum tag and sig tag looks alike.
please do not take the sig tag and try to stretch or shrink it.
You must make each tag separate.


     LET'S BEGIN

Open up Template and Shift D and close original...delete copyright layer
Image canvas resize by 800x800/you don't want your tag distorted so make
sure you resize each layer appropriately/close all layers/choose paper
of choice/copy/paste and put underneath all layers/effects/AAA frame
foto frame with these setting

activate large circle layer/copy/paste paper of choice/resize/selection/
invert on circle layer/delete on paper layer/merge down/add drop shadow

activate medium circle layer/copy/paste paper of choice/resize/selection/
invert on circle layer/delete on paper layer/merge down/add drop shadow

activate long rectangle layer/copy/paste paper of choice/resize
selection/invert on long rectangle layer/delete on paper layer
merge down/add drop shadow

activate square layer/copy/paste paper of choice/resize/selection
invert on square layer/delete on paper layer/merge down/add drop
shadow

activate circle1 layer/copy/paste paper of choice/resize/selection
invert on circle1 layer/delete on paper layer/merge down/add drop
shadow

activate star layer/recolor to suit tag/add drop shadow/do this with
both stars/merge down

activate 3 rounded rectangle layer/copy/paste paper of choice/resize
selection/invert on rounded rectangle layer/delete on paper layer/merge
down/add drop shadow/leave activated/open tubes of choice/on first
rectangle/copy paste tube of choice/resize to fit rectangle/delete on
tube/add drop shadow/repeat these instructions with the next two
rectangles

activate rectangle frame layer/add drop shadow/activate word art layer
color word art to match the color of the tag/add drop shadow

now add the rest of your elements where you want them/make the tag your
own/Have fun with it/make sure you add a drop shadow to each element.


Forum Tag

open template/Shift D and close original...delete copyright layer/follow
above direction to make your tag/match it closely with the signature tag
some element you will use and some elements you will not/the choice is yours
add drop shadow to every layer.


Avatar
open template for avatar/activate circle/copy paste paper of choice/keep
activated/copy/paste one of the tubes of choice/resize to fit/delete on tube
add drop shadow

add your watermark and copyright credits to all three tags...

Animation for Sig and forum tag

For the sig tag the animation will be behind the tubes

close tube layers/frame back layers/and frame layers/word art/name and copyright
layers/copy/merge all other layers/paste into animated shop as new animation
Edit/select all/duplicate for 16 frames/open animation/edit/select all/copy
into selected frame/go back to psp/close all layers and open the ones you
closed/copy/merge/paste into animation shop as new animation/edit/select all
duplicate for 16 frames/edit/select all/paste into selected frame/place exactly
where it lines up/view animation/if satisfy save as gif

For forum tag animation is in the front/close name/word art/copyright/copy/merge
paste remaining tag in animation shop/edit/select all/duplicate for 16 frames
go to animation/edit/select all/copy/paste into selected frame/go back to psp
close those layers and open remaining layers/copy/merge/paste into animation
shop as a new layer/edit/select all/duplicate for 16 frames/edit/select all
copy/paste into selected frame/check to make sure it's position correctly
view animation and if satisfied save as gif

give your forum set to a friend

You're done...thank you for trying my tutorial
please send me a copy so that I can show case it on my blog
riggsbee53@gmail.com

PTU Honored Scraps and Zindy S.D.Nielsen- Alone In The Dark

Alone In The Dark

This tutorial was written on May 15,2014. 
Any similarities to another tutorial is purely coincidental.
All my tutorial are register with My Free Copyright. 
Please do not claim as your own.
This tutorial writer assumes you have a working 
knowledge of using Paint Shop Pro.
This tutorial was done in Paint Shop Pro9,
but can be adapted to use in other 
Paint Shop Pro versions.


SUPPLIES NEEDED

Tube of choice: I'm using the awesome work of Zindy S.D. Nielsen.
Please do not use unless you have a license to do so. 
Get Them HERE

Scrapkit of Choice: I am using PTU Honored Scraps - The Darkness
You can purchase it HERE ...Thanks Patty

Template of choice:I am using Addictive pleasures Template #422
You can download it HERE...Thanks Tamie

Mask of Choice: I am using Moonbeams and Spiderwebs Mask #19
You can download it HERE.... Thank You Stacie

Word art of choice; I am using word art by Tarnish Halo Designs
...you can download HERE ......Thank you Jane

Filters used:Eye Candy 4000 gradient glow - HERE
Tramages - Tow The Line - HERE
Penta.com - Dot and Cross  & Jeans- HERE

Font for Name is 
Copy write is always done in Pixelette  HERE

Drop shadow use through out H-2/V-2/O-60/B-6.85

Please leave a thank you when you downloading for supplies.

my tag is just a guide...please use your imagination 
and make the tag your own you do not have to 
use any of the supplies I used.


     LET'S BEGIN

Open up Template and Shift D and close original...delete 
copyright layer/close all layers/copy/paste paper of choice
resize to fit canvas/layers/load/save mask/find your mask 
and set with these setting/click ok


On the following raster layers follow these directions...

leave large black circle as is/activate long rectangle layer/copy
paste paper of choice/resize paper/selections/invert on rectangle 
layer/delete on paper layer/merge down//keep activated/copy/paste 
close up tube/resize if needed/effects/penta.com/dot and cross
with these setting/click ok/add drop shadow


activate horoztal rectangle layer/copy/paste paper of choice/resize
paper/selections/invert on horozental rectangle layer/delete on paper 
layer/merge down/keep activated/copy/paste close up tube/resize if
needed/add drop shadow

activate rectangle1 layer/copy/paste paper of choice/resize paper
selections/invert on rectangle1 layer/delete on paper layer/merge
down/effects/penta.com/jeans with these setting/click ok/add drop 
shadow


activate large rectangle layer/copy/paste paper of choice/resize paper
selections/invert on large rectangle layer/delete on paper layer/merge
down/effects//tramages/tow the line with these setting/click ok
add drop shadow


activate long rectangle layer/copy/paste paper of choice/resize 
paper/selections/invert on long rectangle layer/delete on paper 
layer/merge down/add drop shadow

activate circle layer/copy/paste paper of choice/resize paper
selections/invert on circle layer/delete on paper layer/merge
down/leave circle frame as is/add drop shadow

activate square layer/copy/paste paper of choice/resize paper
selections/invert on square layer/delete on paper layer/merge
downleave square frame  as is/add drop shadow

copy/paste main tube of choice/resize if needed/place on right side
of tag/add drop shadow

copy/paste word art of choice resize if needed/place at the top
add drop shadow

add any other elements you wish to use/resize if needed/add drop 
shadow to each element/place where they will look best

add your watermark and copyright credits/give it a slight gradient 
glow.....now give your tag to a friend.

You're done...thank you for trying my tutorial
please send me a copy so that I can show case it on my blog

5/14/14

PTU Honored Scraps and Gaetano Difalco - Rockitudeness

Rockitudeness

This tutorial was written on May 14,2013. 
Any similarities to another tutorial is purely coincidental.
All my tutorial are register with My Free Copyright. 
Please do not claim as your own.
This tutorial writer assumes you have a working 
knowledge of using Paint Shop Pro.
This tutorial was done in Paint Shop Pro9,
but can be adapted to use in other 
Paint Shop Pro versions.


SUPPLIES NEEDED

Tube of choice: I'm using the awesome work of Gaetano DiFalco.
DiFalco is no longer in the psp community
please use another tube

Scrapkit of Choice: I am using PTU Honored Scraps Rock It Roll It
You can purchase it HERE ...Thanks Patty

Template of choice:I am using Divine Intentionz Template #375
You can download it HERE...Thanks Missy

Mask of Choice: I am using Whips Mask #501403
I can not share this...please use another mask

Filters used:Eye Candy 4000 gradient glow - HERE
penta.com - Dot and Cross - HERE
Visual Manipulation -Dither - HERE

Font for Name is Dotumche
Copy write is always done in Pixelette  HERE

Drop shadow use through out H-2/V-2/O-60/B-6.85

Please leave a thank you when you downloading for supplies.

my tag is just a guide...please use your imagination 
and make the tag your own you do not have to 
use any of the supplies I used.

     LET'S BEGIN

Open up Template and ShiftD and close original...delete 
copyright layer/close all layers/copy/paste paper of choice
resize to fit canvas/layers/load/save mask/find your mask
and set with these setting/click ok


On the following raster layers follow these directions...

activate thin rectangle layer/copy/paste paper of choice/resize
paper/selections/invert on rectangle layer/delete on paper layer 
merge down/add drop shadow/recolor word art and dotted line to match
tag

activate double rectangle layer/copy/paste paper of choice/resize
paper/selections/invert on rectangle layer/delete on paper layer
merge down/effect/penta.com-dot and cross with these setting/click 
ok/add drop shadow


activate circle 1 layer/copy/paste paper of choice/resize paper
selections/invert on circle layer/delete on paper layer/merge down
add drop shadow

activate circle 2 layer/copy/paste paper of choice/resize paper
selections/invert on circle layer/delete on paper layer/merge down
add drop shadow

activate thin rectangle layer/copy/paste paper of choice/resize
paper/selections/invert on rectangle layer/delete on paper 
layer/merge down/add drop shadow

activate inside oval layer/copy/paste paper of choice/resize paper
selections/invert on oval layer/delete on paper/layer/merge down
recolor oval frame to match tag/add drop shadow

activate frame back layer/copy/paste paper of choice/resize paper
selections/invert on frame back layer/delete on paper/layer/merge 
down/leave frame as is/add drop shadow

copy/paste tube of choice/place where it would look best to you
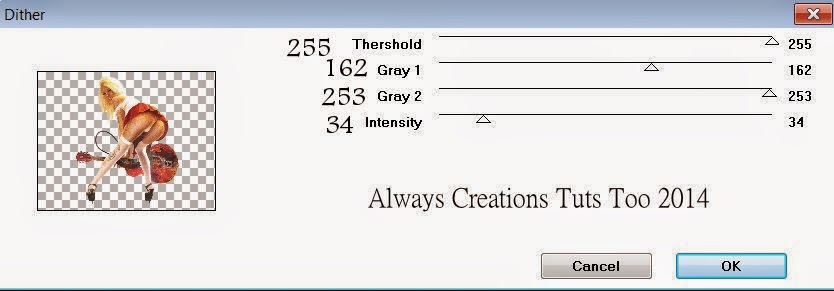
effects/visual manipulation/dither with these setting/click ok


lower opacity to 68 %/copy/paste tube of choice again/place on top of 
first tube/lower/opacity to 96/add drop shadow to bottom tube
add any other elements you wish to use/resize if needed/add drop 
shadow to each element/place where they will look best

add your watermark and copyright credits/give it a slight gradient 
glow.....now give your tag to a friend.

You're done...thank you for trying my tutorial
please send me a copy so that I can show case it on my blog

5/12/14

CDO Hungry Hills and Jennifer Janesko - Spring

Spring

This tutorial was written on May 12,2014. 
Any similarities to another tutorial is purely coincidental.
All my tutorial are register with My Free Copyright. 
Please do not claim as your own.
This tutorial writer assumes you have a working 
knowledge of using Paint Shop Pro.
This tutorial was done in Paint Shop Pro9,
but can be adapted to use in other 
Paint Shop Pro versions.


SUPPLIES NEEDED

Tube of choice: I'm using the awesome work of Jennifer Janesko.
Please do not use unless you have a license to do so. 
You can get her tubes HERE

Scrapkit of Choice: I am using PTU Hungry Hills Scraps - Daisy Chain
You can purchase it HERE ...Thank you Alison

Mask of Choice: I am using Whipp's Mask 22041...this mask can not not be shared
please use another...thank you Whippy

Filters used:Eye Candy 4000 gradient glow - HERE

Font for Name is Marketing Script
Copy write is always done in Pixelette  HERE

Drop shadow use through out H-3/V-3/O-60/B-8.76

Please leave a thank you when you downloading for supplies.


my tag is just a guide...please use your imagination 
and make the tag your own you do not have to 
use any of the supplies I used.


     LET'S BEGIN

Open up new raster layer 800x 800/copy/paste paper of choice
resize to fit canvas/layers/load/save mask/find your mask
and set with these setting/click ok/merge group


copy/paste ribbon-circle/resize if needed/click inside center
selection/modify/expand by 20/copy/paste paper of choice/resize
selection/invert on ribbon circle/delete on paper/place under
neath ribbon circle/keep activate/copy/paste tube of choice
resize if needed/delete on tube/add drop shadow to tube and
ribbon circle

now comes the time when you can let your creativity flow/add any 
other elements you wish to use/resize if needed/add drop shaow
to each element

I used the following elements:
cluster shadow #2
shrubbery
watercan
bow
birdie
butterfly
frog
crystal_leaf/

copy/paste word art of choice/resize if needed/place where it
will look best/add drop shadow

add your watermark and copyright credits/give it a fat gradient  
glow ...now give your tag to a friend.

You're done...thank you for trying my tutorial
please send me a copy so that I can show case it on my blog


CDO Hungry Hills and Caron Vinson - Spring Colors

Spring Colors

This tutorial was written on May 12,2014. 
Any similarities to another tutorial is purely coincidental.
All my tutorial are register with My Free Copyright. 
Please do not claim as your own.
This tutorial writer assumes you have a working 
knowledge of using Paint Shop Pro.
This tutorial was done in Paint Shop Pro9,
but can be adapted to use in other 
Paint Shop Pro versions.


SUPPLIES NEEDED
Animation Shop 3 ....HERE

Animation of Choice: I am using Scrappy Bit of Fun Animation #372 and 375
you can download HERE .... Thank you Simone

Tube of choice: I'm using the awesome work of Caron Vinson.
Please do not use unless you have a license to do so. 
Get Them HERE

Scrapkit of Choice: I am using PTU Hungry Hills Scraps- Watercolor Spring
You can purchase it HERE ...Thanks Alison

Template of choice:I am using Additive Pleasure Template # 172
You can download it HERE...Thanks Tamie

Mask of Choice: I am using Melissa Creationz Mask #20
You can download it HERE.... Thank You Melissa

Filters used:Eye Candy 4000 gradient glow - HERE
AAA Frame-Foto Frame - HERE

Font for Name is Sylfaen - HERE
Copy write is always done in Pixelette  HERE

Drop shadow use through out H-2/V-2/O-60/B-6.85

Please leave a thank you when you downloading for supplies.

my tag is just a guide...please use your imagination 
and make the tag your own you do not have to 
use any of the supplies I used.

     LET'S BEGIN

Open up Template and ShiftD and close original...delete 
copyright layer/close all layers/copy/paste paper of choice
resize to fit canvas/AAA Frame/foto frame with these setting


click ok/copy/paste another paper of choice/layers/load/save 
mask/find your mask and set with these setting/click ok


On the following raster layers follow these directions...

resize all layers by 90%/leave yellow circle layer as is/add
drop shadow/you will need to name all layers so you know which
layers to close when animating


activate purple square layer/copy/paste paper of choice/resize
paper/selections/invert on purple layer/delete on paper layer
merge down/add drop shadow

activate pink rectangle layer/copy/paste paper of choice/resize
paper/selections/invert on rectangle layer/delete on paper layer
merge down/add drop shadow/leave orange oval layer as is/leave
purple rectangle as is/copy/paste tree/resize/place behind the
rectangle/in front of square/now copy/paste flower#4/resize by
50% until they are small/duplicate 15x and decorate the tree
close all layers except flowers and merge visible/open up all 
layers

activate yellow circle layer/copy/paste paper of choice/resize
paper/selections/invert on yellow circle layer/delete on paper 
layer/merge down/add drop shadow

activate black rectangle layer/copy/paste paper of choice/resize 
paper/selections/invert on oval layer/delete on paper/layer/merge 
down/add drop shadow

activate black circle layer/copy/paste paper of choice/resize
paper/selections/invert on black circle layer/delete on paper 
layer/merge down/recolor circle frame to match tag/add drop shadow

copy/paste tube of choice/resize if needed/place in center of tag
add drop shadow

copy/paste word art of choice resize if needed/place at the top
add drop shadow

add any other elements you wish to use/ (see my tag )/resize if needed
add drop shadow to each element/place where they will look best/I used  
a lot of flowers tolook like a garden ( make sure you label each )

(I made it look like she was sitting in a garden feeding her rabbit)

add your watermark and copyright credits/give it a slight gradient 
glow.....

Since I chose the word art of warm breezes I wanted the grass to move
the grass I made didn't work so I used animation grass by Simone

To animate - if you prefer

close the following layers/see example layer/below
copy/merge remaing tag and paste into animation shop/duplicate for 16 
frames

open both animation.grass animation has 15 frames/firefly animation
has 16 frames
you need both animations to have 16 frames/open up grass frame/edit
select/none/click on first frame/copy/go to last frame/paste after
current frame/edit select all/grass animation should now have 16 frames

animation/resize animation by 50%/do this to both animation

on firefly animation/edit/select all/paste into selected frame/place
firefly animation on left side of tag over top flowers/go back to animation
and mirror/select all/paste into selected frame/place on right side of
tag
on grass animation/edit/select all/paste into selected frame/2 times
side by side/then 2 times side by side on top of the first 2 at the bottom
of tag

go back to original tag and open up the layers that are closed and close 
layers that are open/copy/merge and paste into animation shop/duplicate
for 16 frames/edit/select all/paste into selected frame/make sure you
place with the bird on birdhouse

check animation/if satisfied/save as gif

now give your tag to a friend.

You're done...thank you for trying my tutorial
please send me a copy so that I can show case it on my blog