Showing posts with label Robert Alvarado. Show all posts

3/6/18

Luck of the Irish

Luck of the Irish

This tutorial was written on March 6,2018. 
Any similarities to another tutorial is purely coincidental.
All my tutorial are register with My Free Copyright. 
Please do not claim as your own.
This tutorial writer assumes you have a working 
knowledge of using Paint Shop Pro.
This tutorial was done in Paint Shop Pro9,
but can be adapted to use in other 
Paint Shop Pro versions.


SUPPLIES NEEDED

Tube of choice: I'm using the awesome work of Robert Alvarado.
Please do not use unless you have a license to do so. 
Get Them HERE

Mask of Choice: I am using Laurie Made Me Mask 140
You can download it HERE.... Thank You Laurie

Preset Shape of Choice: I am using Scrap Stuff by Shawna Frame Plate 10
SK leaf 12, and candle 134...You can download HERE

Preset Shape -Lucky Charms -money bag,cauldron,coin by Roxanne Acevedo
You can download HERE....Thank you Roxanne

Download all preset shapes to your preset folder in PSP

Filters used:Eye Candy 4000 gradient glow - HERE
Toadies-Ommadawn : HERE

Font for Name is Celtic
Copy write is always done in Pixelette  HERE

Drop shadow use through out H-2/V-2/O-60/B-6.85

Please leave a thank you when you downloading for supplies.

my tag is just a guide...please use your imagination 
and make the tag your own you do not have to 
use any of the supplies I used.


     LET'S BEGIN

Open up new raster layer 800x800/new raser layer/flood fill with this 
color #065a33/layers/load/save mask/find your mask/set with these setting
click ok

download preset shape Shawna Frame Plate 10 to your preset shape folder 
in paint shop pro/open up preset shape and find the shape you're looking 
for/make a large size Frame and place in middle of mask layer/duplicate 
and merge down three times/magic wand inside frame/new layer raser/floodfill 
with color #256372/place underneath frame (see my tag for placement)

open new layer raster/find the leaf 12 preset shape/ draw out a medium
size leaf/magic wand/click inside leaf/flood filled with color #065a33
Duplicate and place on left side of frame/add drop shadow


Effect/inner bevel with these settings
Duplicate and place on left side of frame/add drop shadow

open new raster layer/ find coin preset/draw out a medium size coin/magic wand
click on coin/to color coin/open new raster layer/place underneath coin layer
floodfill bottom layer with this color #e4ae08/merge down/ magic wand/click 
outside coin /delete on floodfill layer/add drop shadow/duplicate 2x 
(see my tag for placement)


copy/paste tube of choice/resize if needed/place in center of frame/duplicate
on duplicated layer/effects/plugin/toadies/ommadawn with these setting
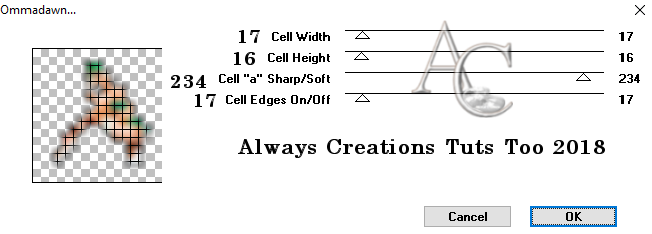
drop shadow on main tube/place duplicated tube underneath main tube

open new raster layer/ find cauldron preset/draw out a large size cauldron/magic
wand/clcik on cauldron/to color cauldron/open new raster layer/place underneath 
cauldron layer/floodfill bottom layer with this color #256372/merge down/ magic 
wand/click outside cauldron /delete on flood fill layer/add drop shadow 
Click on coins one at a time/change color to #e4ae08
(see my tag for placement)


open new layer raster/find the candle preset shape/ draw out a medium size candle
magic wand/click on candle/smooth selection/modify with these setting

flood filled with color #256372/effects/inner bevel with these settings

to color wick/magic wand
click on wick and floodfill with #e4ae08/effects/inner bevel with these settings

add drop shadow (see my tag for placement)


open new raster layer/ find money bag preset/draw out a medium size bag/magic wand
click on bag/to color bag/open new raster layer/place underneath bag layer/floodfill 
bottom layer with this color #e4ae08/merge down/ magic wand/click outside bag/delete 
on flood fill layer/add drop shadow (see my tag for placement)


set up your tag the way you want it/your tag doesn't have to look like mine/be creative
do your own thing

add your watermark and copyright credits/give it a slight gradient 
glow.....now give your tag to a friend.

You're done...thank you for trying my tutorial
please send me a copy so that I can show case it on my blog
send to.... riggsbee53@gmail.com

6/11/16

CDO Hungry Hills and Robert Alvarado

Absolutely Adorable

This tutorial was written on June 11,2016. 
Any similarities to another tutorial is purely coincidental.
All my tutorial are register with My Free Copyright. 
Please do not claim as your own.
This tutorial writer assumes you have a working 
knowledge of using Paint Shop Pro.
This tutorial was done in Paint Shop Pro9,
but can be adapted to use in other 
Paint Shop Pro versions.


SUPPLIES NEEDED

Tube of choice: I'm using the awesome work of Robert Alvarado.
Please do not use unless you have a license to do so. 
Get Them HERE

Scrapkit of Choice: I am using CDO Hungry Hills Scraps Robert Alvarado Bundle 21
You can purchase it HERE ...Thanks Alison

Mask of Choice: I am using Insatiable Dreams #39 and #444 
You can download HERE......Thank you Cat

Filters used:Eye Candy 4000 gradient glow - HERE
Penta.com - HERE

Font for Name is Mayhem
Copy write is always done in Pixelette  HERE

Drop shadow use through out H-2/V-2/O-60/B-6.85

Please leave a thank you when you downloading for supplies.

my tag is just a guide...please use your imagination 
and make the tag your own you do not have to 
use any of the supplies I used.


     LET'S BEGIN


Open up new raster layer 800x800/copy/paste paper of choice/resize
to fit canvas/layers/load/save mask/find your mask/and set with 
these setting/click ok


Open up new raster layer 800x800/copy/paste paper of choice/resize 
to fit canvas/layers/load/save mask/find your mask/and set with 
these setting/click ok/merge mask layers down


copy/paste flourish-3/resize by 70% twice/place in front of mask layer
on the right side of canvas/add drop shadow

copy/paste frame-3/resize by 70%/place in front of flourish layer
in center of canvas/magic wand/click inside of frame/selections/modify
by 15%/invert/copy/paste paper of choice/resize paper/delete on paper
copy/paste close up tube/resize tube so that the top part is overtop of 
the frame/erase any excess tube from the bottom of the tube/effect/penta
.com/jeans/with these setting on the tube/add drop shadow


now it's time to have some fun/add any other elements you wish to use
resize if needed/add drop shadow to each element/place where they will 
look best

copy/paste tube of choice/resize by 70%/place on left side of the tag
add drop shadow

add wordart if you wish/I separted the three word art and put them at  
different areas of the tag/add fat gradient glow/add drop shadow to each

add your watermark and copyright credits/give it a slight gradient 
glow.....now give your tag to a friend.

You're done...thank you for trying my tutorial
please send me a copy so that I can show case it on my blog

6/9/16

CDO Hungry Hill and Robert Alvarado

Girl Got Attitude

This tutorial was written on June 10,2016. 
Any similarities to another tutorial is purely coincidental.
All my tutorial are register with My Free Copyright. 
Please do not claim as your own.
This tutorial writer assumes you have a working 
knowledge of using Paint Shop Pro.
This tutorial was done in Paint Shop Pro9,
but can be adapted to use in other 
Paint Shop Pro versions.


SUPPLIES NEEDED

Tube of choice: I'm using the awesome work of Robert Alvarado.
Please do not use unless you have a license to do so. 
Get Them HERE

Scrapkit of Choice: I am using CDO Hungry Hill Scraps Robert Alvarado Pack 21
You can purchase it HERE ...Thank You Alison

Template of choice:I am using Divine Intentionz Template # 214
You can download it HERE...Thanks Missy

Mask of Choice: I am using Insatiable Dreams Mask #30
You can download it HERE.... Thank You Cat

Filters used:Eye Candy 4000 gradient glow - HERE

Font for Name is Remachine Script
Copy write is always done in Pixelette  HERE

Drop shadow use through out H-2/V-2/O-60/B-6.85

Please leave a thank you when you downloading for supplies.

my tag is just a guide...please use your imagination 
and make the tag your own you do not have to 
use any of the supplies I used.


     LET'S BEGIN

Open up Template and ShiftD and close original...delete 
copyright layer/close all layers/copy/paste paper of choice
resize to fit canvas/layers/load/save mask/find your mask
and set with these setting/click ok


On the following raster layers follow these directions...

activate rectangle layer/copy/paste paper of choice/resize
paper/selections/modify/smooth with these setting


invert on 
rectangle layer/delete on paper layer/merge down/add drop 
shadow/leave dash layer as is

activate thin rectangle layer/selections/smooth with setting 
above/recolor using gradient below/add drop shadow


activate 2nd thin rectangle layer/selections/smooth with setting 
above/recolor using gradient above/add drop shadow

activate 3rd thin rectangle layer/copy/paste paper of choice
resize paper/selections/modify/smooth with setting above/invert 
on rectangle layer/delete on paper layer/merge down/hue-saturation 
with these settings/add drop shadow


activate 4th thin rectangle layer/copy/paste paper of choice
resize paper/selections/modify/smooth with setting above/invert 
on rectangle layer/delete on paper layer/merge down/hue-saturation 
with settings above/add drop shadow

activate word art temp/selections/smooth with setting above/recolor 
using gradient used before/selection none/click on first letter/copy
paste tube of choice/place tube where you want it in the letter/invert
on letter/delete on tube/do this for all letterd/merge each layer down
copy/paste as a new layer/erase all excess tube/goback to main tag
delete picture wordart and replace with the new one/add drop shadow

activate word art layer/adjust/hue-saturation/hue-sauration-lightness
with these  settings/click ok/add drop shadow


add any other elements you wish to use/resize if needed/add drop 
shadow to each element/place where they will look best

copy/paste main tube of  choice/place where it will look best
add drop shadow

Copy/paste frame5/ reside by 50% twice and 70% once/click inside frame
selections/modify by 15%/invert/copy/paste tube/place face inside frame 
delete on tube/erase all excess tube/add drop shadow to tube and frame

add your watermark and copyright credits/give it a slight gradient 
glow.....now give your tag to a friend.

You're done...thank you for trying my tutorial
please send me a copy so that I can show case it on my blog

9/28/15

LadyHawwk Designs and Robert Alvarado

Dream

This tutorial was written on September 27,2015. 
Any similarities to another tutorial is purely coincidental.
All my tutorial are register with My Free Copyright. 
Please do not claim as your own.
This tutorial writer assumes you have a working 
knowledge of using Paint Shop Pro.
This tutorial was done in Paint Shop Pro9,
but can be adapted to use in other 
Paint Shop Pro versions.


SUPPLIES NEEDED

Tube of choice: I'm using the awesome work of Robert Alvarado.
Please do not use unless you have a license to do so. 
Get Them HERE

Scrapkit of Choice: I am using CDO LadyHawwk Designs IB Robert Alvarado 10-3
You can purchase it HERE ...Thanks Cat

Mask of Choice: I am using Vix Big Mask 005
You can download it HERE.... Thank You Vix

Filters used:Eye Candy 4000 gradient glow - HERE

Font for Name is 
Copy write is always done in Pixelette  HERE

Drop shadow use through out H-2/V-2/O-60/B-6.85

Please leave a thank you when you downloading for supplies.

my tag is just a guide...please use your imagination 
and make the tag your own you do not have to 
use any of the supplies I used.


     LET'S BEGIN

Open up new raster layer 800x800/copy/paste paper of choice
resize to fit canvas/layers/load/save mask/find your mask
and set with these setting/click ok


copy/paste round frame #2/resize by 80% twice/copy/paste paper of
choice/resize to fit canvas/click inside frame/selections
modify/expand by 15/selections/invert/delete on paper layer
place underneath frame/keep activate/copy/paste tube of choice
resize by 80% twice/delete on tube/place tube on top of frame/add 
drop shadow

copy/paste element #31 blue flower/resize by 80% twice/place under
neath tube/ add drop shadow

copy/paste element #32 pink flower/resize by 80% twice/place on top
of blue flower/ add drop shadow

copy/paste element #9 white flower/resize by 80% twice/place on top
of pink flower to the right/ add drop shadow

copy/paste element #30 purple drink/resize by 80% twice/place on top
of white flower/ add drop shadow

copy/paste element #3 coconut/resize by 80% twice/place on the left
side of the white flower/add drop shadow

copy/paste element #3 diamonds/resize by 80% twice/underneath tube
tube/add drop shadow

copy/paste element #2 pink shades/resize by 80% twice/place on top
tube at the bottom right side/ add drop shadow

copy/paste element #13 pink shoe/resize by 80% twice/place on top
of tube on left side/ add drop shadow

add any other elements if you wish/resize if needed/add drop shadow
to each element/place where they will look best

add wordart if you wish/add fat gradient glow/place upper right side
underneath the tube/add drop shadow

add your watermark and copyright credits/give it a slight gradient 
glow.....now give your tag to a friend.

You're done...thank you for trying my tutorial
please send me a copy so that I can show case it on my blog

1/31/15

CDO LadyHawwk Designs and Robert Alvarado - The Heart Sees

The Heart Sees

This tutorial was written on January 31,2015. 
Any similarities to another tutorial is purely coincidental.
All my tutorial are register with My Free Copyright. 
Please do not claim as your own.
This tutorial writer assumes you have a working 
knowledge of using Paint Shop Pro.
This tutorial was done in Paint Shop Pro9,
but can be adapted to use in other 
Paint Shop Pro versions.


SUPPLIES NEEDED

Tube of choice: I'm using the awesome work of Robert Alvarado.
Please do not use unless you have a license to do so. 
Get Them HERE

Scrapkit of Choice: I am using PTU LadyHawwk Design IB-Robert Alvarado-January2015-bt
You can purchase it HERE ...Thank You Stu

Template of choice:I am using Toxic Desirez #264
You can download it HERE...Thanks Kristin

Mask of Choice: I am using Monti Blinds
You can download it HERE.... Thank You Monti

Filters used:Eye Candy 4000 gradient glow - HERE
Xero-porcelain - HERE

Font for Coneria Script
Copy write is always done in Pixelette  HERE

Dropshadow use through out H-2/V-2/O-60/B-6.85

Please leave a thank you when you downloading for supplies.

my tag is just a guide...please use your imagination 
and make the tag your own you do not have to 
use any of the supplies I used.


     LET'S BEGIN

Open up Template and ShiftD and close original...delete 
copyright layer/close all layers/copy/paste paper of choice
resize to fit canvas/layers/load/save mask/find your mask
and set with these setting/click ok


On the following raster layers follow these directions...

activate right small rectangle layer/copy/paste paper of choice
resize paper/selections/invert on rectangle layer/delete on paper 
layer/merge down/add drop shadow

activate left small rectangle layer/copy/paste paper of choice
resize paper/selections/invert on rectangle layer/delete on paper 
layer/merge down/add drop shadow

activate left medium circle layer/copy/paste paper of choice resize 
paper/selections/invert on circle layer/delete on paper layer/merge 
down/add drop shadow

activate right medium circle layer/copy/paste paper of choice resize 
paper/selections/invert on circle layer/delete on paper layer/merge 
down/add drop shadow

activate 2nd right small rectangle layer/copy/paste paper of choice/resize 
paper/selections/invert on rectangle layer/delete on paper layer/merge 
down/add drop shadow

activate 2nd left small rectangle layer/copy/paste paper of choice/resize 
paper/selections/invert on rectangle layer/delete on paper layer/merge 
down/add drop shadow

activate left long rectangle layer/copy/paste paper of choice/resize 
paper/selections/invert on rectangle layer/delete on paper layer/merge 
down/add drop shadow

activate right long rectangle layer/copy/paste paper of choice/resize 
paper/selections/invert on rectangle layer/delete on paper layer/merge 
down/add drop shadow

activate 2nd right horazotal rectangle layer/copy/paste paper of choice/resize 
paper/selections/invert on rectangle layer/delete on paper layer/merge 
down/add drop shadow

activate 2nd left horazotal rectangle layer/copy/paste paper of choice/resize 
paper/selections/invert on rectangle layer/delete on paper layer/merge 
down/add drop shadow

copy/paste medium tube to canvas/place on top of left horazotal rectangle
resizeby 80%/adjust/sharpen/add drop shaow

activate left star layer/copy/paste paper of choice/resize paper/selections
invert on rectangle layer/delete on paper layer/merge down/add drop shadow

activate right star layer/copy/paste paper of choice/resize paper/selections
invert on rectangle layer/delete on paper layer/merge down/add drop shadow

activate large circle layer/copy/paste paper of choice/resize paper
selections/invert on circle layer/delete on paper layer/merge down/keep
activated/copy/paste large close up to/duplicate/close duplicate layer/delete
on tube layer/open duplicate layer/erase bottom part of tube/selection none
on top layer/xero/porcelain with these setting/click ok/add drop shadow


copy/paste main tube/resize if needed/place on right side of canvas/ add
drop shadow

add any other elements you wish to use/resize if needed/add drop 
shadow to each element/place where they will look best

copy/paste wordart that's in the kit/give it a fat gradient glow/add drop 
shadow

add your watermark and copyright credits/give it a fat gradient glow/add drop
shadow/adjust/sharpen.....now give your tag to a friend.

You're done...thank you for trying my tutorial
please send me a copy so that I can show case it on my blog

7/17/10

FTU Dark Yarrow and Robert Alvarado - Feeling Funky

Feeling Funky

This tutorial was written July 16, 2010. Any similarities to another tutorial is purely coincidental.
All my tutorial are register with My Free Copyright. Please do not claim as your own.
This tutorial writer assumes you have a working knowledge of using Paint Shop Pro.
This tutorial was done in Paint Shop Pro9,but can be adapted to use in other
Paint Shop Pro versions.


SUPPLIES NEEDED

Tube of Choice: I am using the awesome artwork of Robert Alvarado..
You can purchase his tubes HERE
Please do not use without a license to do so

Scrapkit or colors of your choice, I'm using Dark Yarrow FTU kit Sweet. you can get it HERE
thank you Yarrow

Mask and Template of Choice: Vix has a goodie bag with mask,templates and word art...both the
mask and template came from Vix-Mask-GBso902 and template GB05...thanks Vix

Get It HERE

Font for name is Poor Richard and copy write is always done in Pixelette ... Get them HERE

Drop shadow use througout H-2/V-2/O-50/B-6.72

Please leave a thank you when you downloading for supplies.

     LET'S BEGIN

Open up Template and ShiftD and close original...delete copyright layer
close all layers except the background layer...the one we'll be working on

load your mask into PSP/Choose a paper of choice/copy/paste...now go to layers/new mask layers/
from image/source window/ and find your mask of choice/create mask from source luminance
click ok....go to layers/merge group

now make circle layer active/selection/modify/smooth with these setting(see photo below)
choose paper of choice/ now resize to fit cirlce go to selection/invert
and click ok/go to paper layer and delete/layers/merge/merge down
keep actvated...copy/paste the close up tube and arrange to your liking.
while still on the circle layer go to selections invert/ then go to tube layer and delete
de-activate/add drop shadow.


now we're going to activate the top left layer/ I left this one the color it was
activate the top right layer/use smooth process/copy/paste paper of choice
while still on the top right layer go to selections invert/ then go to paper layer and delete
layers/merge/merge down/add drop shadow

go to the bottom left and bottom right layer and repeat the same process as you did with the
previous layer...give each layer a drop shadow

now come the great part....it's time to decorate...you can either follow my tag or you can use
whatever element you chose to use. I used the flower,two bows,butterfly and bee
make sure you add a drop shadow to each element...I used H-1/V-1/H40/B-5.00

add your main tube and place where you think it will look best...give a drop shadow
add your copyright and water mark
if you're adding a name go to text tool and find your font. once you type the name
go to Eyecandy4000- Gradient Glow with these setting...see below


You're done!!!
Thanks for trying my tutorial
If you use send me a copy so I can show case it...thanks