Showing posts with label CDO CT. Show all posts

11/2/15

BabyCakes Scraps and Steve Baier

Rock Chick

This tutorial was written on November 02,2015. 
Any similarities to another tutorial is purely coincidental.
All my tutorial are register with My Free Copyright. 
Please do not claim as your own.
This tutorial writer assumes you have a working 
knowledge of using Paint Shop Pro.
This tutorial was done in Paint Shop Pro9,
but can be adapted to use in other 
Paint Shop Pro versions.


SUPPLIES NEEDED

Tube of choice: I'm using the awesome work of Steve Blair.
Please do not use unless you have a license to do so. 
Get Them HERE

Scrapkit of Choice: I am using PTU BabyCakes Scraps Rock Chic Violet
You can purchase it HERE ...Thanks Lynne

Mask of Choice: I am using Vix Mask # 211
You can download it HERE  ....Thanks Vix

Filters used:Eye Candy 4000 gradient glow - HERE

Font for Name is Louisianne
Copy write is always done in Pixelette  HERE

Drop shadow use through out H-2/V-2/O-60/B-6.85

Please leave a thank you when you downloading for supplies.

my tag is just a guide...please use your imagination 
and make the tag your own you do not have to 
use any of the supplies I used.


     LET'S BEGIN

Open up new raster layer 800 x 800/copy/paste paper of choice
resize to fit canvas/layers/load/save mask/find your mask
and set with these setting/click ok


Copy/paste element #61/resize at 70%/place on lower left side
see tag for placement/add a drop shadow

copy/paste tube of choice/resize at 70%/place beside element #61 
layer/add drop shadow

add any other elements you wish to use/the ones below are the one 
I used/resize each element/see tag for placement/add drop shadow to 
each element/place where they will look best

element 37
element 31
element 62
element 27
element 25
element 55
element 33

add wordart 63 if you wish/add fat gradient glow/add drop shadow

add your watermark and copyright credits/give it a slight gradient 
glow.....now give your tag to a friend.

You're done...thank you for trying my tutorial
please send me a copy so that I can show case it on my blog

10/29/15

Creative Crazy Scraps and PinupToons

Trick or Treat

This tutorial was written on October 29,2015. 
Any similarities to another tutorial is purely coincidental.
All my tutorial are register with My Free Copyright. 
Please do not claim as your own.
This tutorial writer assumes you have a working 
knowledge of using Paint Shop Pro.
This tutorial was done in Paint Shop Pro9,
but can be adapted to use in other 
Paint Shop Pro versions.


SUPPLIES NEEDED


Tube of choice: I'm using the awesome work of PinupToons.
Please do not use unless you have a license to do so. 
Get Them HERE

Scrapkit of Choice: I am using PTU Creative Crazy Scraps Trick or Treat
You can purchase it HERE ...Thank You Stu

Template of choice:I am using Toxic Desire Mask 295
You can download it HERE...Thanks Kristin

Filters used:Eye Candy 4000 gradient glow - HERE

Font for Name is O Whoa DNA
Copy write is always done in Pixelette  HERE

Drop shadow use through out H-2/V-2/O-60/B-6.85

Please leave a thank you when you downloading for supplies.

my tag is just a guide...please use your imagination 
and make the tag your own you do not have to 
use any of the supplies I used.


     LET'S BEGIN

On the following raster layers follow these directions...

activate raster #12/copy/paste paper of choice/resize paper/selections
invert on rectangle layer/delete on paper layer/merge down/add drop shadow

activate copy of raster #12/copy/paste paper of choice resize paper/selections
invert on rectangle layer/delete on paper layer/merge down/add drop shadow

activate raster layer #11/copy/paste paper of choice/resize paper/selections
invert on rectangle layer/delete on paper layer/merge down/add drop shadow

activate copy of raster #11/copy/paste paper of choice/resize paper/selections
invert on rectangle layer/delete on paper layer/merge down/add drop shadow

activate raster layer #10/copy/paste paper of choice/resize paper/selections
invert on rectangle layer/delete on paper layer/merge down/add drop shadow

activate copy of raster #10/copy/paste paper of choice/resize paper/selections
invert on rectangle layer/delete on paper layer/merge down/add drop shadow

activate raster layer #2/copy/paste paper of choice/resize paper/selections
invert on square layer/delete on paper layer/merge down/add drop shadow

activate copy of raster #2/copy/paste paper of choice/resize paper/selections
invert on square layer/delete on paper layer/merge down/add drop shadow

activate raster layer #9/copy/paste paper of choice/resize paper/selections
invert on circle layer/delete on paper layer/merge down/add drop shadow

activate copy of raster #9/copy/paste paper of choice/resize paper/selections
invert on circle layer/delete on paper layer/merge down/add drop shadow

leave pumpkin layer #8 and copy of pumpkin layer #8 as is/add drop shadow

activate raster layer #6/copy/paste paper of choice/resize paper/selections
invert on long rectangle layer/delete on paper layer/merge down/add drop shadow

leave copy of circle layer #4 as is/activate circle layer #4/copy/paste paper of 
choice/resize paper/selections/invert on circle layer/delete on paper layer/merge 
down/add drop shadow

activate circle layer #14/choose two colors from kit/for gradient color using these 
setting/click ok


add drop shadow/on raster #16 add noise with these setting/click ok


add drop shadow/on raster #15 and raster #5 leave as is/add drop shadow

activate copy of raster layer #4/Copy/paste tube of choice/invert on layer #4/delete
on tube layer/add drop shadow

Copy/paste main tube/resize if needed/place on right side of tag (see image)add
drop shadow

add any other elements you wish to use/resize if needed/add drop 
shadow to each element/place where they will look best

add your watermark and copyright credits/give it a slight gradient 
glow.....now give your tag to a friend.

You're done...thank you for trying my tutorial
please send me a copy so that I can show case it on my blog

10/22/15

LadyHawwk Design and Elias Chatzoudis

A Wee Bit Wicked

This tutorial was written on October 22,2015. 
Any similarities to another tutorial is purely coincidental.
All my tutorial are register with My Free Copyright. 
Please do not claim as your own.
This tutorial writer assumes you have a working 
knowledge of using Paint Shop Pro.
This tutorial was done in Paint Shop Pro9,
but can be adapted to use in other 
Paint Shop Pro versions.


SUPPLIES NEEDED

Tube of choice: I'm using the awesome work of Elias Chatzoudis.
Please do not use unless you have a license to do so. 
Get Them HERE

Scrapkit of Choice: I am using CDO LadyHawwk Designs - Elias Chatzoudis Exclusive
IB- C2...You can purchase it HERE ...Thank You Cat

Template of choice:I am using Dee'signs Depot Millie PSP Madness Collab #2
You can download it HERE...Thanks Dee/Millie

Mask of Choice: I am using Insatiable Dreams Mask # 59
You can download it HERE.... Thank You Cat

Filters used:Eye Candy 4000 gradient glow - HERE
dab flux-linear transmission - HERE
Penta.com - Dot and cross /Jeans - HERE
Toadies- ommadawn- HERE

Font for Name is Surf Safari
Copy write is always done in Pixelette  HERE

Drop shadow use through out H-2/V-2/O-60/B-6.85

Please leave a thank you when you downloading for supplies.

my tag is just a guide...please use your imagination 
and make the tag your own you do not have to 
use any of the supplies I used.


     LET'S BEGIN

Open up Template and ShiftD and close original...delete 
copyright layer/close all layers/copy/paste paper of choice
resize to fit canvas/layers/load/save mask/find your mask
and set with these setting/click ok


On the following raster layers follow these directions...

Copy/paste tree/resize by 70%/place toward left side of mask/add drop
shadow

activate top orange rectangle layer/copy/paste paper of choice/resize
paper by 70% twice/selections/invert on rectangle layer/delete on paper 
layer/merge down/effects/dsb flux/linear transmission with these settings
click ok/add drop shadow


activate bottom orange rectangle layer/copy/paste paper of choice/resize
paper by 70% twice/selections/invert on rectangle layer/delete on paper 
layer/merge down/effects/dsb flux/linear transmission with these settings
click ok/add drop shadow


activate blue square layer/copy/paste paper of choice/resize paper by 70%
selections/invert on rectangle layer/delete on paper layer/merge down/effects
Penta.com/dot and cross with these settings/click ok/leave right dotted line 
as is/add drop shadow to square


recolor purple middle left rectangle with this color #3c0d44/activate bottom 
left rectangle/copy/paste paper of choice/resize paper by 70% twice/selections
invert on rectangle layer/delete on paper layer/activate top left rectangle
copy/paste paper of choice/resize paper by 70% twice/selections/invert on 
rectangle layer/delete on paper layer/leave left dotted rectangle as is/add 
drop shadow to all three squares

activate top purple square layer/recolor with same color as previously used
add drop shadow/activate bottom purple square layer/recolor with same color 
as previously used/add drop shadow

leave top right glitter square and bottom right glitter square as is/activate
top right green square layer/copy/paste paper of choice/resize paper by 70% 
twice/selections/invert on rectangle layer/delete on paper layer/merge down
add drop shadow to green layers only

activate bottom blue rectangle layer/recolor with this color #4e7773/effects
penta.com/jeans with these settings/click ok/do the same with top blue
rectangle layer/add drop shadow to both/leave top and bottom purple strips
as is/add drop shadow to both


leave black oval layer as is/leave orange oval layer and dot dash layer as is
activate half green oval layer/recolor with color #4e7773/activate orange oval
inert/copy/paste tube of choice/resize by 160%/now place tube where you'll 
have the top half of the top in the oval/place toward the orange part/delete
on tube/erase all excess tube from the bottom/duplicate tube/close original
tube on duplicate/effects/toadies/ommadawn with these settings/click ok/open
original tube layer/add drop shadow to top tube


copy/paste tube of choice/place on left side of tag/add drop shadow

on word art merge down all layers of the word art/move word art to complement 
the tag/add fat gradient glow/add drop shadow/add fat gradient and drop shadow
to 2nd word art/place over top first word art

on star layer/raster deform tube/circle bottom stars and delete/leave top stars
add drop shadow

add any elements you wish to use on your tag/resize if needed/add drop shadow
to all elements

add your watermark and copyright credits/give it a slight gradient glow.....now 
give your tag to a friend.

You're done...thank you for trying my tutorial
please send me a copy so that I can show case it on my blog

10/19/15

Monti Scraps and Michael Landefeld

Right To Remain Sexy

This tutorial was written on October 19,2015. 
Any similarities to another tutorial is purely coincidental.
All my tutorial are register with My Free Copyright. 
Please do not claim as your own.
This tutorial writer assumes you have a working 
knowledge of using Paint Shop Pro.
This tutorial was done in Paint Shop Pro9,
but can be adapted to use in other 
Paint Shop Pro versions.


SUPPLIES NEEDED
Animation Shop 3 ....HERE

Animation of Choice: I am using Scrappy Bit of Fun Animation # red special lighting 
you can download HERE .... Thank you Simone

Tube of choice: I'm using the awesome work of Michael Landefeld.
Please do not use unless you have a license to do so. 
Get Them HERE

Scrapkit of Choice: I am using Monti scraps CDO Mini - Walking the Beat
You can purchase it HERE ...Thank You Monti

Template of choice:I am using Millie's PSP Madness Template #53
You can download it HERE...Thanks Millie

Filters used:Eye Candy 4000 gradient glow - HERE

Font for Name is Carbon Block
Copy write is always done in Pixelette  HERE

Drop shadow use through out H-2/V-2/O-60/B-6.85

Please leave a thank you when you downloading for supplies.

my tag is just a guide...please use your imagination 
and make the tag your own you do not have to 
use any of the supplies I used.


     LET'S BEGIN

Open up Template and ShiftD and close original...delete 
copyright layer/close all layers/starting at bottom open
layer #1

On the following raster layers follow these directions...


starting at bottom open layer #1/click on small rectangle
copy/paste layer of choice/invert on rectangle layer/delete 
on paper layer/add drop shadow

open layer #2/click on small rectangle/copy/paste paper of 
choice/invert on rectangle layer/delete on paper layer/add 
drop shadow

open layer #3/click on large circle/copy/paste paper of choice
invert on circle layer/delete on paper layer/add drop shadow

open layer #4/click on oval layer/copy/paste paper of choice
invert on oval layer/delete on paper layer/add drop shadow

leave blue circle layer #5 as is/add drop shadow

open layer #6/click on rounded rectangle/copy/paste paper of 
choice/invert on circle layer/delete on paper layer/keep activated
copy/paste close up tube/resize if needed/delete/add drop 
shadow

leave blue circle layer #7 as is/move this circle down to the bottom
of rounded rectangle tag/add drop shadow

remove star badge and replace with element #10/ add drop shadow

copy/paste tube of choice/resize by 70%/place on left side of tag
add drop Shadow

add any other elements you wish to use/resize if needed/add drop 
shadow to each element/place where they will look best

on wordart add gradient glow to both words and merge down/add drop
shadow and move to top of tag

add your watermark and copyright credits/give it a slight gradient 
glow.....

To animate

Copy/paste/merge all layers and take to animation shop
open up animation and resize twice by 50%
on your tag duplicate your tag 5 times/click on tag and delete one time
edit/you should have 16 frames/select all
goto animation/edit select all/copy/paste into delected frame twice on
big yellowlight and once on back light/check animation/if satisfied
saved as gif.....now give your tag to a friend.

You're done...thank you for trying my tutorial
please send me a copy so that I can show case it on my blog

Here's a tag I did with the same kit.


10/13/15

Monti Scraps and Maryline Cazenave

Seeds of Love

This tutorial was written on October 13,2015. 
Any similarities to another tutorial is purely coincidental.
All my tutorial are register with My Free Copyright. 
Please do not claim as your own.
This tutorial writer assumes you have a working 
knowledge of using Paint Shop Pro.
This tutorial was done in Paint Shop Pro9,
but can be adapted to use in other 
Paint Shop Pro versions.


SUPPLIES NEEDED

Tube of choice: I'm using the awesome work of Maryline Cazenave.
Please do not use unless you have a license to do so. 
Get Them HERE

Scrapkit of Choice: I am using Monti Scraps IB Maryline Cazenave 8-2
You can purchase HERE ....Thank you Monti

Mask of Choice: I am using Sophisticate Simone Mask 0153
You can download it HERE.... Thank You Simone

Filters used:Eye Candy 4000 gradient glow - HERE
Toadies - Blast'Me - HERE
Penta.com-Jeans - HERE

Font for Name is Precious
Copy write is always done in Pixelette  HERE

Drop shadow use through out H-3/V-3/O-60/B-7.00

Please leave a thank you when you downloading for supplies.

my tag is just a guide...please use your imagination 
and make the tag your own you do not have to 
use any of the supplies I used.


     LET'S BEGIN

Open up new raster layer 800x800/copy/paste paper of choice
resize to fit canvas/layers/load/save mask/find your mask
and set with these setting/click ok


copy/paste frame 2/resize by 70%/selections/select all/float/defloat
modify/expand by 12/copy/paste paper of choice/invert on frame/delete
on paper/place underneath frame/effects/penta.com/jeans with these 
settings/click ok/add drop shadow to frame


Copy/paste tube1/resize by 70%/place on top frame frame/add drop shadow

Copy/paste 2nd tube/resize by 70%/place on bottom frame/add drop shadow

copy/paste element 11/resize by 70%/duplicate/on bottom element/effects
Toadies/Blast'em with these settings/click ok/add drop shadow to top
element


add any other elements you wish to use/resize if needed/add drop shadow
to each element/place where they will look best

add word art if you wish/add drop shadow

add your watermark and copyright credits/give it a slight gradient 
glow.....now give your tag to a friend.

You're done...thank you for trying my tutorial
please send me a copy so that I can show case it on my blog

9/30/15

Monti Scraps and Garrett Blair

Can You Feel The Madness

This tutorial was written on September 30,2015. 
Any similarities to another tutorial is purely coincidental.
All my tutorial are register with My Free Copyright. 
Please do not claim as your own.
This tutorial writer assumes you have a working 
knowledge of using Paint Shop Pro.
This tutorial was done in Paint Shop Pro9,
but can be adapted to use in other 
Paint Shop Pro versions.


SUPPLIES NEEDED

Tube of choice: I'm using the awesome work of Garrett Blair.
Please do not use unless you have a license to do so. 
Get Them HERE

Scrapkit of Choice: I am using CDO Monti Scraps - Can You Feel The Madness
You can purchase it HERE ...Thank You Monti

Template of choice:I am using Additive Pleasures Template #98
You can download it HERE...Thanks Tamie

Mask of Choice: I am using Whips Mask # 
You have to be a member of CM to download
You can download it HERE.... Thank You Whip

Filters used:Eye Candy 4000 gradient glow - HERE
Xero- Fritillary - HERE
DC Special - Brix - HERE
DBS Flux -Blast -  HERE

Font for Name is Decaying
Copy write is always done in Pixelette  HERE

Drop shadow use through out H-2/V-2/O-60/B-6.85

Please leave a thank you when you downloading for supplies.

my tag is just a guide...please use your imagination 
and make the tag your own you do not have to 
use any of the supplies I used.


     LET'S BEGIN

Open up Template and ShiftD and close original...delete 
copyright layer/close all layers/copy/paste paper of choice
resize to fit canvas/layers/load/save mask/find your mask
and set with these setting/click ok


On the following raster layers follow these directions...

activate right angel rectangle layer 6/copy/paste paper of choice/resize
paper by 70% twice/selections/invert on rectangle layer/delete on paper 
layer/merge down/effects/dc special/brix with these settings/click ok
add drop shadow


activate top long rectangle layer 10/copy/paste paper of choice/resize
paper by 70%/selections/invert on rectangle layer/delete on paper layer
merge down/add drop shadow

activate pink circle layer 5/copy/paste paper of choice/resize paper by
70% twice/selections/invert on circle layer/delete on paper layer/merge 
down/add drop shadow

activate large pink circle layer 4/copy/paste paper of choice/resize paper
by 70%/selections/invert on circle layer/delete on paper layer/merge down
add drop shadow

activate long rectangle layer 11/copy/paste paper of choice/resize paper
by 70%/selections/invert on long rectangle layer/delete on paper layer/merge
down/effects/xero/fritillry with these setting/click ok/add drop shadow


activate pink square layer 7/choose color from tube/flood fill with that
color/leave frame as is/add drop shadow

activate fat pink rectangle layer 2/copy/paste paper of choice/resize paper
by 70%/selections/invert on fat pink rectangle layer/delete on paper layer
merge down/add drop shadow

copy/paste tube of choice/resize by 120%/place in center of tag/duplicate/on
duplicate layer/effects/dsb flux/blast with these setting/click ok

duplicate tube again/on duplicate layer/
effects/dsb flux/blast with these setting/click ok


add drop shadow to main tube

add word art from kit/I alternated the color on word art/add drop shadow

when doing name for tag choose a color from tube/effects/inner bevel with these
settings/click ok/then alternate the color like the word art/add drop shadow


add your watermark and copyright credits/give it a slight gradient glow.....now 
give your tag to a friend.

You're done...thank you for trying my tutorial
please send me a copy so that I can show case it on my blog


9/25/15

CDO Monti Scraps and Dirk Richter

Asian Dreams

This tutorial was written on September 24,2015. 
Any similarities to another tutorial is purely coincidental.
All my tutorial are register with My Free Copyright. 
Please do not claim as your own.
This tutorial writer assumes you have a working 
knowledge of using Paint Shop Pro.
This tutorial was done in Paint Shop Pro9,
but can be adapted to use in other 
Paint Shop Pro versions.


SUPPLIES NEEDED

Tube of choice: I'm using the awesome work of Dirk Richter.
Please do not use unless you have a license to do so. 
Get Them HERE

Scrapkit of Choice: I am using CDO Monti Scraps-Asian Dreams/previously M 22-1
You can purchase it HERE ...Thanks Monti

Mask of Choice: I am using Vix Big Mask 019 and 020
You can download it HERE.... Thanks Vix

Filters used:Eye Candy 4000 gradient glow - HERE
Eye Candy 4000 Bevel Boss - HERE
Penta.com - Dot and Cross - HERE
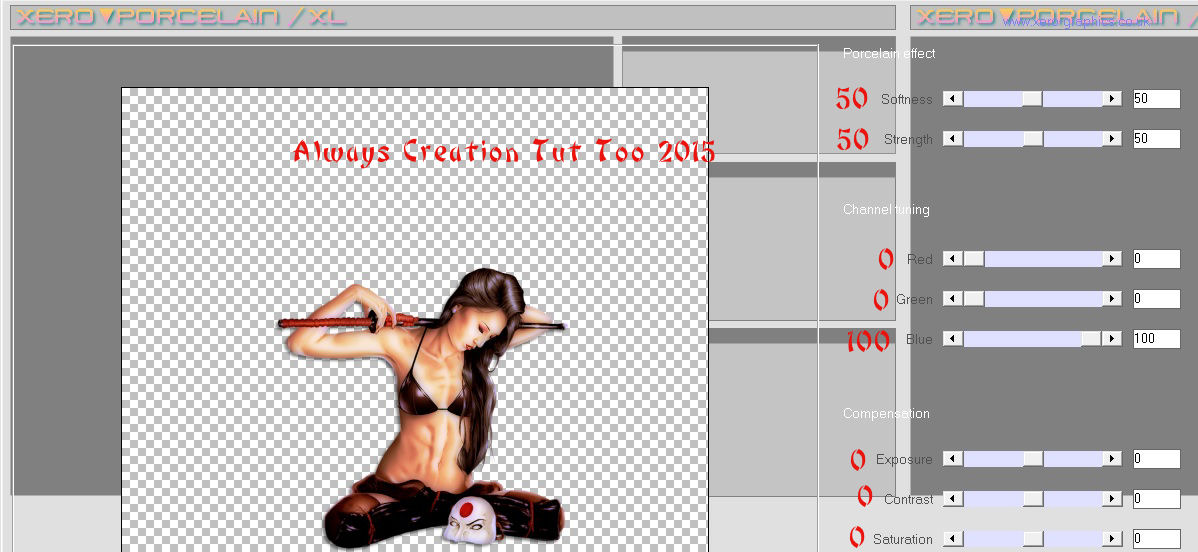
Xero - Porcelain _ HERE

Font for Name is Bonzai - HERE
Copy write is always done in Pixelette  HERE

Drop shadow use through out H-4/V--4/O-50/B-7.00

Please leave a thank you when you downloading for supplies.

my tag is just a guide...please use your imagination 
and make the tag your own you do not have to 
use any of the supplies I used.


     LET'S BEGIN

Open up new raster layer 800x800/copy/paste paper of choice
resize to fit canvas/layers/load/save mask/find your mask
and set with these setting/click ok


copy/paste paper of choice/resize to fit canvas/layers/load
save mask/find your mask/and set with these setting/click ok


copy/paste element 8/resize by 70%/place on center of canvas
add drop shadow

copy/paste element 7/resize by 50% twice/place on left side of
screen/effects/penta.com/dot and cross with these settings/click
ok/add drop shadow


copy/paste element 22/ resize by 70%/place on right side of screen
add drop shadow

copy/paste element 1/resize by 65%/place in center of canvas/add
drop shadow

copy/paste element 3/resize by 50% twice and 70% once/place at the
bottom of element 22/add drop shadow

copy/paste tube of choice/resize by 70%/ place in center of canvas
effects/xero/porcelain with these settings/click ok/add drop shadow


copy/paste element 11/ resize by 70%/place on left side of screen
add drop shadow

copy/paste element 5/ resize by 70%/place on right side of screen
add drop shadow

copy/paste element 17/ resize by 70%/place on right side of screen
add drop shadow

copy/paste element 18/ resize by 70%/place on right side of screen
add drop shadow

add any other elements you wish to use/resize if needed/add drop 
shadow to each element/place where they will look best

add word art if you wish/add fat gradient glow with these setting/add 
drop shadow


add your watermark and copyright credits/give it a slight gradient 
glow.....now give your tag to a friend/when doing the name use
these setting for gradient glow/click ok


You're done...thank you for trying my tutorial
please send me a copy so that I can show case it on my blog

3/31/15

CDO Chichi Design and Anna Liwanag - La Provence

La Provence

This tutorial was written on April 3,2015. 
Any similarities to another tutorial is purely coincidental.
All my tutorial are register with My Free Copyright. 
Please do not claim as your own.
This tutorial writer assumes you have a working 
knowledge of using Paint Shop Pro.
This tutorial was done in Paint Shop Pro9,
but can be adapted to use in other 
Paint Shop Pro versions.


SUPPLIES NEEDED

Tube of choice: I'm using the awesome work of Anna Liwanag.
Please do not use unless you have a license to do so. 
Get Them HERE

Scrapkit of Choice: I am using PTU Chichi Designz La Provence
You can purchase it HERE ...Thanks Cindy

Mask of Choice: I am using Spiderwebs and Moonbeams Mask #62
You can download it HERE.... Thank You Staci

Filters used:Eye Candy 4000 gradient glow - HERE
Xero- Porcelain - HERE

Font for Name is Nina Script Demo
Copy write is always done in Pixelette  HERE

Drop shadow use through out H-2/V-2/O-60/B-6.85

Please leave a thank you when you downloading for supplies.

my tag is just a guide...please use your imagination 
and make the tag your own you do not have to 
use any of the supplies I used.


     LET'S BEGIN

Open up new raster layer 800x800/copy/paste paper of choice
resize to fit canvas/layers/load/save mask/find your mask
and set with these setting/click ok


copy/paste element #3/resize if needed/copy/paste paper of
choice/resize to fit canvas/click inside frame/selections
modify/expand by 15/selections/invert/delete on paper layer
place underneath frame/keep activate/copy/paste tube of choice
resize if needed/duplicate/close this layer/delete on original 
layer tube/open duplicate layer/erase excess tube if needed
effects/xero/porcelain with these setting/click ok/add drop 
shadow to bottom tube and frame


copy/paste element #12/resize if needed/place on right side of
frame add drop shadow

copy/paste element #11/resize by 70%/place on right side of 
frame/duplicate/mirror/add drop shadow to both

copy/paste the following elements/resize if needed/place along the 
frame/where you want them/after placement add drop shadow to each

#6
#20
#36/duplicate 2x/layer/merge down twice/duplicate/duplicate again 
merge down and mirror/add drop shadow
#33
#5/duplicate/mirror/merge down/add drop shadow
#34/duplicate and mirror/add drop shadow
#28
#23
#39
#25

add word art if you wish/add fat gradient glow/add drop shadow

add your watermark and copyright credits/give it a slight gradient 
glow.....now give your tag to a friend.

You're done...thank you for trying my tutorial
please send me a copy so that I can show case it on my blog


3/19/15

CDO Rebel Designz and Anna Marine

50 Shades-Lick It Up

This tutorial was written on March 19,2015. 
Any similarities to another tutorial is purely coincidental.
All my tutorial are register with My Free Copyright. 
Please do not claim as your own.
This tutorial writer assumes you have a working 
knowledge of using Paint Shop Pro.
This tutorial was done in Paint Shop Pro9,
but can be adapted to use in other 
Paint Shop Pro versions.


SUPPLIES NEEDED

Tube of choice: I'm using the awesome work of Anna Marine.
Please do not use unless you have a license to do so. 
Get Them HERE

Scrapkit of Choice: I am using CDO Rebel Designz - 50 Shades
You can purchase it HERE ...Thank You Gizzy

Template of choice:I am using Toxic Desirez Template # 258
You can download it HERE...Thanks Kristin

Mask of Choice: I am using Moonbeams and Spiderwebs Mask 23
You can download it HERE.... Thank You Stacie

Filters used:Eye Candy 4000 glass and gradient glow - HERE

Font for Name is Bloody
Copy write is always done in Pixelette  HERE

Drop shadow use through out H-2/V-2/O-60/B-6.85

Please leave a thank you when you downloading for supplies.

my tag is just a guide...please use your imagination 
and make the tag your own you do not have to 
use any of the supplies I used.


     LET'S BEGIN

Open up Template and ShiftD and close original...delete 
copyright layer/close all layers/copy/paste paper of choice
resize to fit canvas/layers/load/save mask/find your mask
and set with these setting/click ok


On the following raster layers follow these directions...

activate bottom long rectangle layer 8/copy/paste paper of choice/resize
paperby 90% twice/selections/invert on rectangle layer/delete on paper 
layer/merge down/add drop shadow

activate top long rectangle layer 8/copy/paste paper of choice/resize
paper by 90% twice/selections/invert on rectangle layer/delete on paper 
layer/merge down/copy/paste element 8/resize by 70%/place on right side
of rectangle/add drop shadow

activate top circle layer 9/copy/paste paper of choice resize paper 
layer by 90% three times/selections/invert on circle layer/delete on 
paper layer/merge down/copy/paste element 1/resize by 70%/place on left
side of top circle/add drop shadow

activate bottom circle layer 9/copy/paste paper of choice resize paper
layer by 90% three times/selections/invert on circle layer/delete on 
paper layer/copy/paste element 18/resize by 70%/place on right size of
circle layer/merge down/add drop shadow

activate top square layer 7/copy/paste paper of choice resize paper
by 80%/selections/invert on left square layer/delete on paper layer
merge down/copy/paste element 10/ resize by 70%/place on top square
add drop shadow

activate bottom square layer 7/copy/paste paper of choice resize paper
by 80%/selections/invert on right square layer/delete on paper layer
merge down/copy/paste element 17/resize by 70%/place on bottom square
add drop shadow

activate right circle layer 6/copy/paste paper of choice resize paper 
layer by 80%/selections/invert on circle layer/delete on paper layer
merge down/add drop shadow

activate left circle layer 6/copy/paste paper of choice resize paper 
layer by 80%/selections/invert on circle layer/delete on paper layer
merge down/add drop shadow

leave the following raster layer as is/5-5a-10-and 3

activate medium center circle layer 2/copy/paste paper of choice resize 
paper layer by 80%/selections/invert on circle layer/delete on paper 
layer/merge down/keep activated/copy/paste close up tube/duplicate/close
duplicated layer/on original layer invert on circle layer/delete on tube 
layer/open duplicated layer/erase excess tube from the bottom/add drop 
shadow

activate small center circle layer 4/copy/paste paper of choice resize 
paper layer by 80%/selections/invert on circle layer/delete on paper layer
merge down/add drop shadow

activate half circle layer 11/recolor this layer using a lighter brown from 
the tube so that it matches the tag/add drop shadow

copy/paste tube of choice/resize if needed/place on left side of tag/add drop 
shadow

add any other elements you wish to use/resize if needed/add drop shadow to each 
element/place where they will look best/add word art that is within the kit or use
your own word art/on name and word art/effect/eye candy glass with these setting


add drop shadow

add your watermark and copyright credits/give it a slight gradient glow.....now 
give your tag to a friend.

You're done...thank you for trying my tutorial
please send me a copy so that I can show case it on my blog