Showing posts with label Barbara Jensen. Show all posts

6/30/21

PTU Foxy's Designz and Barbara Jensen

Dream A Little Dream

This tutorial was written on June 30 2021. 
Any similarities to another tutorial is purely coincidental.
All my tutorial are register with My Free Copyright. 
Please do not claim as your own.
This tutorial writer assumes you have a working 
knowledge of using Paint Shop Pro.
This tutorial was done in Paint Shop Pro 9,
but can be adapted to use in other 
Paint Shop Pro versions.


SUPPLIES NEEDED

Tube of choice: I'm using the awesome work of Barbara Jensen.
Please do not use unless you have a license to do so.
 Purchase Barbara Jensen tubes HERE

Scrapkit of Choice: I am using PTU CDO Foxy Designz Dreamer
You can purchase it HERE 

Template of choice: I am using template Dream by Dees'Signz Depot
You can download it HERE...Thanks Dee

Masks of Choice: I am using MPM #110 - Thank you Millie
You can download it HERE.... Thank You 

Filters used: Eye Candy 4000 gradient glow - HERE

Font for Name is  - About Love - HERE
Copy write is always done in Pixelade  HERE

Drop shadow use through out / H-2/V-2/O-50/B-5.00
Smooth Setting through out /10

Please leave a thank you when you downloading for supplies.
My tag is just a guide...please use your imagination 
and make the tag your own. You do not have to 
use any of the supplies I used.


     LET'S BEGIN

Open up Template and ShiftD and close original...resize all
layers to 800 x 800/delete  copyright layer/close all layers

On the following raster layers follow these directions...

activate group raster layer/change color to #8fbdde/go to change 
color to target/recolor group layer with this color/sharpen

activate large purple rectangle layer/selections/modify/smooth with setting 
below/invert on rectangle layer/copy/paste paper of choice/resize paper 
to fit canvas/delete on paper layer/merge down/add drop shadow
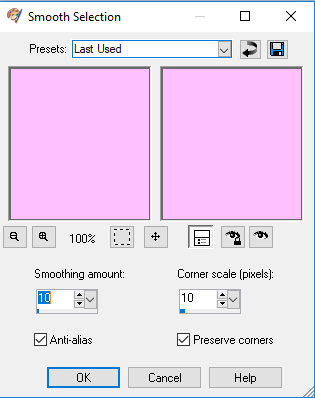


activate large blue square layer/selections/modify/smooth with setting 
above/invert on square layer/copy/paste paper of choice/resize paper 
to fit canvas/delete on paper layer/merge down/add drop shadow

activate purple oval background/recolor layer wit #8fbdde/add drop shadow

activate purple oval layer/selections/modify/smooth with setting 
above/invert on oval layer/copy/paste paper of choice/resize paper 
by 60%/delete on paper layer/merge down/add drop shadow

activate purple star layer/change color to #adc6c9/add drop shadow

activate purple star layer2/change color to #adc6c9/add drop shadow

activate dotted shape layer/adjust/hue and saturation hue saturation lightness 
with these settings/add drop shadow


activate purple shape layer/selections/modify/smooth with setting 
above/invert on purple layer/copy/paste paper of choice/resize paper 
by 60%/delete on paper layer/merge down/add drop shadow/leave word art as 
is/add light drop shadow

activate purple circle layer/change color to #adc6c9/add drop shadow

leave all other layers as is except black swirl layer/ change the color to 
#aacdce/add drop shadow

copy paste your tube choice /place on top of oval layer /resize by if needed/blend
overlay/add drop shadow 2/-2/7/6.76

copy paste your tube again and place on top of first tube/resize to make it smaller
to fit layer/mirror tube/place tube to the left side of the tag. See my tag for position/add drop shadow

add any elements you wish to use/resize if needed/add drop shadow
to each element/place where they will look best

I use the wordart on the template or use a wordart from the kit/position 
on tag where ever it looks best to you/add drop shadow

Copy/paste paper of choice at the bottom/resize to fit canvas/go to where
ever your mask are/follow picture above for settings/ you can use more 
than one mask


add your watermark and copyright credits/give it a slight gradient 
glow...now give your tag to a friend.

You're done...thank you for trying my tutorial
please send me a copy so that I can show case it on my blog


1/14/18

Barbara Jensen-Memories of Love

Memories of Love

This tutorial was written on January 14,2018. 
Any similarities to another tutorial is purely coincidental.
All my tutorial are register with My Free Copyright. 
Please do not claim as your own.
This tutorial writer assumes you have a working 
knowledge of using Paint Shop Pro.
This tutorial was done in Paint Shop Pro9,
but can be adapted to use in other 
Paint Shop Pro versions.


SUPPLIES NEEDED

Tube of choice: I'm using the awesome work of Barbara Jensen.
Please do not use unless you have a license to do so. 
Get Them HERE

Scrapkit of Choice: I am using LadyHawwk Designs Exclusive 
Barbara Jensen-Beloved......You can purchase it HERE ...Thanks Cat

Mask of Choice: I am using mask by Rebel Designz #182 and #219
You can download them HERE

Filters used:Eye Candy 4000 gradient glow - HERE
Penta.com - Jeans- HERE
Toadies - Omnadawn - HERE

Font for Name and Wordart is Bosk - HERE
Word Art is my own - HERE (Or you can use your own)
Copy write is always done in Pixelette  HERE

Dropshadow use through out H-2/V-2/O-60/B-6.85

Please leave a thank you when you downloading for supplies.

my tag is just a guide...please use your imagination 
and make the tag your own you do not have to use any of 
the supplies I used. Also make sure you read each
designer or artist TOU.Make sure you save as you go along so
you don't lose anything.


     LET'S BEGIN

Open up new raster layer 800x800/copy/paste paper of choice
resize to fit canvas/layers/load/save mask/find your mask
and set with these setting/click ok


copy/paste another paper of choice
resize to fit canvas/layers/load/save mask/find your mask


Copy/paste frame 3/resize by 70%
place in center of canvas/magic wand/click inside/selections/modify
by 20/invert on frame/copy/paste paper of choice/delete on paper
selection none/add drop shadow on frame

copy/paste tube close up/place on outside of frame/duplicate/effects
penta.com-jeans with these setting on the top tube


On bottom tube/effects-Toadies-Omnadawn with these setting


add drop shadow to both

copy/paste elements/resize to suit the tag/place where you would like 
them to be/It doesn't have to look like mine/make it your own 

add drop shadow to each element after resizing and placement

Elements used:
element 1
element 6
elemeny 8
element 13
element 14
element 15
element 33
element 34
element 39
element 44
element 46

add any other elements you wish to use/resize if needed/add drop shadow 
to each element/place where they will look best
you can add my wordart or use one of your own

add your watermark and copyright credits/give it a slight gradient glow
now give your tag to a friend

You're done...thank you for trying my tutorial
please send me a copy so that I can show case it on my blog

5/5/16

PTU Exclusive LadyHawwk Designs and Barbara Jensen

Elegance

This tutorial was written on May 5,2016. 
Any similarities to another tutorial is purely coincidental.
All my tutorial are register with My Free Copyright. 
Please do not claim as your own.
This tutorial writer assumes you have a working 
knowledge of using Paint Shop Pro.
This tutorial was done in Paint Shop Pro9,
but can be adapted to use in other 
Paint Shop Pro versions.


SUPPLIES NEEDED

Tube of choice: I'm using the awesome work of Barbara Jensen.
Please do not use unless you have a license to do so. 
Get Them HERE

Scrapkit of Choice: I am using PTU LadyHawwk Designs Exclusive 
for Barbara Jensen-Elegance...You can purchase it HERE ...Thank You Cat

Template of choice:I am using Gimptastic Tuts Template #1
You can download it HERE...Thanks Leah

Mask of Choice: I am using Insatiable Dreams Mask #395
You can download it HERE.... Thank You Cat

Filters used:Eye Candy 4000 gradient glow - HERE
Eye Candy 4000- Glass

Font for Name is Precious
Copy write is always done in Pixelette  HERE

Dropshadow use through out H-2/V-2/O-60/B-6.85

Please leave a thank you when you downloading for supplies.

my tag is just a guide...please use your imagination 
and make the tag your own you do not have to 
use any of the supplies I used.


     LET'S BEGIN

Open up Template and ShiftD and close original...delete 
copyright layer/close all layers/copy/paste paper of choice
resize to fit canvas/layers/load/save mask/find your mask
and set with these setting/click ok


On the following raster layers follow these directions...

activate circle backing layer/copy/paste paper # 9/resize
paper/recolor paper a little darker/I used e6bf60/selections
modify/smooth with these setting


click ok/invert on circle 
layer/delete on paper layer/merge down/add drop shadow

activate large circle layer/copy/paste paper # 6/resize paper
selections/modify/smooth setting above/click ok/invert on 
circle layer/delete on paper layer/merge down/keep activated
copy/pase  tube of choice/resize by 120%/place in middle of
circle/delete on tube/erase all excess tube/add drop shadow
to circle and tube

activate rectangle backing2 layer/copy/paste paper of choice
resize paper/selections/modify/smooth setting above/click 
ok/invert on rectangle layer/delete on paper layer/merge down
add drop shadow

activate rectangle #2 layer/copy/paste paper of choice/resize
paper/selections/modify/smooth setting above/click ok
invert on rectangle layer/delete on paper layer/merge down/add
drop shadow

activate rectangle backing #1 layer/recolor black/add drop shadow
activate rectangle 1/copy/paste paper # 10/recolor this paper the
samecolor as you did the other one/resize paper/selections/modify
smooth setting above/click ok/invert on rectangle layer/delete
on paper layer/merge down/now merge this layer to the backing layer
add drop shadow

activate long strip backing layer/recolor black/activate long strip
layer/copy/paste paper of choice/recolor with the same color/resize 
paper/selections/modify/smooth  setting above/click ok/invert on 
Strip layer/delete on paper layer/merge down/now merge this layer to 
the backing layer/add drop shadow
recolor thin strip 1 layer and thinstrip2 layer black/add drop shadow

copy/paste tube of choice/resize if needed/place on left side of tag
mirror/add drop Shadow

add any other elements you wish to use/resize if needed/add drop shadow
to each element/place where they will look best
Forword art I wrote the word Elegance with same font for name/add drop 
shadow

add your watermark and copyright credits/give it a slight gradient glow
.....now give your tag to a friend.

You're done...thank you for trying my tutorial
please send me a copy so that I can show case it on my blog

Exclusive PTU LadyHawwk Designs and Barbara Jensen

Fabulous

This tutorial was written on May 5,2016. 
Any similarities to another tutorial is purely coincidental.
All my tutorial are register with My Free Copyright. 
Please do not claim as your own.
This tutorial writer assumes you have a working 
knowledge of using Paint Shop Pro.
This tutorial was done in Paint Shop Pro9,
but can be adapted to use in other 
Paint Shop Pro versions.


SUPPLIES NEEDED

Tube of choice: I'm using the awesome work of Barbara Jensen.
Please do not use unless you have a license to do so. 
Get Them HERE

Scrapkit of Choice: I am using PTU LadyHawwk Designs Exclusive 
for Barbara Jensen-Elegance...You can purchase it HERE ...Thank You Cat

Template of choice:I am using Millie PSP Madness Template #794
You can download it HERE...Thanks Millie

Mask of Choice: I am using Insatiable Dreams Mask #211 and 218
You can download it HERE.... Thank You Cat

Filters used:Eye Candy 4000 gradient glow - HERE
Eye Candy 4000- Glass

Font for Name is Copper Black
Copy write is always done in Pixelette  HERE

Dropshadow use through out H-2/V-2/O-60/B-6.85

Please leave a thank you when you downloading for supplies.

my tag is just a guide...please use your imagination 
and make the tag your own you do not have to 
use any of the supplies I used.


     LET'S BEGIN

Open up Template and ShiftD and close original...delete 
copyright layer/close all layers/copy/paste paper of choice
resize to fit canvas/layers/load/save mask/find your mask
and set with these setting/click ok/merge group


copy/paste paper of choice/resize to fit canvas/layers/load
save mask/find your 2nd mask/and set with these setting/click 
ok/merge group


On the following raster layers follow these directions...

activate large rounded square layer/copy/paste paper of choice
resize paper/selections/modify/smooth with these setting/


click 
ok/invert on rounded square layer/delete on paper layer/merge 
down/add drop shadow

activate small rounded rectangle layer/copy/paste paper of choice
resize paper/selections/modify/smooth setting above/click ok
invert on rectangle layer/delete on paper layer/merge down/add
drop shadow

activate long rectangle layer/copy/paste paper of choice/resize
paper/selections/modify/smooth setting above/click ok/invert
on rectangle layer/delete on paper layer/merge down/add drop
shadow

activate large square layer/copy/paste paper of choice/resize
paper/selections/modify/smooth setting above/click ok
invert on rectangle layer/delete on paper layer/merge down/add
drop shadow

activate medium rectangle layer/copy/paste paper of choice/resize
paper/selections/modify smooth setting above/click ok/invert 
on rectangle layer/delete on paper layer/merge down


copy/paste tube of choice/resize if needed/place in middle of tag
add drop Shadow

add any other elements you wish to use/resize if needed/add drop 
shadow to each element/place where they will look best

Recolor large wordart to match the tag/leavewhite word art as is/add 
drop shadow

On name/Effects inner bevel with these settings/click ok


then effects
eye candy/glass with these settings


click ok/add drop shadow

add your watermark and copyright credits/give it a slight gradient 
glow.....now give your tag to a friend.

You're done...thank you for trying my tutorial
please send me a copy so that I can show case it on my blog
send to.... riggsbee53@gmail.com

1/23/16

PTU Exclusive LadyHawwk Designs and Barbara Jensen


Vintage

This tutorial was written on January 23,2016. 
Any similarities to another tutorial is purely coincidental.
All my tutorial are register with My Free Copyright. 
Please do not claim as your own.
This tutorial writer assumes you have a working 
knowledge of using Paint Shop Pro.
This tutorial was done in Paint Shop Pro9,
but can be adapted to use in other 
Paint Shop Pro versions.

 photo BJ-Vintage-Cat.gif


SUPPLIES NEEDED

Animation Shop - HERE

Animation of Choice: I am using Simone's 119 # 22
You can download it HERE ....Thanks Simone

Tube of choice: I'm using the awesome work of Barbara Jensen.
Please do not use unless you have a license to do so. 
Get Them HERE

Scrapkit of Choice: I am using PTU LadyHawwk Designs Vintage
You can purchase it HERE ...Thanks Cat

Mask of Choice: I am using Insatiable Dreams Mask 31
You can download it HERE .... Cat

Filters used:Eye Candy 4000 gradient glow - HERE

Font for Name is  
Copy write is always done in Pixelette  HERE

Drop shadow use through out H-2/V-2/O-60/B-6.85

Please leave a thank you when you downloading for supplies.

my tag is just a guide...please use your imagination 
and make the tag your own you do not have to 
use any of the supplies I used.


     LET'S BEGIN

Open up new raster layer 800x800/copy/paste paper of choice
resize to fit canvas/layers/load/save mask/find your mask
and set with these setting/click ok


copy/paste element #2 screen/resize if needed/place in center of
canvas/add drop shadow

copy/paste element #13 tub/resize if needed/place in center of
screen/add drop shadow

copy/paste element #3 book/resize if needed/place in center of
tub/add drop shadow

copy/paste element #10 candle/resize if needed/place in left side 
of books/add drop shadow

copy/paste element #23 flowers/resize if needed/place in front of
candle/center of books/duplicate/mirror/merge down/add drop shadow

copy/paste element #11 dress/resize if needed/place on right side
of books/add drop shadow

copy/paste tube of choice/resize if needed/place on top of books
add drop shadow

copy/paste element #9 jug/resize if needed/place in left side in 
front of flowers/add drop shadow

now it's time to have some fun/add any other elements you wish to use
resize if needed/add drop shadow to each element/place where they will 
look best

add your watermark and copyright credits/give it a slight gradient 
glow

To animate

close all layers except mask and screen layer/on mask layer lower opiacity
to 40%/copy/merge paste into animation shop

find the animation you wish to use and open it on canvas
duplicate you tag so that you have 25 frames
go to animation/edit select all/copy
go to your tag and edit/select all/copy into selected frame 4 times
now go back to psp andclose those two layers and open the rest
copy/merge and paste into animation shop
duplicate this second tag so you have 25 frames
edit/select/paste into selected frame of your first tag
on top of animation/make sure it's center/view animation
if satisfied/save as gif

.....now give your tag to a friend.


You're done...thank you for trying my tutorial
please send me a copy so that I can show case it on my blog


12/17/15

PTU Foxy Designz and Barbara Jensen

Silver Beauty

This tutorial was written on December 16,2015. 
Any similarities to another tutorial is purely coincidental.
All my tutorial are register with My Free Copyright. 
Please do not claim as your own.
This tutorial writer assumes you have a working 
knowledge of using Paint Shop Pro.
This tutorial was done in Paint Shop Pro9,
but can be adapted to use in other 
Paint Shop Pro versions.


SUPPLIES NEEDED
Animation Shop; Get it HERE

Animation of Choice: I am using Rebel Designz. Animation pack #2
animation #5....Get it HERE.

Tube of choice: I'm using the awesome work of Barbara Jensen.
Please do not use unless you have a license to do so. 
Get Them HERE

Scrapkit of Choice: I am using PTU Foxy's Designz Silver Frost
You can purchase it HERE ...Thanks Ann

Mask of Choice: I am using Tonya Mask # 9 
You can download it HERE .... Thank You Tonya

Filters used:Eye Candy 4000 gradient glow - HERE
Blend of Choice
Xero-HERE
AAA Frame-Foto Frame - HERE

Font for Name is Janda Elegant Handwriting
Copy write is always done in Pixelette  HERE

Drop shadow use through out H-2/V-2/O-60/B-6.85

Please leave a thank you when you downloading for supplies.

my tag is just a guide...please use your imagination 
and make the tag your own you do not have to 
use any of the supplies I used.


     LET'S BEGIN

Open up new raster layer 800x800/flood fill with this color
cbc9de/effect/AAA Frame/foto frame with these setting

copy/paste paper of choice
resize to fit canvas/layers/load/save mask/find your mask
and set with these setting/click ok


copy/paste window frame #23/resize if needed/place on top of mask
add drop shadow

copy/paste Christmas tree #45/resize if needed/place on top of window
frame /add drop shadow

copy/paste tube of choice/resize if needed/place on top of tree
duplicate tube/ on original layer/blend/screen/lower opacity to 90%


on copy layer/xero/porcelain with these setting/click ok


now it's time to have some fun/add any other elements you wish to use
resize if needed/add drop shadow to each element/place where they will 
look best

add wordart if you wish/add fat gradient glow/add drop shadow

add your watermark and copyright credits/give it a slight gradient 
glow.....

To Animate

close all layers on your tag except/mask/window frame and tree
copy/paste/merge your tag/copy/paste into animation shop
duplicate your tag for 25 frames
to do this/click on your tag/edit/duplicate selected 5 times
click on selected frame and duplicate 4 times/for total of 25 frames
edit/select all

open up the animation you want to use/edit/select all
copy/paste animation/paste into your tag/2 times/at the top
and at the bottom

go back to psp and close the three layers and open the layes you have
closed/copy/merge/paste remaining layers into animation shop
click on tag and duplicate for 25 frames/edit select all
copy/pasted into selected frame/view animation/if satisfied
save as gif......now give your tag to a friend.

You're done...thank you for trying my tutorial
please send me a copy so that I can show case it on my blog


10/28/15

LadyHawwk Designs and Barbara Jensen

Dreams

This tutorial was written on October 28,2015. 
Any similarities to another tutorial is purely coincidental.
All my tutorial are register with My Free Copyright. 
Please do not claim as your own.
This tutorial writer assumes you have a working 
knowledge of using Paint Shop Pro.
This tutorial was done in Paint Shop Pro9,
but can be adapted to use in other 
Paint Shop Pro versions.


SUPPLIES NEEDED

Tube of choice: I'm using the awesome work of Barbara Jensen.
Please do not use unless you have a license to do so. 
Get Them HERE

Scrapkit of Choice: I am using PTU LadyHawwk Designs PinupToons BT March 2015
Bundle Pack 30....You can purchase it HERE ...Thanks Cat

Mask of Choice: I am using Insatiable Dreams Mask # 368
You can download it HERE.... Thank You Cat

Filters used:Eye Candy 4000 gradient glow - HERE

Font for Name is Brock Script
Copy write is always done in Pixelette  HERE

Dropshadow use through out H-2/V-2/O-60/B-6.85

Please leave a thank you when you downloading for supplies.

my tag is just a guide...please use your imagination 
and make the tag your own you do not have to 
use any of the supplies I used.


     LET'S BEGIN

Open up new raster layer 800x800/copy/paste paper of choice
resize to fit canvas/layers/load/save mask/find your mask
and set with these setting/click ok


copy/paste rectangle frame #1/resize by 70%/copy/paste paper of
choice/resize to fit canvas/click inside frame/selections
modifiy/expand by 20/selections/invert on frame/delete on paper 
layer/place underneath frame/keep activate/copy/paste tube of
choice/resize by 70%/delete on tube/duplicate tube/place 2nd tube
on top of frame/erase excess tube from the bottom/add drop shadow

copy/paste element #9/resize by 70% twice/place along bottom of 
frame/add drop shadow

copy/paste element #12/resize and place on right side of frame
add drop shadow

copy/paste element #3/resize and place on right side of frame
underneath element #12/add drop shadow

copy/paste element #15/resize and place on right side of frame
underneath element #3/add drop shadow

copy/paste element #5/resize and place on bottom of frame next
io white flower/add drop shadow

copy/paste element #21/resize and place on right side of frame
in between black and white flowers/add drop shadow

copy/paste full tube of choice/place on left side of tag/resize 
if needed/add drop shadow

add word art if you wish/add fat gradient glow/add drop shadow

add your watermark and copyright credits/give it a slight gradient 
glow.....now give your tag to a friend.

You're done...thank you for trying my tutorial
please send me a copy so that I can show case it on my blog

1/1/14

CDO Hungry Hills and Jennifer Janesko - Winter Cutie

Winter Cutie

This tutorial was written on January 1,2014. 
Any similarities to another tutorial is purely coincidental.
All my tutorial are register with My Free Copyright. 
Please do not claim as your own.
This tutorial writer assumes you have a working 
knowledge of using Paint Shop Pro.
This tutorial was done in Paint Shop Pro9,
but can be adapted to use in other 
Paint Shop Pro versions.


SUPPLIES NEEDED

Animation Shop ..... HERE

Tube of choice: I'm using the awesome work of Jennifer Janesko.
Please do not use unless you have a license to do so. 
Get it HERE

Scrapkit of Choice: I am using PTU Hungry Hills Early Snow
You can purchase it HERE ...Thanks Alison

Template of choice:I am using Millie PSP Madness-Template #127
You can download it HERE...Thanks Millie

Animation of Choice: I am using Scrappy Bit of Fun Animation #16
You can download it HERE ....Thanks Simone

Filters used:Eye Candy 4000 gradient glow - HERE

Font for Name is Kingthings christmas 2
Copy write is always done in Pixelette  HERE
AAA Frame Foto Frame  HERE

Drop shadow use through out H-2/V-2/O-60/B-6.85

Please leave a thank you when you downloading for supplies.

my tag is just a guide...please use your imagination 
and make the tag your own you do not have to 
use any of the supplies I used.


     LET'S BEGIN

Open up Template and ShiftD and close original...delete 
copyright layer/close all layers/copy/paste paper of choice
resize to fit canvas

On the following raster layers follow these directions...

activate two rounded rectangles/copy/paste frame of choice
resize frame to fit rectangle/duplicate frame/image/mirror
add drop shadow to both frames

activate two small circles layer/copy/paste paper of choice/resize 
paper/selections/invert on small circles layer/delete on paper 
layer/merge down/add drop shadow

activate medium rounded rectangle layer/copy/paste paper of choice
resize paper/selections/invert on rectangle layer/delete on paper
layer/merge down/add drop shadow

activate medium circle layer/copy/paste paper of choice/resize 
paper/selections/invert on medium circle layer/delete on paper
layer/merge down/copy/paste circle frame of choice/resize to fit
circle/add drop shadow to circle

activate small rounded rectangle layer/copy/paste paper of choice
resize paper/selections/invert on rectangle layer/delete on paper
layer/merge down/add drop shadow/or leave as is and add drop shadow

activate small circle layer/copy/paste paper of choice/resize paper
selections/invert on small circle layer/delete on paper layer/merge 
down/keep activated/copy/paste/closeup tube of choice/selections
invert on paper/delete on tube/add drop shadow to tube

add any other elements you wish to use/resize if needed/add drop 
shadow to each element/place where they will look best

copy/paste your main tube of choice/resize if needed/place where it 
will look best/add drop shadow

add your watermark and copyright credits/give it a slight gradient 
glow.....now give your tag to a friend.

To animate

delete closeup tube/main tube/wordart and candle cluster
copy/merge tag and paste into animation shop
paste as a new animation
duplicate tag for 27 frames
open animation # 16/resize 296 x 197
edit select all/copy/paste into selected frame
make sure you place into top circle/you have to estimate 
where to place it so it will be inside the circle/do this twice
go back to psp/close all layers and open closeup and main tube
wordart andcnadle cluster
copy/merge and paste into animation shop as a new animation
duplicate tag for 27 frame/edit select all/copy/paste into
selected frame/make sure closeup is within the circle and
everything else will be in the right place
if satisfied save as gif

You're done...thank you for trying my tutorial
please send me a copy so that I can show case it on my blog


Another version with Barbara Jensen


8/7/13

PTU Foxy's Designz and Barbara Jensen

1-800-Bite Me

This tutorial was written on August 6, 2013. 
Any similarities to another tutorial is purely coincidental.
All my tutorial are register with My Free Copyright. 
Please do not claim as your own.
This tutorial writer assumes you have a working 
knowledge of using Paint Shop Pro.
This tutorial was done in Paint Shop Pro9,
but can be adapted to use in other 
Paint Shop Pro versions.


SUPPLIES NEEDED

Animation Shop of Choice

Tube of choice: I'm using the awesome work of Barbara Jensen.
Please do not use unless you have a license to do so. 
Get Them HERE

Scrapkit of Choice: I am using PTU Foxy's Designz -1-800-Bite Me
You can purchase it HERE ...Thanks Foxy

Template of choice:I am using Toxic Desire Template #170
You can download it HERE...Thanks Kristin

Animation of Choice: I am using one of Scappy Bit of Fun 
Animations #243 ...You can download HERE   Thanks Simone

Filters used:Eye Candy 4000 gradient glow - HERE
Eye Candy 4000 glass
AAA Frame - Foto Frame - HERE

Font for Name is Lucida Sans Unicode
Copy write is always done in Pixelette  HERE

Drop shadow use through out H-2/V-2/O-50/B-5.00

Please leave a thank you when you downloading for supplies.

my tag is just a guide...please use your imagination 
and make the tag your own you do not have to 
use any of the supplies I used.

     LET'S BEGIN

Open up Template and ShiftD and close original...delete 
copyright layer/close all layers//copy/paste paper of choice
resize to fit canvas/layers/load/save mask/find your mask
and set with these setting/click ok


open background/effect
AAA Frame/foto frame with these setting/click ok


On the following raster layers follow these directions...

activate thin top rectangle layer/copy/paste paper of choice
resize paper/selections/invert on rectangle layer/delete on 
paper layer/merge down/ add drop shadow

activate thin bottom rectangle layer/copy/paste paper of choice
resize paper/selections/invert on rectangle layer/delete on 
paper layer/merge down/ add drop shadow

activate purple top rectangle layer/copy/paste paper of choice
resize paper/selections/invert on rectangle layer/delete on 
paper layer/merge down/ add drop shadow

activate purple bottom rectangle layer/copy/paste paper of choice
resize paper/selections/invert on rectangle layer/delete on 
paper layer/merge down/ add drop shadow

activate blue top rectangle layer/copy/paste paper of choice
resize paper/selections/invert on rectangle layer/delete on 
paper layer/merge down/ add drop shadow

activate blue bottom rectangle layer/copy/paste paper of choice
resize paper/selections/invert on rectangle layer/delete on 
paper layer/merge down/ add drop shadow

activate purple top rectangle2 layer/copy/paste paper of choice
resize paper/selections/invert on rectangle layer/delete on 
paper layer/merge down/ add drop shadow

activate purple bottom rectangle2 layer/copy/paste paper of choice
resize paper/selections/invert on rectangle layer/delete on 
paper layer/merge down/ add drop shadow

activate pink circle left layer/copy/paste paper of choice
resize paper/selections/invert on left circle layer/delete on 
paper layer/merge down/ add drop shadow

activate pink circle right layer/copy/paste paper of choice
resize paper/selections/invert on right circle layer/delete on 
paper layer/merge down/ add drop shadow

activate middle circle layer/copy/paste paper of choice/resize
paper/selections/invert on middle circle layer/delete on 
paper layer/merge down/keep activated/copy paste tube of choice 
delete on circle layer/delete on tube layer/duplicate tube/on
original layer/blend/hard light/place duplicate tube underneath
original/add drop shadow

copy/paste your tube of choice/resize if needed/place on your 
tag where it will look best/add drop shadow

add any other elements you wish to use/resize/add drop shadow 
to each element/place where they will look best

add your watermark and copyright credits/give it a slight 
gradient glow/on name effects/glass with these settings.....


to animate

close off main tube layer and arrow layer for now
copy/merge/paste tag into animation shop
duplicate tag so you have 17 layers
on animation # 243/select all 
on tag select all
on animation select all/copy into selected frame
place five times on tag/four on right side/one on left side
(see my tag)
go back to psp and close all layers except the main tube and arrow
copy/merge paste tube and arrow as new layer in animation shop
duplicate until you have 21 layers/select all/copy into 
selected frame/place near bottom right hand side near musical 
note/see my tag for placement
view animation if satisfied save as gif

now give your tag to a friend.

You're done...thank you for trying my tutorial
please send me a copy so that I can show case it on my blog