9/25/11

PTU Designz by Stina and Eugene Rzhevskii

Hallow EMO

This tutorial was written on September 24th 2011.
Any similarities to another tutorial is purely coincidental.
All my tutorial are register with My Free Copyright. 
Please do not claim as your own.
This tutorial writer assumes you have a 
working knowledge of using Paint Shop Pro.
This tutorial was done in Paint Shop Pro9,
but can be adapted to use in other
Paint Shop Pro versions.


SUPPLIES NEEDED

Tube of Choice: I am using the awesome artwork of Eugene Rzhevskii ..You can purchase
 his tubes HERE...Please do not use without a license to do so

Scrapkit of Choice: I am using Designz by Stina Coll-ab PTU Happy Hallow EMO
You can purchase it HERE....Thank you Stina

Mask of Choice: I'm using one of Insatiable Dreams #38...You can find it HERE
Put mask in mask folder..Thanks so much for the use of your Cat

Template of Choice: I'm using Dezigns by Ali #69. Ali is no longer in the Scrap
business. Please choose another template. We wish her much success in whatever
she does.She will be missed amongst the tagging world.Thanks Ali

Filters used:Mura's Meister -Copies/ Xero- Porcelain/Eye Candy 4000-Gradient Glow 

Font for name is Creep-ville, font for word art is Awakening 
and copy write is always done in Pixelette ...
Get them HERE


Drop shadow use through out H-2/V-2/O-50/B-5.00

Please leave a thank you when you downloading for supplies.


my tag is just a guide...please use your imagination and make the tag your own
you do not have to use any of the supplies I used,but by all means have fun
making your tag.


     LET'S BEGIN

Open Template/shift/D/ Close the original Template/delete credit layer
Image/ resize 700x700 /we will resize again at the end

go to last layer/copy/paste paper of choice/place below black circle layer
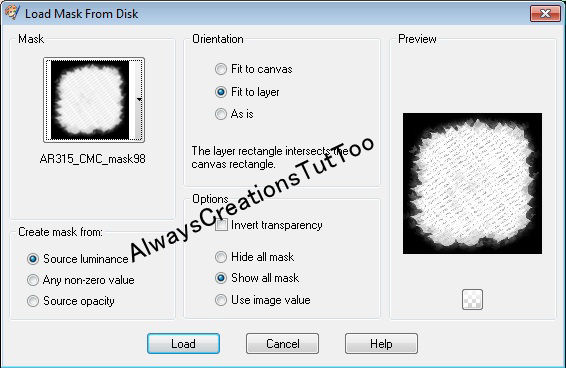
resize paper to fit canvas/now go to layers/load/save mask/load mask from
disk/ and find your mask of choice...with these setting see photo below....
go to layers/merge group

open black circle layer/copy/paste paper of choice/resize paper/on circle
layer/selection/float/unfloat/invert/go to paper layer and delete/layers
new raster layer on top of black circle layer/Text tool/background/foreground
white/size 10/font-awakening/Type out Happy Hallow EMO/Convert to raster/Object
center/selection/float/defloat on black circle/effect/mura's meister/copies
with these setting

 delete extra layer/selections/none/add drop shadow
On circles 4-3 and 2/one at a time/selections/float/defloat/invert/copy/paste
paper of choice/resize to fit/delete paper layer/selection/none/merge down/
place spider frame of choice on each of the small circles

open your tube and place a different part on each of the small circles/one at
a time/you may need to resize the tube to get it to fit the way you want.
Do the same with circle one/add xero porcelain with these setting
add your remaining elements to finish up your tag
add your main tube 
add copy right and your watermark
now give to a friend

thank you for trying my tutorial..please send me a copy of what you did
so I can showcase it...riggsbee53@gmail.com

9/21/11

FTU Always Creations and Pinuptoons


This tutorial was written on September 17th 2011. 
Any similarities to another tutorial is purely coincidental.
All my tutorial are register with My Free Copyright. 
Please do not claim as your own.
This tutorial writer assumes you have a
working knowledge of using Paint Shop Pro.
This tutorial was done in Paint Shop Pro9,
 but can be adapted to use in other
Paint Shop Pro versions.


Things That Go Bump in the Night


SUPPLIES NEEDED

Scrapkit of Choice: Always Creations-Halloween for You. you can get it HERE
please follow my TOU

Tube of Choice: I am using the awesome artwork of Pinup toons..You can purchase
his tubes HERE...Please do not use without a license to do so


Mask of Choice: I'm using one of Vix Halloween 2010 #1...You can find it HERE
Put mask in mask folder..Thanks so much for the use of your Vix

Template of Choice:I'm using Denz Designz #160.
You can get it HERE
Thank you Denny


ghost of choice or you can used mine. 
HERE  please follow my TOU

Filter of Choice:Eye Candy 4000-Gradient Glow-HERE
Font for name is Ash and copy write is always done in Pixelette ...
Get them HERE
 
Drop shadow use through out H-2/V-2/O-50/B-5.00

Please leave a thank you when you downloading for supplies.
my tag is just a guide...please use your imagination and make the tag your own
you do not have to use any of the supplies I used.

     LET'S BEGIN

Open Template/ShiftD/delete original template/delete copyright layer
close all layers except background layer/copy/paste paper of choice/resize
go to layersload/save mask/find your mask/setup with these setting below

click ok/merge group.

activate shape2 layer/copy/paste paper of choice/go to effects/gradient glow with
these setting below(do this for each template layer)

activate shape1 layer/copy/paste paper of choice/go to effects/gradient glow with
these setting below/add the glow

activate rectangle layer/copy/paste paper of choice/go to effects/gradient glow with
these setting below/add the glow

activate circle1 layer/copy/paste paper of choice/go to effects/gradient glow with
these setting below/add the glow

activate circle2 layer/copy/paste paper of choice/go to effects/gradient glow with
these setting below/add the glow

place the web on top of circle2/resize web to fit/now copy/paste spider/resize
duplicate 4x moving the spider up a little each time until you get to the top
close copies until later

place the bats where you want them/add the ghost where you want it/add drop
shadow to them/ add the orange eyes/place the lids on top of the eyes/close the
lid layer until time to animate

activate all word art and change the colors to orange/add the glow
place your tube where you want it to be/resize/add drop shadow

resize tag if needed/Add your water mark and copyright/on the name add the same
gradient glow 2 times/duplicate and move over just a little/duplicate and move over
just a little again/merge down after each duplication so that the name is triple
(see my tag)

to animate
your first spider layer and the eyes should be open
all other spiders and lids closed
Copy merge/paste to animation shop as a new layer

back to paint shop pro/close first spider layer and eyes
open up the next spider layer and lids copy merge/paste after current tag

back to paint shop pro/close second spider layer and lids
open up the next spider layer and eyes copy merge/paste after current tag

back to paint shop pro/close third spider layer and eyes
open up the next spider layer and lids copy merge/paste after current tag

back to paint shop pro/close fourth spider layer and eyes
open up the next spider layer and eyes copy merge/paste after current tag

you should have 5 layers/three with eyes and two with lids
edit select all/animation/frame property 100
save as gif

now give to a friend

thank you for trying my tutorial..please send me a copy of what you did
so I can showcase it...riggsbee53@gmail.com


9/16/11

PTU Aussie Scrap Designs and Michael Calandra

Creepy Hollow

This tutorial was written on September 15th 2011. 
Any similarities to another tutorial is purely coincidental.
All my tutorial are register with My Free Copyright. 
Please do not claim as your own.
This tutorial writer assumes you have a 
working knowledge of using Paint Shop Pro.
This tutorial was done in Paint Shop Pro9,
but can be adapted to use in other
Paint Shop Pro versions.


SUPPLIES NEEDED

Tube of Choice: I am using the awesome artwork of Michael Calandra..You can purchase
 his tubes HERE...Please do not use without a license to do so

Scrapkit of Choice: I am using Aussie Scrap Designs PTU Scrap kit called Creepy Hollow
You can purchase it HERE....Thank you Gail

Mask of Choice: I'm using one of Vix Halloween 2010 #10...You can find it HERE
Put mask in mask folder..Thanks so much for the use of your Vix

Filters used:Screen work - Fabric Weave...get it HERE

Font for name is Blue Highway D Type and copy write is always done in Pixelette ...
Get them HERE


Drop shadow use through out H-2/V-2/O-50/B-5.00
Please leave a thank you when you downloading for supplies.


my tag is just a guide...please use your imagination and make the tag your own
you do not have to use any of the supplies I used.


     LET'S BEGIN

Open Up a new raster layer 700x630.floodfill white/Overtop of background layer/copy
paste paper of choice from kit/resize to fit layer...now go to layers/load/
save mask/load mask from disk/ and find your mask of choice...with these setting
see photo below....go to layers/merge group 


go to preset shape/with setting below/make a rectangle about the size as mine(see tag)
convert to raster/choose paper of choice from kit/resize to fit the rectangle layer/
with magic wand click on rectangle/on rectangle layer/selection/invert/go to paper
layer and delete.


copy/paste spider web from kit/place on left side of rectangle near the edge/place
spider near the edge at the top/duplicate 8x and move a spider down a little each
time so that you have a trail of the spider going down the page/close all the
spiders except the first spider

open/copy/paste/resize the scare cross/place on the left side on top of the trail
of spiders/add drop shadow
add the bat and duplicate 2x/place in the upper right corner and spread the bats
out/place the cloud over two of them.
copy/place/resize and place the dying tree2 on the right hand size/add drop shadow
copy/place/resize and place the head stone over top the tree/add drop shadow

copy/paste the spider/place on right side of tomb stone/placespider near the edge
at the bottom/duplicate 8x and move a spider up a little each time so that you
have a trail of the spider going up the tomb stone/close all the spiders except
the first spider
copy/paste/resize your tube and place behind tombstone/duplicate and close this layer
noe go to screenwork/fabic weave/change the blend mode to screen/open the duplicate
and lower the opacity to 60%.now open your tube and select the top part and paste
on the other side on top of the cross/add drop shadow and change blend mode to hard light.

Add the wordart Creepy hollow /add drop shadow/resize your tag
Add your water mark and copyright

to animate

Copy merge/paste to animation shop as a new layer
back to paint shop pro/close two spider layers and
open up the next two spider layers
copymerge/paste after current tag
continute until all spider layers are copy into animation shop
you should have 8 layers
edit select all/animation/frame property 100
save as gif

now give to a friend

thank you for trying my tutorial..please send me a copy of what you did
so I can showcase it...riggsbee53@gmail.com

9/13/11

PTU Broken Sky Designs and Michael Calandra

Haunted by Memories

This tutorial was written on September 12th 2011. 
Any similarities to another tutorial is purely coincidental.
All my tutorial are register with My Free Copyright. 
Please do not claim as your own.
This tutorial writer assumes you have a
working knowledge of using Paint Shop Pro.
This tutorial was done in Paint Shop Pro9
,but can be adapted to use in other
Paint Shop Pro versions.


SUPPLIES NEEDED

Tube of Choice: I am using the awesome artwork of Michael Calandra.
You can purchase his tubes HERE...you will need a tube that's laying or crawling
Please do not use without a license to do so


Scrapkit of Choice: I am using a Broken Dreams Designs PTU Scrapkit- Haunted By Memories .
 You can purchase it HERE....Thank you Tonya

Mask of choice:I'm using a mask by Chichi #1. You can find it HERE..thank you Cindy

Font for name is Inked God and copy write is always done in Pixelette ...
Get them HERE

Filter: Eye Candy 4000/Gradient Glow..Get it Here
Drop shadow use throughout H-2/V-2/O-50/B-5.00

Please leave a thank you when you downloading for supplies.


my tag is just a guide...please use your imagination and make the tag your own
you do not have to use any of the supplies I used.this will be a quick tag.


     LET'S BEGIN


open new raster layer 700x700/copy/paste paper of choice from kit/go to layers/load/
save mask/load mask from disk/find your mask and load with these setting then merge grou
p


open frame1/move down a little/with magic wand click inside frame/selection/modify by 10
copy/paste paper of choice/resize/go to frame layer and invert/then paper layer and delete

take you tube/copy/paste and place on top the frame on the left/duplicate/place this copy
underneath the frame/now take your ereaser tool and erase any area that needs to be take
off the top of the frame.

add any more elements you wish to use/make sure you add a drop shadow to each element.
place your main tube where you want it/add drop shadow.(see my tag if needed)

resize your tag/Add your copyright and watermark-(I put a slight gradient glow on mine)
now it's ready to give to a friend

thank you for trying my tutorial..please send me a copy of what you did
so I can showcase it...riggsbee53@gmail.com

PTU Broken Sky Designs and Duncan Long

Freddy's Curse

This tutorial was written on September 12th 2011. 
Any similarities to another tutorial is purely coincidental.
All my tutorial are register with My Free Copyright. 
Please do not claim as your own.
This tutorial writer assumes you have a 
working knowledge of using Paint Shop Pro.
This tutorial was done in Paint Shop Pro9,
but can be adapted to use in other
Paint Shop Pro versions.


SUPPLIES NEEDED

Tube of Choice: I am using the awesome artwork of Duncan Long.
You can purchase his tubes HERE...you will need a tube that's laying or crawling
Please do not use without a license to do so

Scrapkit of Choice: I am using a Broken Dreams Designs PTU Scrapkit- Haunted House .
 You can purchase it HERE....Thank you Tonya

Font for name is Creep ville and copy write is always done in Pixelette ...
Get them HERE

Drop shadow use throughout H-2/V-2/O-50/B-5.00

Please leave a thank you when you downloading for supplies.


my tag is just a guide...please use your imagination and make the tag your own
you do not have to use any of the supplies I used.


     LET'S BEGIN

first open up frame1/take your magic wand and click inside/copy/paste paper 8/
resize to fit the frame/close off/selection/modify by 6/go to frame layer and
invert/now go to paper layer and delete/select none/minimize this for now.

open up the haunted house/shift D and close original layer/resize 700x688/move
house a little lower on canvas/close off for now/copy/paste bllodsplatter1/duplicate
mirror/duplicate/flip/duplicate mirror/merge visible all four layers.This is your mask.

open up your house layer and copy/paste the bloody chain/resize to fit the wood slates
on the house. If you place on top of the railings then use your eraser tool to erase the
prts on top so it looks like it's underneath. once that is done merge visible all chain layers
then merge down on top of the house

now open up the paper layer you previous did.you're going to used just the paper/copy/paste
above house layer and place toward the top (see my tag for directions)resize and go to
adjust/sharpen so the words stand out.open the hand and resize until you get the size you want.
place the hand under the house on the right hand side/duplicate the hand four more time/each time
bringing it out from underneath the house more and more/once you paste the fifth one/close all of
them except the first one.

add any more elements you wish to use/make sure you add a drop shadow to each element.
place your main tube where you want it/add drop shadow.(see my tag if needed)

resize your tag/Add your copyright and watermark-(I put a slight gradient glow on mine)

To animate

copy/merge all layers except the 4 duplicates of the hand/go to animation shop and paste as
new layer/go back and close the first hand and open the second hand and paste in animations
shop after current frame/repeat until you do the fourth copy of the hand/now go back and
close the fourth layer and reopen the third layer/copy merge and paste in animation shop
behind current layer/ do this until you get to the original hand layer/you should have 9
frames/go to edit/select all/animation/frame properties and change to 100


view animated/if happy save as gif/now it's ready to give to a friend

thank you for trying my tutorial..please send me a copy of what you did
so I can showcase it...riggsbee53@gmail.com

9/12/11

PTU Hungry Hills and Pinuptoons


Autumn Leaves

This tutorial was written on September 10th 2011. 
Any similarities to another tutorial is purely coincidental.

All my tutorial are register with My Free Copyright. 
Please do not claim as your own.
This tutorial writer assumes you have a 
working knowledge of using Paint Shop Pro.

This tutorial was done in Paint Shop Pro9,
but can be adapted to use in other

Paint Shop Pro versions.


                                                                     SUPPLIES NEEDED


                                Tube of Choice: I am using the awesome artwork of Pinuptoons..
                      You can purchase his tubes HERE...you will need a closeup and regular tube
                                            Please do not use without a license to do so


                     Scrapkit of Choice: I am using a Sarah Hungry Hills PTU Scrapkit- Subtle Autumn .
                                         You can purchase it HERE....Thank you Sarah


                              Template of Choice: I'm using a template by Blissfully Beth #9. 
                                        You can get it HERE. Thank you  for the Share Beth


                                 Mask of Choice: I'm using Creative Misfit Autumn Collection. 
                               Place in your mask folder. You can get it HERE. Thanks Aqua

                              Filter Used:Eye Candy 4000-Gradient Glow...You can get it HERE
                            Gradient: Autumn Gradient from Eleven Sword...You can get it HERE

                                         Font for name is HT Trattona and copy write is always 
                                                   done in Pixelette ... Get them HERE


                                                         animation fallen leaves...Here


                                              Drop shadow use through out H-2/V-2/O-50/B-5.00
                                      Please leave a thank you when you downloading for supplies.

                                       my tag is just a guide...please use your imagination and make
                                    the tag your own you do not have to use any of the supplies I used.

                                                                                LET'S BEGIN
                        Open template/Image resize all layer to 600x600/shiftD/close original template.
                     Remove background and credits.Close out every layer. Choose paper of choice/
                      paste underneath all layers.Go to layers/load/save mask/load mask from disk/
                              find your mask of choice and paste with these setting.merge group


Do the following task to layers 1-7/merge down after each task and add a drop shadow

copy/paste paper of choice/go to the layer/invert/go to paper layer and delete

put the tree behind layer 6/add a drop shadow.

add any other elements you wish to use/make sure you add a drop shadow to each element.
place your main tube where you want it/add drop shadow.(see my tag if needed)

Resize if needed/Add your copyright and watermark-(I put a slight gradient glow on mine)


now it's time to animate

copy merge/paste your tag into animation shop/open up your animation leaves into
animation shop/duplicate your tag with the same number of layers as the animation
you should have 27 layers/edit/select all/animation/frame properties/30
save as gif

thank you for trying my tutorial..please send me a copy of what you did
so I can showcase it...riggsbee53@gmail.com

9/10/11

PTU Sunshine Daze and Suzanne Woolcott

Any Day Now 

This tutorial was written on September 10th 2011. 
Any similarities to another tutorial is purely coincidental.
All my tutorial are register with My Free Copyright. 
Please do not claim as your own.
This tutorial writer assumes you have a 
working knowledge of using Paint Shop Pro.
This tutorial was done in Paint Shop Pro9,

but can be adapted to use in other
Paint Shop Pro versions.


SUPPLIES NEEDED

Tube of Choice: I am using the awesome artwork of Suzanne Woolcott.
You can purchase her tubes HERE...you will need a 2 images and regular tube
Please do not use without a license to do so

Scrap kit of Choice: I am using a Sunshine Daze PTU Scrap kit- Any Day Now.
 You can purchase it HERE....Thank you Dawn

Template of Choice: I'm using a template by Denz Designs # 14. You can get it HERE.
Thank you  for the Share Denny

Mask of Choice: I'm using Designs by Vaybs #131. Place in your mask folder.
You can get it HERE. Thanks Vaybs

Filter Used:No Filter was used

Font for name is Ms UI Gothic and copy write is always done in Pixelette ...
Get them HERE


  Drop shadow use through out H-2/V-2/O-50/B-5.00

Please leave a thank you when you downloading for supplies.


my tag is just a guide...please use your imagination and make the tag your own
you do not have to use any of the supplies I used.


     LET'S BEGIN

Open template/Image resize all layer to 650x650/We will resize later/shift D/
close original template/Remove background and credits.Close out every layer.
Choose paper of choice/paste underneath all layers.Go to layers/load/
save mask/load mask from disk/find your mask of choice and paste
with these setting.merge group


activate circle2 back layer/copy/paste image of choice on the part that you
want to show/go to circle2 back layer/invert/go to paper layer and delete/merge down
change blend mode to soft light
do the same thing with circle1 back layer/change blend mode to screen

activate square layer/copy/paste paper of choice/go to square layer/invert/
go to paper layer and delete/merge down/place you main tube on top of the
white frame/add drop shadow

activate small square layer/copy/paste paper of choice/go to small square layer/
invert/go to paper layer and delete/merge down

leave all the frames white and remove the three flower layers
on the circle2 layer/go to present/ellipse/create on vector/width 1/foreground black
background null and draw a circle/new raster layer/type words of choice/convert to raster
delete present layer and blank layer.

add any elements you wish to use/make sure you add a drop shadow to each element.
place your main tube where you want it/add drop shadow.(see my tag if needed)
resize you tag if still to big.

Add your copyright and watermark/now it's ready to give to a friend

thank you for trying my tutorial..please send me a copy of what you did
so I can showcase it... riggsbee53@gmail.com

9/9/11

PTU Mythical Designs and Jennifer Janesko

Autumn Glory

This tutorial was written on September 9th 2011.
Any similarities to another tutorial is purely coincidental.
All my tutorial are register with My Free Copyright.
Please do not claim as your own.
This tutorial writer assumes you have a
working knowledge of using Paint Shop Pro.
This tutorial was done in Paint Shop Pro9,
but can be adapted to use in other
Paint Shop Pro versions.


SUPPLIES NEEDED

Tube of Choice: I am using the awesome artwork of Jennifer Janesko..
You can purchase her tubes
HERE...you will need a closeup and regular tube
Please do not use without a license to do so

Scrapkit of Choice: I am using a Mythical Designs PTU Scrapkit- Autumn Glory.
 You can purchase it
HERE....Thank you Sally

Template of Choice: I'm using a template by Essence of Creativity #38. You can get it HERE.
Thank you  for the share Yvette

Mask of Choice: I'm using Creative Misfit Autumn Collection. Place in your mask folder.
You can get it
HERE. Thanks Tina

Filter Used:Eye Candy 4000-Grandient Glow...You can get it HERE
Font for name is Monika and copy write is always done in Pixelette ...
Get them
HERE

Dropshadow use througout H-2/V-2/O-50/B-5.00
Please leave a thank you when you downloading for supplies.

my tag is just a guide...please use your imagination and make the tag your own
you do not have to use any of the supplies I used.


     LET'S BEGIN

Open template/Image resize all layer to 615x615/shiftD/close original template.
Remove background and credits.Close out every layer. Choose paper of choice/
paste underneath all layers.Go to layers/load/save mask/load mask from disk/
find your mask of choice and paste with these setting.merge group


activate circle layer/copy/paste paper of choice/
go to circle layer/invert/go to paper layer 
and delete/merge down
activate square2 layer/copy/paste paper of choice
go to square2 layer/invert
go to paper layer and delete/merge down
activate square1 layer/copy/paste paper of choice
go to square1 layer/invert
go to paper layer and delete/merge down

keep activated/copy paste your close up
tube on top of square1 layer/add drop shadow 

and change blend mode to hard light.
activate rectangles layer/copy/paste paper of choice
go to rectangles layer/invert
go to paper layer and delete/merge down
add any elements you wish to use
make sure you add a drop shadow to each element.

place your main tube where you want it

add drop shadow.(see my tag if needed)
Add your copyright and watermark-
(I put a slight gradient glow on mine)
for the finish touch I took the sparkles 

and copy/paste on top of the tag
now it's ready to give to a friend

thank you for trying my tutorial..please send me a copy of what you did
so I can showcase it..   
riggsbee53@gmail.com

9/7/11

FTU Bea's Creations and Barbara Jensen

Fukitol

This tutorial was written on August 6th 2011.
Any similarities to another tutorial is purely coincidental.
All my tutorial are register with My Free Copyright. 
Please do not claim as your own.
This tutorial writer assumes you have a 
working knowledge of using Paint Shop Pro.
This tutorial was done in Paint Shop Pro9,
but can be adapted to use in other
Paint Shop Pro versions.


SUPPLIES NEEDED

Tube of Choice: I am using the awesome artwork of Barbara Jensen..It was a bonus tube
If it's not available,use anther tube from her. You can purchase her tubes HERE...
Please do not use without a license to do so

Scrapkit of Choice: I am using a Bea's Creations FTU Scrapkit -Spring.
You can download it HERE....Thank you Bea

Template of Choice: I'm using a template by Just Fi called Fukitol. You can get it HERE.
Thank you Fi for the Share

Mask of Choice: I'm using Insatiable Dreams Mask #2. Place in your mask folder.
You can get it HERE...Thanks Cat

Font for name is Chopin Script and copy write is always done in Pixelette ...
Get them HERE

Dropshadow use througout H-2/V-2/O-50/B-5.00

Please leave a thank you when you downloading for supplies.

my tag is just a guide...please use your imagination and make the tag your own
you do not have to use any of the supplies I used.


LET'S BEGIN

Open template/shiftD/close original template.Remove background and credits.Close
out every layer. Choose paper of choice/paste underneath all layers. Go to layers/
load/save mask/load mask from disk/find your mask of choice and paste with these
setting.merge group.


starting with blur mask layer.Change the color to reflect your tube.I also changed
the mask layer too to the same color.

activate small black circle.Copy/paste paper of choice.go to selection/ invert circle
layer and then go to paper layer and delete/ merge down.leave small striped layer as is.

leave pink circles/pink glitter circles as is.On large black circle/activate.
Copy/paste paper of choice.go to selection/ invert circle layer and then
go to paper layer and delete/ merge down.

leave blur circle and blue glitter circle as is.I change the color on the word art to
purple/left the rectangle black and merge visible the whole thing to place it lower.
(see my tag for ference)


place your main tube on top of large circle/place it where you want it activate
large circle/I used the top part of the tube/go to selection/ invert circle layer and then
go to tube layer and delete/add drop shadow.

add any elements you wish to use/make sure you add a drop shadow to each element.
place your main tube where you want it/add drop shadow.(see my tag if needed)

Add your copyright and watermark-(I put a slight gradient glow on mine)
and give your tag to a friend
thank you for trying my tutorial..please send me a copy of what you did
so I can showcase it...riggsbee53@gmail.com

9/5/11

PTU Crystals Creations and Very Many

Punk Princess with Attitude


This tutorial was written on September 3st 2011.
Any similarities to another tutorial is purely coincidental.
All my tutorial are register with My Free Copyright.
Please do not claim as your own.
This tutorial writer assumes you have a
working knowledge of using Paint Shop Pro.
This tutorial was done in Paint Shop Pro9,
but can be adapted to use in other
Paint Shop Pro versions.

SUPPLIES NEEDED
Tube of Choice: I am using the awesome artwork of Very Many..
You can purchase her tubes HERE...
Please do not use without a license to do so

Scrapkit of Choice: I am using  Crystals Creations PTU Scrapkit- Gothic Punk
 You can purchase it
HERE and visit her blog HERE....Thank you Crystal

Template of Choice: I'm using a template by Toxic Desirez #36. You can get it HERE.
Thank you  for the share Kristin

Mask of Choice: I'm using Insatiable Dreams #155. Place in your mask folder.
You can get it
HERE. ..Thanks Cat

Filter Used:Eye Candy 4000-Grandient Glow...You can get it HERE
Font for name is  Haunted Mouse and copy write is always done in Pixelette ...
Get them
HERE

Dropshadow use througout H-2/V-2/O-50/B-5.00
Please leave a thank you when you downloading for supplies.

my tag is just a guide...please use your imagination and make the tag your own
you do not have to use any of the supplies I used.


     LET'S BEGIN
Open template/shiftD/close original template.Remove background and credits.Close
out every layer. Choose paper of choice/paste underneath all layers. Go to layers/
load/save mask/load mask from disk/find your mask of choice and paste with these
setting.merge group


activate rectangle fill layer/copy/paste paper of choice/go to rectangle fill layer/invert/
go to paper layer and delete/merge down
leave the first wordart layer the way it is
activate rectangle frame layer/copy/paste paper of choice/go to rectangle frame layer/invert/
go to paper layer and delete/merge down
copy/paste the closeup of your tube underneath the first wordart layer/duplicate and mirror
on the copy layer change blend to hard light/add drop shadow to both layers
remove the star layer if you wish.I replaced it with the star from the kit
on the second wordart/activate/copy/paste paper of choice/go to wordart layer/invert/
go to paper layer and delete/merge down
add any elements you wish to use/make sure you add a drop shadow to each element.
place your main tube where you want it/add drop shadow.(see my tag if needed)
Add your copyright and watermark-(I put a slight gradient glow on mine)
and give your tag to a friend
thank you for trying my tutorial..please send me a copy of what you did
so I can showcase it...  
  riggsbee53@gmail.com

9/2/11

PTU Queen Brat Designs and Jennifer Janesko

Vintage Love

This tutorial was written on September 1st 2011.
Any similarities to another tutorial is purely coincidental.
All my tutorial are register with My Free Copyright.
Please do not claim as your own.
This tutorial writer assumes you have a
working knowledge of using Paint Shop Pro.
This tutorial was done in Paint Shop Pro9,
but can be adapted to use in other
Paint Shop Pro versions.


SUPPLIES NEEDED
Tube of Choice: I am using the awesome artwork of Jennifer Janesko..
You can purchase her tubes HERE...
Please do not use without a license to do so

Scrapkit of Choice: I am using a Queen Brat Designs
 PTU Scrapkit- Vintage Love,You can purchase it HERE
and visit her blog HERE....Thank you Renee

Template of Choice: I'm using a template by Denz Designz #6.
You can get it HERE. Thank you  for the Share Denny

Mask of Choice: I'm using Insatiable Dreams #37.
Place in your mask folder.
You can get it
HERE. Thanks Cat


Font for name is  Arial,Renaissance and 
copy write is always done in Pixelette ...
Get them
HERE

Drop shadow use throughout H-2/V-2/O-50/B-5.00
Please leave a thank you when you downloading for supplies.

my tag is just a guide...please use your imagination and 
make the tag your own you do not have to use any of the supplies I used.


     LET'S BEGIN
Open template/shiftD/close original template.Remove background and credits.Close
out every layer. Choose paper of choice/paste underneath all layers. Go to layers/
load/save mask/load mask from disk/find your mask of choice and paste with these
setting.merge group


pick two colors from your kit/on the blur layer/go to target brush and change
the color of the blur layer/selection/float/defloat/new raster layer/using
arial font type out my vintage love/object/centered/Mura's Meister-copy
with these setting


activate circle layer/copy/paste paper of choice/go to circle layer/invert/
go to paper layer and delete/merge down
on circle edging layer/selection/float/defloat/color of choice/selection none
bottom and top strip layer/copy/paste paper of choice/go to bottom and top layer/invert/
go to paper layer and delete/merge down
activate back1/copy/paste paper of choice/go to back1 layer/invert/
go to paper layer and delete/merge down/keep activated/copy/paste closeup of choice
place where you want it/delete tube/now go to filter unlimited 2.0-Photo aging kit
with these setting


activate back2/copy/paste paper of choice/go to back2 layer/invert/
go to paper layer and delete/merge down/keep activated/copy/paste closeup of choice
place where you want it/delete tube/now go to filter unlimited 2.0-Photo aging kit
with these setting


remove the two frame and copy/paste the lace frames of choice/resize if
needed/add drop shadow
add any elements you wish to use/make sure you add a drop shadow to each element.
place your main tube where you want it/add drop shadow.(see my tag if needed)
on the envelope/write my vintage love with the font renaissance
Add your copyright and watermark-(I put a slight gradient glow on mine)
and give your tag to a friend
thank you for trying my tutorial..please send me a copy of what you did
so I can showcase
it...  riggsbee53@gmail.com

9/1/11

PTU Hungry Hills and Keith Garvey

Cherry Pie

This tutorial was written on August 31th 2011.
Any similarities to another tutorial is purely coincidental.
All my tutorial are register with My Free Copyright.
Please do not claim as your own.
This tutorial writer assumes you have a
working knowledge of using Paint Shop Pro.
This tutorial was done in Paint Shop Pro9,
but can be adapted to use in other
Paint Shop Pro versions.


SUPPLIES NEEDED
Tube of Choice: I am using the awesome artwork of Keith Garvey..
You can purchase his tubes HERE...
Please do not use without a license to do so

Scrapkit of Choice: I am using a Sarah Hungry Hills PTU Scrapkit- Cherry Pie.
 You can download it
HERE....Thank you Sarah

Template of Choice: I'm using a template by Addicitive Pleasure #57.
You can get it HERE.
Thank you for the Share Tammy

Mask of Choice: I'm using WSL #258. Place in your mask folder.
You can get it
HERE. Thanks Chelle

Filter Used:penta.com -jeans- HERE and-xero-radiance...You can get it HERE

Font for name is Organic Elements and copy write is always done in Pixelette ...
Get them
HERE

Dropshadow use througout H-2/V-2/O-50/B-5.00
Please leave a thank you when you downloading for supplies.

my tag is just a guide...please use your imagination and make the tag your own
you do not have to use any of the supplies I used.


     LET'S BEGIN
Open template/shiftD/close original template.Remove background and credits.Close
out every layer. Choose paper of choice/paste underneath all layers. Go to layers/
load/save mask/load mask from disk/find your mask of choice and paste with these
setting.merge group.


activate circle layer/Copy/paste paper of choice.go to selection/ invert circle
layer and then go to paper layer and delete/ merge down.


keep circle activated/copy/paste closeup tube/hit delete/go to penta.com-jeans
with these setting/no go to xero-radiance with these setting


deactivate and add a drop shadow

activate rectangle3/Copy/paste paper of choice/go to selection/invert rectangle3
layer and then go to paper layer and delete/merge down/sharpen/add drop shadow 
activate rectangle/Copy/paste paper of choice/go to selection/invert rectangle
layer and then go to paper layer and delete/merge down/sharpen/add drop shadow
activate raster5 layer/Copy/paste paper of choice/go to selection/invert raster5
layer and then go to paper layer and delete/merge down/sharpen/add drop shadow

activate circle2 layer/Copy/paste paper of choice/go to selection/invert circle2
layer and then go to paper layer and delete/copy/keep activated/paste next closeup
delete/change blend mode to hard light/merge down/sharpen/add drop shadow

activate rectangle4/Copy/paste paper of choice/go to selection/invert rectangle4
layer and then go to paper layer and delete/merge down/sharpen/add drop shadow

add any elements you wish to use/make sure you add a drop shadow to each element.
place your main tube where you want it/add drop shadow.(see my tag if needed)

Add your copyright and watermark-(I put a slight gradient glow on mine)
and give your tag to a friend
thank you for trying my tutorial..please send me a copy of what you did
so I can showcase it...  
riggsbee53@gmail.com