
Shut Up and Drive
This tutorial was written on July 20th 2010.This is a really simply to do tutorial.
Any similarities to another tutorial is purely coincidental.
All my tutorial are register with My Free Copyright. Please do not claim as your own.
This tutorial writer assumes you have a working knowledge of using Paint Shop Pro.
This tutorial was done in Paint Shop Pro9, but can be adapted to use in other
Paint Shop Pro versions.
SUPPLIES NEEDED
Tube of Choice: I am using the awesome artwork of David Deb..
You can go here to check out his artwork HERE..Please make sure you have permission to use.
Scrapkit or colors of your choice, I'm using Shut Up and Drive PTU kit from Tyger Tidbits
you can get it HERE....thank you Tyger
Mask of Choice: I'm using Vix #100 ..You can find it HERE
Put mask in mask folder..Thanks so much for the use of your mask Vix
Font for name is Ajile and copy write is always done in Pixelette ... Get them HERE
Drop shadow use throughout H-1/V-1/O-50/B-5.00
Please leave a thank you when you downloading for supplies.
LET'S BEGIN
Open up a new raster layer 700x700 transparency
Choose a paper of choice/copy/paste...now go to layers/Load/
save mask/load mask from disk/ and find your mask of choice...with these setting
see photo below....go to layers/merge group
open up the highway and copy/paste as a new layer/take your raster deform tool and strecth
out to the size you want/ now give it a drop shadow.
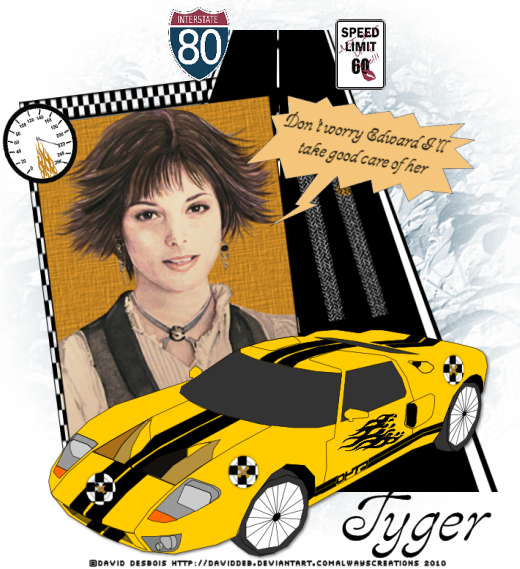
open up the yellow race car and shift/d to get a new layer. I added a few elements to the car,
but you don't have too...once you finish adding elements merge your layer and copy/paste to the
canvas we're working on...place it at the end of the road.
now find the tube you want to use..I chose Alice..open up the frame and adjust the frame
around the tube... now open up a paper of choice for the back ground of the frame.
make frame active and copy/paste paper as a new layer...go to frame layer/selections/invert
and go to paper layer and delete...add a drop shadow to the frame.
now add some elements to your tag/ add a drop shadow to each element...
once that's done place your framed picture behind the car.
You can add some word art or not..it's up to you.
I added a call box from preset shapes and added the words that
Tube of Choice: I am using the awesome artwork of David Deb..
You can go here to check out his artwork HERE..Please make sure you have permission to use.
Scrapkit or colors of your choice, I'm using Shut Up and Drive PTU kit from Tyger Tidbits
you can get it HERE....thank you Tyger
Mask of Choice: I'm using Vix #100 ..You can find it HERE
Put mask in mask folder..Thanks so much for the use of your mask Vix
Font for name is Ajile and copy write is always done in Pixelette ... Get them HERE
Drop shadow use throughout H-1/V-1/O-50/B-5.00
Please leave a thank you when you downloading for supplies.
LET'S BEGIN
Open up a new raster layer 700x700 transparency
Choose a paper of choice/copy/paste...now go to layers/Load/
save mask/load mask from disk/ and find your mask of choice...with these setting
see photo below....go to layers/merge group
open up the highway and copy/paste as a new layer/take your raster deform tool and strecth
out to the size you want/ now give it a drop shadow.
open up the yellow race car and shift/d to get a new layer. I added a few elements to the car,
but you don't have too...once you finish adding elements merge your layer and copy/paste to the
canvas we're working on...place it at the end of the road.
now find the tube you want to use..I chose Alice..open up the frame and adjust the frame
around the tube... now open up a paper of choice for the back ground of the frame.
make frame active and copy/paste paper as a new layer...go to frame layer/selections/invert
and go to paper layer and delete...add a drop shadow to the frame.
now add some elements to your tag/ add a drop shadow to each element...
once that's done place your framed picture behind the car.
You can add some word art or not..it's up to you.
I added a call box from preset shapes and added the words that
Alice said to Edward when she
took Bella to protect her from the hunter
add your copyright and watermark and give to a friend
You're done!!!
Thanks for trying my tutorial
If you use send me a copy so I can show case it...thanks
took Bella to protect her from the hunter
add your copyright and watermark and give to a friend
You're done!!!
Thanks for trying my tutorial
If you use send me a copy so I can show case it...thanks
No comments:
Post a Comment