
Shaking My Hips
Here's another tutorial I wrote.This is a very simple tutorial,although it's animated
it's really easy. Any similarities to another tutorial is purely coincidental.
All my tutorial are register with My Free Copyright. Please do not claim as your own.
This tutorial writer assumes you have a working knowledge of using Paint Shop Pro.
This tutorial was done in Paint Shop Pro9,but can be adapted to use in other
Paint Shop Pro versions.
SUPPLIES NEEDED
Tube of Choice: I am using the awesome artwork of Ismael Rac..
You can purchase his tubes HERE
Please do not use without a license to do so
Scrapkit or colors of your choice...I chose to do colors.
Mask of Choice: I'm using one of Weescotslass template WSL#189..You can find it HERE
Put mask in mask folder..Thanks so much for the use of your mask
Template of Choice: I am using Blissfully Beth template#84..you can get it HERE...Thanks Beth
Font for name is Poor Richard,Rockwell and copy write is always done in Pixelette ... Get them HERE
Effects use dbs flux-bright noise.....Get it HERE
Dropshadow use througout H-2/V-2/O-50/B-6.72
Please leave a thank you when you downloading for supplies.
LET'S BEGIN
Open up Template and ShiftD and close original...delete copyright layer
close all layers except the background layer...the one we'll be working on
Choose a color or paper of choice/copy/paste...now go to layers/Load/
save mask/load mask from disk/ and find your mask of choice...with these setting
see photo below....go to layers/merge group

now make circle layer active/ choose paper or color of choice and do each circle a different color
now active frame2 background/magic wand/mode[shift]/match mode[RGB Value]/Tolerance [55]
Contiguous[checked]/Feather[0]/anti-alias[checked]/click Inside
and duplicate 2x....rename each layer bkg frame 1,2 and 3
close off top two layers and choose a color for the bkg frame 1
go to dbs flux with these setting...see photo below...

click ok
now deactivate 1st layer and go to 2nd layers/choose different color/go to dbs flux and hit ok 2x
now deactivate 2nd layer and go to 3rd layer/choose different color/go to dbs flux and hit ok 3x
deactivate layers 2 and 3 for the time being...leave 1st layer open.
go to frame2/magic wand/same setting as above...click inside/flood-filled with color black.
Now repeat process from frame1 background as above,rename these layers bkgr 4,5and 6
using three different colors than frame2/color each layer and do the dbs flux
repeat process for frame1...close layers 5 and 6 and leave layer4 open
now place your tube where you want it and duplicate 2x. close top tube and on the middle
tube/mirror it /move to the left side a little...close this layer and on the bottom tube
move it over a little to the right.(see my tag for reference)
close the top two layers of the tube
add saying of choice or use the saying I have..I did it in Rockwell
add your copyright and watermark and your done
Now it time to animate......
If you have your board set up right you should have this

Copy merge and paste into animation shop
go back to paint shop pro and activate layers
fra2bkgr2/fra1bkgr5 and tube 2/copy merge and paste
into animation shop after first layer
go back to paint shop pro and activate
fra2bkgr3/fra2bkgr6 and tube3/copy merge and paste
into animation shop after 2nd layer
edit select all frames/animation/frame properties/set to 30
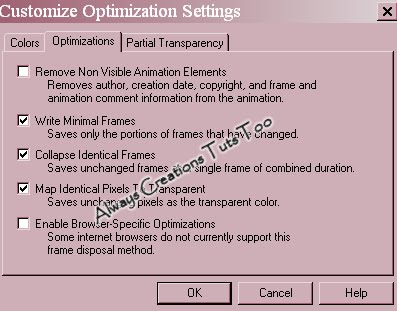
save as gif at these setting


You're done!!!...Save as Gif
Thanks for trying my tutorial
If you use send me a copy so I can show case it...thanks
Thanks for trying my tutorial
If you use send me a copy so I can show case it...thanks
No comments:
Post a Comment