This Babe Wants To Rock
Here's another tutorial I wrote.This is a great tutorial for a beginner.
Any similarities to another tutorial is purely coincidental.
All my tutorial are register with My Free Copyright.
Please do not claim as your own.This tutorial writer assumes you
have a working knowledge of using Paint Shop Pro.
This tutorial was done in Paint Shop Pro9,
but can be adapted to use in other Paint Shop Pro versions.

SUPPLIES NEEDED
Tube of Choice: I am using the awesome artwork of Michael Landefeld..
Here's another tutorial I wrote.This is a great tutorial for a beginner.
Any similarities to another tutorial is purely coincidental.
All my tutorial are register with My Free Copyright.
Please do not claim as your own.This tutorial writer assumes you
have a working knowledge of using Paint Shop Pro.
This tutorial was done in Paint Shop Pro9,
but can be adapted to use in other Paint Shop Pro versions.

SUPPLIES NEEDED
Tube of Choice: I am using the awesome artwork of Michael Landefeld..
You can purchase his tubes HERE
Please do not use without a license to do so
Template of Choice: I'm using Wicked Scraps template#34..You can find it HERE
Thanks Kristin for the use of your work.
Mask of Choice: I am using Sue's Creations Mask#26..Sue is no longer on the net right
now so please use another mask
Font for name is Garamond and copyright is always done in Pixelette ... Get them HERE
Drop shadow use throughout H-2/V-2/O-50/B-6.72
LET'S BEGIN
Open up Template and ShiftD and close original...delete copyright layer
close all layers except the background layer...the one we'll be working on
Go to layers/new raster layer/click ok.Flood fill this layer with color from
your tube. I chose 41578d...
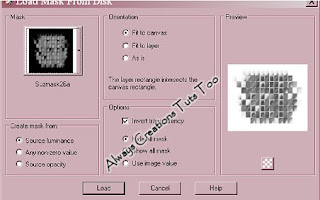
Go to layers/load/save mask/load mask from disk...find your mask and set it with
these setting....
layers/merge group
Activate circle layer/click on magic wand...mode-add/match-RGB value/Tolerance 10
contigous checked/feather 0/anti-alias checked/inside
Choose a color from the tube...I chose f8d56d. flood fill circle with this color.
...add a drop shadow
Activate the bars and repeat the same process as the circle layer
from the kit...I chose 41578d
I left the musical notes as is and the stars I color one the same as the circle
and the other one the same as the bars
actvate the word layer/selections/select all/float/defloat and color it the
same color as the bars
Add your tube where ever you want to place it.
add a drop shadow on all layers
add your copyright and watermark and your done
Thanks for trying my tutorial
If you use send me a copy so I can show case it...thanks


No comments:
Post a Comment